Automating tests
Overview
Teaching: 15 min
Exercises: 10 minQuestions
Why is automating tests important?
What tools are available to help me automate tests?
How can I use these tools to automate simple tests?
Objectives
Understand the benefits of automating tests.
Be aware of test frameworks and runners such as pytest for automating tests.
Be able to write tests that can be detected and run by pytest.
Testing is extremely important. Without testing, you cannot be sure that your code is doing what you think. Testing is an integral part of software development, and where possible should be done while you are writing code, not after the code has been written.
Most programmers’ first approach to testing is to manually check that the code does the right thing. This might include running your code over a particular input file and making sure that a correct-looking plot comes out at the end, or running it with a few known inputs and checking that the results are the same as were obtained on the previous try? This is a start, but has a number of limitations:
- If the changes you’ve made have an effect on an area of code not relied on by the check that you’re currently using, then how do you know that that effect hasn’t broken anything?
- How can you be sure that there’s not a subtle bug that means that the output is incorrect in a way that isn’t immediately obvious?
- If there is a problem, how will you be able to work out exactly which line of code it causing it?
In order to be confident that our code it giving a correct output, a test suite is useful which provides a set of known inputs and checks that the code matches a set of known, expected outputs. To make it easier to locate where a bug is occuring, it’s a good idea to make each individual test run over as small an amount of code as possible so that if that test fails, you know where to look for the problem. In Python this “small unit of code” is usually a function.
To begin, let’s look at a Python function to add lists of numbers. This is in
the arrays directory, in the arrays.py file.
"""
This module contains functions for manipulating and combining Python lists.
"""

def add_arrays(x, y):
    """
    This function adds together each element of the two passed lists.

    Args:
        x (list): The first list to add
        y (list): The second list to add

    Returns:
        list: the pairwise sums of ``x`` and ``y``.

    Examples:
        >>> add_arrays([1, 4, 5], [4, 3, 5])
        [5, 7, 10]
    """
    z = []
    for x_, y_ in zip(x, y):
        z.append(x_ + y_)

    return z
Since the name of the module we want to test is arrays, let’s make a file
called test_arrays.py which contains the following:
from arrays import add_arrays

def test_add_arrays():
    a = [1, 2, 3]
    b = [4, 5, 6]
    expect = [5, 7, 9]

    output = add_arrays(a, b)

    if output == expect:
        print("OK")
    else:
        print("BROKEN")

test_add_arrays()
This script defines a function called test_add_arrays which defines some known
inputs (a and b) and a known, matching output (expect). It passes them to
the function add_arrays and compares the output to expected. It will either
print OK or BROKEN depending on whether it’s working or not. Finally, we
explicitly call the test function.
When we run the script in the Terminal, we see it output OK:
$ python test_arrays.py
OK
Break a test
Break the test by changing either
a,borexpectand rerun the test script. Make sure that it printsBROKENin this case. Change it back to a working state once you’ve done this.
Asserting
The method used here works and runs the code correctly but it doesn’t give very useful output. If we had five test functions in our file and three of them were failing we’d see something like:
OK
BROKEN
OK
BROKEN
BROKEN
We’d then have to cross-check back to our code to see which tests the BROKENs
referred to.
To be able to automatically relate the output of the failing test to the place
where your test failed, you can use an assert statement.
An assert statement is followed by something which is either truthy or
falsy. A falsy expression is something which, when converted to a bool gives
False. This includes empty lists, the number 0 and None; everything else
is considered truthy. The full list is available in the
documentation.
If it is truthy then nothing happens, but if it is falsy then an exception is raised:
assert 5 == 5
assert 5 == 6
---------------------------------------------------------------------------
AssertionError                            Traceback (most recent call last)
<ipython-input-6-05598cd61862> in <module>
----> 1 assert 5 == 6

AssertionError:
We can now use this assert statement in place of the if/else block:
from arrays import add_arrays

def test_add_arrays():
    a = [1, 2, 3]
    b = [4, 5, 6]
    expect = [5, 7, 9]

    output = add_arrays(a, b)

    assert output == expect

test_add_arrays()
Now when we run the test script we get nothing printed on success:
$ python test_arrays.py
but on a failure we get an error printed like:
Traceback (most recent call last):
  File "test_arrays.py", line 13, in <module>
    test_add_arrays()
  File "test_arrays.py", line 11, in test_add_arrays
    assert output == expect
AssertionError
Which, like all exception messages gives us the location in the file at which the error occurred. This has the avantage that if we had many test functions being run it would tell us which one failed and on which line.
The downside of using an assert like this is that as soon as one test fails,
the whole script will halt and you’ll only be informed of that one test.
pytest
There’s a few things that we’ve been doing so far that could be improved.
Firstly, for every test function that we write we then have to explicitly call
it at the bottom of the test script like test_add_arrays(). This is
error-prone as we might write a test function and forget to call it and then we
would miss any errors it would catch.
Secondly, we want nice, useful output from our test functions. Something better
than the nothing/exception that a plain assert gives us. It would be nice to
get a green PASSED for the good tests and a red FAILED for the bad ones
alongside the name of the test in question.
Finally, we want to make sure that all tests are run even if a test early in the process fails.
Luckily, there is tool called pytest which can give us all of these things. It will work on our test script almost exactly as written with only one change needed.
Remove the call to test_add_arrays() on the last line of the file:
from arrays import add_arrays

def test_add_arrays():
    a = [1, 2, 3]
    b = [4, 5, 6]
    expect = [5, 7, 9]

    output = add_arrays(a, b)

    assert output == expect
And in the Terminal, run pytest:
$ pytest
=================== test session starts ====================
platform linux -- Python 3.8.5, pytest-6.0.1, py-1.9.0, pluggy-0.13.1
rootdir: /home/matt/projects/courses/software_engineering_best_practices
plugins: requests-mock-1.8.0
collected 1 item

test_arrays.py .                                     [100%]

==================== 1 passed in 0.02s =====================
Pytest will do two stages. First it will try to locate all the test functions that it can find and then it will run each of them in turn, reporting the results.
Here you can see that it’s found that the file test_arrays.py contains a
single test function. The green dot next to the name of the file signifies the
passing test. It then prints a summary at the end saying “1 passed”.
The way that pytest works is that it looks for files which are called
test_*.py or *_test.py and look inside those for functions whose names begin
with test. It will then run those functions one at a time, reporting the
results of each in turn.
To see what it looks like when you have a failing test, let’s deliberately break the test code by giving a wrong expected result:
from arrays import add_arrays

def test_add_arrays():
    a = [1, 2, 3]
    b = [4, 5, 6]
    expect = [5, 7, 999]  # Changed this to break the test

    output = add_arrays(a, b)

    assert output == expect
When we run this test with pytest it should tell us that the test is indeed failing:
$ pytest
=================== test session starts ====================
platform linux -- Python 3.8.5, pytest-6.0.1, py-1.9.0, pluggy-0.13.1
rootdir: /home/matt/projects/courses/software_engineering_best_practices
plugins: requests-mock-1.8.0
collected 1 item

test_arrays.py F                                     [100%]

========================= FAILURES =========================
_____________________ test_add_arrays ______________________

    def test_add_arrays():
        a = [1, 2, 3]
        b = [4, 5, 6]
        expect = [5, 7, 999]  # Changed this to break the test

        output = add_arrays(a, b)

>       assert output == expect
E       assert [5, 7, 9] == [5, 7, 999]
E         At index 2 diff: 9 != 999
E         Use -v to get the full diff

test_arrays.py:11: AssertionError
================= short test summary info ==================
FAILED test_arrays.py::test_add_arrays - assert [5, 7, 9]...
==================== 1 failed in 0.10s =====================
The output from this is better than we saw with the plain assert. It’s
printing the full context of the contents of the test function with the line
where the assert is failing being marked with a >. It then gives an expanded
explanation of why the assert failed. Before we just got AssertionError but
now it prints out the contents of output and expect and tells us that at
index 2 of the list it’s finding a 9 where we told it to expect a 999.
Before continuing, make sure that you change the file back to its previous
contents by changing that 999 back to a 9.
Test subtraction
In the
arrays.pyfile you can see another function defined,subtract_arrays(). Write a test that verifies that this function works as expected.Solution
from arrays import subtract_arrays

def test_subtract_arrays():
    a = [1, 2, 3]
    b = [6, 2, 1]
    expect = [-5, 0, 2]

    output = subtract_arrays(a, b)

    assert output == expect
Test first
In the
arrays.pyfile you can see that the functionmultiply_arrays()is present, but its functionality hasn’t been written.First, write a test that this function should pass. Check that the
multiply_arrays()function fails this test.Now, write a
multiply_arrays()function that lets this test pass.This is the first step towards a process called “test-driven development” (TDD). We won’t discuss TDD in detail today, but it is a popular methodology in some parts of the software world.
Solution
from arrays import multiply_arrays

def test_multiply_arrays():
    a = [1, 2, 3]
    b = [4, 5, 6]
    expect = [4, 10, 18]

    output = multiply_arrays(a, b)

    assert output == expect
def multiply_arrays(x, y): """ This function multiplies each element of one of the two passed lists from the other. Args: x (list): The first list to multiply y (list): The second list to multiple Returns: list: the pairwise products of ``x`` and ``y``. Examples: >>> multiply_arrays([1, 4, 5], [4, 3, 5]) [4, 12, 25] """ if len(x) != len(y): raise ValueError("Both arrays must have the same length.") z = [] for x_, y_ in zip(x, y): z.append(x_ * y_) return z
Key Points
Automated tests allow a program’s complete behaviour to be tested every time changes are made, revealing any problems the changes may have caused.
Test frameworks provide tools to make writing tests easier, and test runners will automatically search for tests, run them, and verify that they give the correct results. pytest is an example of both of these.
Write tests functions that use
asserts to check that the results are as expected. Name the functions to start withtest, and put them in files starting withtest_or ending with_test.py. Run the tests automatically by callingpytest.
pytest features
Overview
Teaching: 15 min
Exercises: 10 minQuestions
How can I avoid repetition when writing similar tests?
How can I test cases that I expect to raise exceptions?
How can I test that documentation is up to date?
Objectives
Be able to use parametrized tests.
Be able to write tests to verify that exceptions are correctly raised.
Be able to write docstrings that can be tested.
In the previous episode, we used pytest as a test runner. That is to say, it
we used the fact that it looks through the current directory (and
subdirectories) to find anything that looks like a test, and runs it. This is
already incredibly useful, but is only a small slice of what pytest can do. When
imported as a module into your tests, pytest gives additional functionality that
makes your tests much more powerful.
Avoiding repetition
Having a single test for a function is already infinitely better than having none, but one test only gives you so much confidence. The real power of a test suite is being able to test your functions under lots of different conditions.
Lets add a second test to check a different set of inputs and outputs to the
add_arrays function and check that it passes:
from arrays import add_arrays

def test_add_arrays1():
    a = [1, 2, 3]
    b = [4, 5, 6]
    expect = [5, 7, 9]

    output = add_arrays(a, b)

    assert output == expect

def test_add_arrays2():
    a = [-1, -5, -3]
    b = [-4, -3, 0]
    expect = [-5, -8, -3]

    output = add_arrays(a, b)

    assert output == expect
When we run pytest we can optionally pass the -v flag which puts it in
verbose mode. This will print out the tests being run, one per line which I find
a more useful view most of the time:
$ pytest -v
=================== test session starts ====================
platform linux -- Python 3.8.5, pytest-6.0.1, py-1.9.0, pluggy-0.13.1 -- /usr/bin/python3
cachedir: .pytest_cache
rootdir: /home/matt/projects/courses/software_engineering_best_practices
plugins: requests-mock-1.8.0
collected 2 items

test_arrays.py::test_add_arrays1 PASSED              [ 50%]
test_arrays.py::test_add_arrays2 PASSED              [100%]

==================== 2 passed in 0.07s =====================
We see both tests being run and passing. This will work well but we’ve had to repeat ourselves almost entirely in each test function. The only difference between the two functions is the inputs and outputs under test. Usually in this case in a normal Python function you would take these things as arguments and we can do the same thing here.
The actual logic of the function is the following:
def test_add_arrays(a, b, expect):
    output = add_arrays(a, b)
    assert output == expect
We then just need a way of passing the data we want to check into this function. Since we’re not explicitly calling this function ourselves, we need a way to tell pytest that it should pass in certain arguments. For this, pytest provides a feature called parametrization. We label our function with a decoration which allows pytest to run it mutliple times with different data.
What’s a decorator?
A decorator is a function that takes a function and gives it extra behavior. This is done by putting the name of the decorator after an
@sign, before the function definition. We won’t go into detail about decorators in this lesson, but more details on what they are and how you can write your own can be found in the lesson on Object-oriented programming with Python.
To use this feature we must import the pytest module and use the
pytest.mark.parametrize` decorator like the following:
import pytest

from arrays import add_arrays

@pytest.mark.parametrize("a, b, expect", [
    ([1, 2, 3],    [4, 5, 6],   [5, 7, 9]),
    ([-1, -5, -3], [-4, -3, 0], [-5, -8, -3]),
])
def test_add_arrays(a, b, expect):
    output = add_arrays(a, b)

    assert output == expect
The parametrize decorator takes two arguments:
- a string containing the names of the parameters you want to pass in (“a, b, expect”)
- a list containing the values of the arguments you want to pass in
In this case, the test will be run twice. Once with each of the following values:
a = [1, 2, 3],b = [4, 5, 6],expect = [5, 7, 9]a = [-1, -5, -3],b = [-4, -3, 0],expect = [-5, -8, -3]
Running these tests in verbose mode:
$ pytest -v
=================== test session starts ====================
platform linux -- Python 3.8.5, pytest-6.0.1, py-1.9.0, pluggy-0.13.1 -- /usr/bin/python3
cachedir: .pytest_cache
rootdir: /home/matt/projects/courses/software_engineering_best_practices
plugins: requests-mock-1.8.0
collected 2 items

test_arrays.py::test_add_arrays[a0-b0-expect0] PASSED [ 50%]
test_arrays.py::test_add_arrays[a1-b1-expect1] PASSED [100%]

==================== 2 passed in 0.03s =====================
We see that both tests have the same name (test_arrays.py::test_add_arrays)
but each parametrization is differentiated with some square brackets.
More parameters
Add some more parameters sets to the
test_add_arraysfunction. Try to think about corner-cases that might make the function fail. It’s your job as the tester to try to “break” the code.Solution
import pytest

from arrays import add_arrays

@pytest.mark.parametrize("a, b, expect", [
    ([1, 2, 3], [4, 5, 6], [5, 7, 9]),
    ([-1, -5, -3], [-4, -3, 0], [-5, -8, -3]), # Test zeros
    ([41, 0, 3], [4, 76, 32], [45, 76, 35]), # Test larger numbers
    ([], [], []), # Test empty lists
])
def test_add_arrays(a, b, expect):
    output = add_arrays(a, b)

    assert output == expect
Failing correctly
The interface of a function is made up of the parameters it expects and the values that it returns. If a user of a function knows these things then they are able to use it correctly. This is why we make sure to include this information in the docstring for all our functions.
The other thing that is part of the interface of a function is any exceptions that are raised by it.
To add explicit error handling to our function we need to do two things:
- Add in a conditional raise statement:
if len(x) != len(y): raise ValueError("Both arrays must have the same length.") - Document in the docstring the fact that the function may raise something:
Raises:
    ValueError: If the length of the lists ``x`` and ``y`` are different.
Let’s add these to arrays.py:
"""
This module contains functions for manipulating and combining Python lists.
"""

def add_arrays(x, y):
    """
    This function adds together each element of the two passed lists.

    Args:
        x (list): The first list to add
        y (list): The second list to add

    Returns:
        list: the pairwise sums of ``x`` and ``y``.

    Raises:
        ValueError: If the length of the lists ``x`` and ``y`` are different.

    Examples:
        >>> add_arrays([1, 4, 5], [4, 3, 5])
        [5, 7, 10]
    """

    if len(x) != len(y):
        raise ValueError("Both arrays must have the same length.")

    z = []
    for x_, y_ in zip(x, y):
        z.append(x_ + y_)

    return z
We can then test that the function correctly raises the exception when passed
appropriate data. Inside a pytest function we can require that a specific
exception is raised by using pytest.raises in a with block.
pytest.raises takes as an argument the type of an exception and if the block
ends without that exception having been rasied, will fail the test.
It may seem strange that we’re testing—and requiring—that the function raises an error but it’s important that if we’ve told our users that the code will produce a certain error in specific circumstances that it does indeed do as we promise.
In our code we add a new test called test_add_arrays_error which does the
check we require:
import pytest

from arrays import add_arrays

@pytest.mark.parametrize("a, b, expect", [
    ([1, 2, 3],    [4, 5, 6],   [5, 7, 9]),
    ([-1, -5, -3], [-4, -3, 0], [-5, -8, -3]),
])
def test_add_arrays(a, b, expect):
    output = add_arrays(a, b)

    assert output == expect

def test_add_arrays_error():
    a = [1, 2, 3]
    b = [4, 5]
    with pytest.raises(ValueError):
        output = add_arrays(a, b)
$ pytest -v
=================== test session starts ====================
platform linux -- Python 3.8.5, pytest-6.0.1, py-1.9.0, pluggy-0.13.1 -- /usr/bin/python3
cachedir: .pytest_cache
rootdir: /home/matt/projects/courses/software_engineering_best_practices
plugins: requests-mock-1.8.0
collected 3 items

test_arrays.py::test_add_arrays[a0-b0-expect0] PASSED [ 33%]
test_arrays.py::test_add_arrays[a1-b1-expect1] PASSED [ 66%]
test_arrays.py::test_add_arrays_error PASSED         [100%]

==================== 3 passed in 0.03s =====================
Parametrize tests with errors
Try and parametrize the
test_add_arrays_error()test that we’ve just written.Solution
@pytest.mark.parametrize("a, b, expected_error", [
    ([1, 2, 3], [4, 5], ValueError),
    ([1, 2], [4, 5, 6], ValueError),
])
def test_add_arrays_error(a, b, expected_error):
    with pytest.raises(expected_error):
        output = add_arrays(a, b)
Fix the function
Write some parametrized tests for the
divide_arrays()function. Think carefully about what kind of input might:
- cause a bad implementation of the function to not work correctly, or
- cause a good implementation of the function to raise an exception.
Use your tests to identify and fix the bug in
divide_arrays()Solution
@pytest.mark.parametrize("a, b, expect", [
    ([1, 4, 12], [1, 2, 6], [1, 2, 2]), # Test integers
    ([-1, -45, 128], [-1, 9, -32], [1, -5, -4]), # Test negative numbers
    ([6], [3], [2]), # Test single-element lists
    ([1, 2, 3], [4, 5, 6], [0.25, 0.4, 0.5]), # Test non-integers
    ([], [], []), # Test empty lists
])
def test_divide_arrays(a, b, expect):
    output = divide_arrays(a, b)

    assert output == expect


@pytest.mark.parametrize("a, b, expected_error", [
    ([1, 2, 3], [4, 5], ValueError),
    ([1, 2], [4, 5, 6], ValueError),
    ([1, 2, 3], [0, 1, 2], ZeroDivisionError),
])
def test_divide_arrays_error(a, b, expected_error):
    with pytest.raises(expected_error):
        output = divide_arrays(a, b)
In this case, the implementation of
divide_arraysdoes not correctly deal with pairs of numbers that do not divide exactly. This is because the implementation has accidentally used//instead of/. Replacing//with/in the implementation allows the test to pass.
Doctests
You may have noticed that the functions in arrays.py have extensive
docstrings, including examples of how to use the functions defined there,
looking like:
Examples:
    >>> add_arrays([1, 4, 5], [4, 3, 5])
    [5, 7, 10]
Since this is valid Python code, we can ask pytest to run this code and check
that the output we claimed would be returned is correct. If we pass
--doctest-modules to the pytest command, it will search .py files for
docstrings with example blocks and run them:
$ pytest -v --doctest-modules
=================== test session starts ====================
platform linux -- Python 3.8.5, pytest-6.0.1, py-1.9.0, pluggy-0.13.1 -- /usr/bin/python3
cachedir: .pytest_cache
rootdir: /home/matt/projects/courses/software_engineering_best_practices
plugins: requests-mock-1.8.0
collected 6 items

arrays.py::arrays.add_arrays PASSED                                                                                                                                                [ 16%]
arrays.py::arrays.divide_arrays FAILED                                                                                                                                             [ 33%]
arrays.py::arrays.subtract_arrays PASSED                                                                                                                                           [ 50%]
test_arrays.py::test_add_arrays[1-1-1] PASSED                                                                                                                                      [ 66%]
test_arrays.py::test_add_arrays[2-2-2] PASSED                                                                                                                                      [ 83%]
test_arrays.py::test_add_arrays_error PASSED                                                                                                                                       [100%]

======================================================================================== FAILURES ========================================================================================
_____________________________________________________________________________ [doctest] arrays.divide_arrays _____________________________________________________________________________
067
068     Args:
069         x (list): The list to divide
070         y (list): The list to divide by
071
072     Returns:
073         list: the pairwise quotient of ``x`` and ``y``.
074
075     Examples:
076         >>> divide_arrays([3, 12, -25], [3, -4, 5])
Expected:
    [1, -3, -5]
Got:
    [1.0, -3.0, -5.0]

/Users/edbennett/Desktop/code/arrays/arrays.py:76: DocTestFailure
================================================================================ short test summary info =================================================================================
FAILED arrays.py::arrays.divide_arrays
============================================================================== 1 failed, 5 passed in 0.01s ===============================================================================
(If you get a warning about deprecation then ignore it, this is from a third-party module which is leaking through.)
We see here the arrays.py::arrays.add_arrays
and arrays.py::arrays.subtract_arrays tests,
which have passed,
and arrays.py::arrays.divide_arrays,
which failed.
(If you didn’t complete the previous challenge,
then arrays.py::arrays.divide_arrays will also pass.)
The reason for this can be seen in the output:
the result printed is different to the one given in the example.
(Unlike regular tests,
which compare for equality,
doctests check that the output looks the same,
since that is what matters in documentation.)
Doctests are a really valuable thing to have in your test suite as they ensure that any examples that you are giving work as expected. It’s not uncommon for the code to change and for the documentation to be left behind and being able to automatically check all your examples avoids this.
Break a doctest
Try breaking one of the doctests, either by changing the example or by changing the function implementation. Re-run
pytestand see how the output changes.
Running specific tests
As you increase the number of tests you will come across situations where you
only want to run a particular test. To do this, you follow pass the name of the
test, as printed by pytest -v as an argument to pytest. So, if we want to
run all tests in test_arrays.py we do:
$ pytest -v test_arrays.py
=================== test session starts ====================
platform linux -- Python 3.8.5, pytest-6.0.1, py-1.9.0, pluggy-0.13.1 -- /usr/bin/python3
cachedir: .pytest_cache
rootdir: /home/matt/projects/courses/software_engineering_best_practices
plugins: requests-mock-1.8.0
collected 3 items

test_arrays.py::test_add_arrays[a0-b0-expect0] PASSED [ 33%]
test_arrays.py::test_add_arrays[a1-b1-expect1] PASSED [ 66%]
test_arrays.py::test_add_arrays_error PASSED         [100%]

==================== 3 passed in 0.01s =====================
Or, if we want to specifically run the test_add_arrays test:
$ pytest -v test_arrays.py::test_add_arrays
=================== test session starts ====================
platform linux -- Python 3.8.5, pytest-6.0.1, py-1.9.0, pluggy-0.13.1 -- /usr/bin/python3
cachedir: .pytest_cache
rootdir: /home/matt/projects/courses/software_engineering_best_practices
plugins: requests-mock-1.8.0
collected 2 items

test_arrays.py::test_add_arrays[a0-b0-expect0] PASSED [ 50%]
test_arrays.py::test_add_arrays[a1-b1-expect1] PASSED [100%]

==================== 2 passed in 0.01s =====================
Or, if we want to run one parameter set for that test specifically:
$ pytest -v "test_arrays.py::test_add_arrays[a0-b0-expect0]"
=================== test session starts ====================
platform linux -- Python 3.8.5, pytest-6.0.1, py-1.9.0, pluggy-0.13.1 -- /usr/bin/python3
cachedir: .pytest_cache
rootdir: /home/matt/projects/courses/software_engineering_best_practices
plugins: requests-mock-1.8.0
collected 1 item

test_arrays.py::test_add_arrays[a0-b0-expect0] PASSED [100%]

==================== 1 passed in 0.01s =====================
Take a look at the output of pytest -h for more options. For example, you can
tell pytest to only run the tests that failed on the last run with pytest
--last-failed.
Key Points
Use the
@pytest.mark.parametrizedecorator to run the same test multiple times with different data.Use
with pytest.raises:to define a block that is expected to raise an exception. The test will fail if the exception is not raised.Use
pytest --doctest-modulesto check the examples given in any docstrings, and ensure that the output given is correct.
Input data for tests
Overview
Teaching: 15 min
Exercises: 10 minQuestions
How can I avoid repetition when defining input data for tests?
How can I re-use test data that take significant time to generate?
Objectives
Be able to define fixtures and use them in tests.
Understand when to mark fixtures for re-use and be able to do so.
As we saw in the last section, when using parametrization it’s often useful to split your test function into two logical parts:
- The data to be tested
- The code to do the test
This is because we had a situation where we had one test function and multiple examples to test. The opposite situation also happens where we have multiple test functions, all of which want the same input data.
The name that pytest uses for “data which are provided to test functions” is fixture since it fixes a set of data against which to test.
We’ll start with the example of the add_arrays function to explain the syntax
but soon we’ll need to use a example which demonstates the benefits more.
To make things clearer, we’ll trim down the test file back to the basics. Just
one test for add_arrays:
from arrays import add_arrays

def test_add_arrays():
    a = [1, 2, 3]
    b = [4, 5, 6]
    expect = [5, 7, 9]

    output = add_arrays(a, b)

    assert output == expect
To create our fixture we define a function which is decorated with the
pytest.fixture decorator. Apart from that, all the function needs to do is
return the data we want to provide to our tests, in this case, the two input
lists:
import pytest

@pytest.fixture
def pair_of_lists():
    return [1, 2, 3], [4, 5, 6]
To make the test functions make use of the fixture, we use the name of the
fixture (pair_of_lists) as a parameter of the test function, similar to how we
did with parametrization:
def test_add_arrays(pair_of_lists):
    ...
The data are now available inside the function using that name and we can use it however we wish:
def test_add_arrays(pair_of_lists):
    a, b = pair_of_lists
    ...
This isn’t how functions and arguments usually work in Python. pytest is doing something magic here and is matching up the names of things which it knows are fixtures (due to the decorator) with the names of parameters to test functions, automatically running the fixture and passing in the data.
Note that pair_of_lists here is not a test function. It does not contain any
asserts and will not explicitly appear in the pytest output.
Putting it all together, we end up with:
import pytest

from arrays import add_arrays

@pytest.fixture
def pair_of_lists():
    return [1, 2, 3], [4, 5, 6]

def test_add_arrays(pair_of_lists):
    a, b = pair_of_lists
    expect = [5, 7, 9]

    output = add_arrays(a, b)

    assert output == expect
When we run the test suite, pytest will automatically run the pair_of_lists
function for any test that has it as an input and pass in the result.
$ pytest -v test_arrays.py
=================== test session starts ====================
platform linux -- Python 3.8.5, pytest-6.0.1, py-1.9.0, pluggy-0.13.1 -- /usr/bin/python3
cachedir: .pytest_cache
rootdir: /home/matt/projects/courses/software_engineering_best_practices
plugins: attrib-0.1.3, requests-mock-1.8.0, cov-2.10.1
collected 1 item

test_arrays.py::test_add_arrays PASSED               [100%]

==================== 1 passed in 0.01s =====================
Big fixtures
It might be hard to see the benefit of fixtures with this rather contrived example in which there aren’t repeated uses of the same input data. So lets take a look at a more sensible one where using a fixture makes sense.
Let’s move now to the books directory, and looks at the file books.py, which
contains the following:
def word_count(text, word=''):
    """
    Count the number of occurences of ``word`` in a string.
    If ``word`` is not set, count all words.

    Args:
        text (str): the text corpus to search through
        word (str): the word to count instances of

    Returns:
        int: the count of ``word`` in ``text``
    """
    if word:
        count = 0
        for text_word in text.split():
            if text_word == word:
                count += 1
        return count
    else:
        return len(text.split())
To test this function we want a corpus of text to test it on. For the purposes
of this example and to simulate a complex data input, we will download the
contents of a particularly long novel from Project Gutenberg. Our test function
uses urllib.request to download the text, converts it to a
string and passes that to the word_count function.
At first we will make a single check: that the word “hat” appears 33 times in the book:
import urllib.request

from books import word_count

def test_word_counts():
    url = "https://www.gutenberg.org/files/2600/2600-0.txt"
    book_text = urllib.request.urlopen(url).read().decode('utf-8')
    assert word_count(book_text, "hat") == 33
$ pytest -v test_books.py
=================== test session starts ====================
platform linux -- Python 3.8.5, pytest-6.0.1, py-1.9.0, pluggy-0.13.1 -- /usr/bin/python3
cachedir: .pytest_cache
rootdir: /home/matt/projects/courses/software_engineering_best_practices
plugins: attrib-0.1.3, requests-mock-1.8.0, cov-2.10.1
collected 1 item

test_books.py::test_word_counts PASSED               [100%]

==================== 1 passed in 2.77s =====================
The test has passed and it took about two seconds. This is because it takes some time to download the file from the internet. For this example we want it to take some time as it helps demonstrate the point. In reality you will come across test data inputs which take some time (more than a few milliseconds) to create.
This creates a tension between wanting to have a large test suite which covers your code from lots of different angles and being able to run it very quickly and easily. An ideal test suite will run as quickly as possible as it will encourage you to run it more often. It’s a good idea to have at least a subset of your tests which run through in some number of seconds rather than hours.
Two seconds is not bad for this test but if we want to test against multiple examples, it could get slow. Let’s parametrise the test to add in a bunch more inputs:
import urllib.request

import pytest

from books import word_count

@pytest.mark.parametrize('word, count',  [
    ('hat', 33),
    ('freedom', 71),
    ('electricity', 1),
    ('testing', 3),
    ('Prince', 1499),
    ('internet', 0),
    ('Russia', 71),
    ('Pierre', 1260),
    (None, 566334),
])
def test_word_counts(word, count):
    url = "https://www.gutenberg.org/files/2600/2600-0.txt"
    book_text = urllib.request.urlopen(url).read().decode('utf-8')
    assert word_count(book_text, word) == count
$ pytest -v test_books.py
=================== test session starts ====================
platform linux -- Python 3.8.5, pytest-6.0.1, py-1.9.0, pluggy-0.13.1 -- /usr/bin/python3
cachedir: .pytest_cache
rootdir: /home/matt/projects/courses/software_engineering_best_practices
plugins: attrib-0.1.3, requests-mock-1.8.0, cov-2.10.1
collected 9 items

test_books.py::test_word_counts[hat-33] PASSED       [ 11%]
test_books.py::test_word_counts[freedom-71] PASSED   [ 22%]
test_books.py::test_word_counts[electricity-1] PASSED [ 33%]
test_books.py::test_word_counts[testing-3] PASSED    [ 44%]
test_books.py::test_word_counts[Prince-1499] PASSED  [ 55%]
test_books.py::test_word_counts[internet-0] PASSED   [ 66%]
test_books.py::test_word_counts[Russia-71] PASSED    [ 77%]
test_books.py::test_word_counts[Pierre-1260] PASSED  [ 88%]
test_books.py::test_word_counts[None-566334] PASSED  [100%]

==================== 9 passed in 27.46s ====================
You see here that it took about nine times as long. This is because the file is downloaded afresh for every test example where really, it only needs to be downloaded once.
Let’s move the slow setup into a fixture and give that as a parameter of the test function:
import urllib.request

import pytest

from books import word_count

@pytest.fixture()
def long_book():
    url = "https://www.gutenberg.org/files/2600/2600-0.txt"
    book_text = urllib.request.urlopen(url).read().decode('utf-8')
    return book_text

@pytest.mark.parametrize('word, count',  [
    ('hat', 33),
    ('freedom', 71),
    ('electricity', 1),
    ('testing', 3),
    ('Prince', 1499),
    ('internet', 0),
    ('Russia', 71),
    ('Pierre', 1260),
    (None, 566334),
])
def test_word_counts(long_book, word, count):
    assert word_count(long_book, word) == count
$ pytest -v test_books.py
=================== test session starts ====================
platform linux -- Python 3.8.5, pytest-6.0.1, py-1.9.0, pluggy-0.13.1 -- /usr/bin/python3
cachedir: .pytest_cache
rootdir: /home/matt/projects/courses/software_engineering_best_practices
plugins: attrib-0.1.3, requests-mock-1.8.0, cov-2.10.1
collected 9 items

test_books.py::test_word_counts[hat-33] PASSED       [ 11%]
test_books.py::test_word_counts[freedom-71] PASSED   [ 22%]
test_books.py::test_word_counts[electricity-1] PASSED [ 33%]
test_books.py::test_word_counts[testing-3] PASSED    [ 44%]
test_books.py::test_word_counts[Prince-1499] PASSED  [ 55%]
test_books.py::test_word_counts[internet-0] PASSED   [ 66%]
test_books.py::test_word_counts[Russia-71] PASSED    [ 77%]
test_books.py::test_word_counts[Pierre-1260] PASSED  [ 88%]
test_books.py::test_word_counts[None-566334] PASSED  [100%]

==================== 9 passed in 30.57s ====================
Perhaps surprisingly, it is still taking very long time!
By default a fixture will run once for every test function that uses it. In our
case we only need it to run once for all the tests in the test session so we can
pass in the scope parameter to pytest.fixture and set it to "session":
import urllib.request

import pytest

from books import word_count

@pytest.fixture(scope="session")
def long_book():
    url = "https://www.gutenberg.org/files/2600/2600-0.txt"
    book_text = urllib.request.urlopen(url).read().decode('utf-8')
    return book_text

@pytest.mark.parametrize('word, count',  [
    ('hat', 33),
    ('freedom', 71),
    ('electricity', 1),
    ('testing', 3),
    ('Prince', 1499),
    ('internet', 0),
    ('Russia', 71),
    ('Pierre', 1260),
    (None, 566334),
])
def test_word_counts(long_book, word, count):
    assert word_count(long_book, word) == count
$ pytest -v test_books.py
=================== test session starts ====================
platform linux -- Python 3.8.5, pytest-6.0.1, py-1.9.0, pluggy-0.13.1 -- /usr/bin/python3
cachedir: .pytest_cache
rootdir: /home/matt/projects/courses/software_engineering_best_practices
plugins: attrib-0.1.3, requests-mock-1.8.0, cov-2.10.1
collected 9 items

test_books.py::test_word_counts[hat-33] PASSED       [ 11%]
test_books.py::test_word_counts[freedom-71] PASSED   [ 22%]
test_books.py::test_word_counts[electricity-1] PASSED [ 33%]
test_books.py::test_word_counts[testing-3] PASSED    [ 44%]
test_books.py::test_word_counts[Prince-1499] PASSED  [ 55%]
test_books.py::test_word_counts[internet-0] PASSED   [ 66%]
test_books.py::test_word_counts[Russia-71] PASSED    [ 77%]
test_books.py::test_word_counts[Pierre-1260] PASSED  [ 88%]
test_books.py::test_word_counts[None-566334] PASSED  [100%]

==================== 9 passed in 3.06s =====================
Now it only takes about as long as a single test did since the slow part is only being done once.
Double check
Add some more parameters to the test and check that it doesn’t take any longer to run
A double-edged sword
We’ve seen that the default behaviour of pytest is to not re-use fixtures between different tests. This is because sometimes this will change the behaviour of the tests, and pytest prioritises correctness of the tests over their performance.
What sort of behavior would functions have that failed in this way?
Solution
If a test (or a function called by the test) accepts a mutable argument, and then mutates it, then any other tests depending on that fixture that run after the badly-behaved test will receive different data than were originally specified in the fixture. This means that the test is likely to fail.
Fixtures should only be re-used within groups of tests that do not mutate them.
Key Points
A fixture is a piece of test data that can be passed to multiple tests.
Define a fixture by creating a function with the
@pytest.fixturedecorator that returns the desired data. Any test that takes an argument of the same name will receive the data in the fixture.Set the
scopeparameter to the@pytest.fixturedecorator to control if and where the fixture is re-used across multiple tests. For example.scope="session"reuses the fixture for the complete run of tests.
Edge and corner cases, and integration testing
Overview
Teaching: 15 min
Exercises: 10 minQuestions
What considerations are there when testing problems with boundaries?
What are unit and integration tests?
Objectives
Understand what edge and corner cases are, and how to test them.
Understand the difference between unit and integration tests, and the importance of both.
So far we have been testing simple functions that take, at most, two parameters as arguments. There are no complex algorithms or logic at work, so the functions shouldn’t behave differently depending on the input. The failure of these functions is down to oversights during programming, rather than anything fundamentally complicated in their workings.
In practice, this is often not the case. Functions might require many parameters and their execution and output can vary wildly depending on the input. In many cases there might be a normal range of parameter space where the function output is easy to predict, then other regions where the behaviour can be much more complex. When writing tests it is important that you cover as many cases as possible. You should push the boundaries of your software to make sure that it works as expected across the entire range of input under which it is meant to operate. This is known as having good code coverage, and will be discussed later.
Testing extreme values is often referred to as covering edge and corner cases. Typically, edge cases test situations where one parameter is at an extreme, while corner cases test two (or more in a multidimensional problems) edge cases simultaneously. However, sometimes the definition isn’t so clear. (The principle of testing unusual input holds, though.)
In this episode we will make use of the provided grid package.
$ cd ../grid
This provides functionality for working with cells in a two-dimensional grid,
like the 4×4 one shown below. (The values in each cell indicate the (x,
y) position of the cell within the grid.)
(0, 3) |
(1, 3) |
(2, 3) |
(3, 3) |
(0, 2) |
(1, 2) |
(2, 2) |
(3, 2) |
(0, 1) |
(1, 1) |
(2, 1) |
(3, 1) |
(0, 0) |
(1, 0) |
(2, 0) |
(3, 0) |
Let’s import the Cell class from the package and see how it works.
from grid import Cell
help(Cell)
We’ll now create a Cell object that sits in the bulk of the grid and test that
its neighbours are correct.
def test_bulk():
    """ Test that a cell in the bulk of the grid is correct. """

    # Instantiate a cell in the bulk of a 4x4 grid.
    c = Cell(2, 2, 4, 4)

    # Make sure that the cell has 4 neighbours.
    assert c.neighbours() == 4

    # Check the coordinates of the neighbours.
    assert c.left()  == (1, 2)
    assert c.right() == (3, 2)
    assert c.up()    == (2, 3)
    assert c.down()  == (2, 1)
Here we’ve instantiated a cell that sits at position (2, 2) in a 4×4
grid. Like Python, we choose to index from 0.
Now let’s check the neighbours of the cell. It should have 4 neighbours: (1,
2) to the left, (3, 2) to the right, (2, 1) below, and (2, 3) above.
Let’s run the unit test with pytest.
$ pytest test/test_cell.py::test_bulk
Great, everything worked as expected. Of course, the results are not unexpected, and we could have worked out the neighbours directly from the cell position by adding and subtracting 1 to the two indices.
Now let’s check a cell on the left-hand edge of the grid at position (0, 2).
This should have 3 neighbours: one to the right, one below, and one above.
def test_left_edge():
    """ Test that a cell on the left edge of the grid is correct. """

    # Instantiate a cell on the left edge of a 4x4 grid.
    c = Cell(0, 2, 4, 4)

    # Make sure that the cell has 3 neighbours.
    assert c.neighbours() == 3

    # Check the coordinates of the neighbours.
    assert c.left()  == None
    assert c.right() == (1, 2)
    assert c.up()    == (0, 3)
    assert c.down()  == (0, 1)
$ pytest grid/test/test_cell.py::test_left_edge
Fantastic, it works! The behaviour of the Cell object was fundamentally
different because of the input (we triggered a different set of conditions). Had
we done what we suggested above and assumed we could always add/subtract 1 from
an index to go to the next cell, this test would have failed, as we would exceed
the size of the grid.
Let’s now check a cell at the bottom left-corner. This should only have two neigbours: one to the right, and one above.
def test_bottom_left_corner():
    """ Test that a cell on the bottom left corner of the grid is correct. """

    # Instantiate a cell at the bottom left corner of a 4x4 grid.
    c = Cell(0, 0, 4, 4)

    # Make sure that the cell has 2 neighbours.
    assert c.neighbours() == 2

    # Check the coordinates of the neighbours.
    assert c.left()  == None
    assert c.right() == (1, 0)
    assert c.up()    == (0, 1)
    assert c.down()  == None
$ pytest grid/test/test_cell.py::test_bottom_left_corner
Once again a different condition has been triggered by our change of input. Here we have tested a corner case.
Corner cases are especially important to test, as it is very easy for two pieces of code we have written for dealing with different edges to conflict with one another. For example, triggering the right edge code could prevent the bottom edge code from executing. Explicitly testing corner cases guards against this kind of error.
Integration tests
So far we have been testing functions and objects in isolation, so called unit testing. However, it is likely that you will write software with multiple objects that need to work together in order to do something useful. The process of checking that different pieces of code work together as intended is often called integration testing.
The grid module also contains a Grid class that generates a matrix of Cell
objects and stores them internally. The user can then manipulate the cells by
filling or emptying them. Let’s import the class and see how it works.
grid = Grid(10, 10)
grid.fill(0, 0)
assert grid.nFilled() == 1
grid.fill(3, 7)
assert grid.nFilled() == 2
grid.empty(0, 0)
assert grid.nFilled() == 1
assert grid.cell(3, 7).occupied()
assert not grid.cell(0, 0).occupied()
Class?
GridandCellhere are “classes”, which you may not yet be familiar with. More detail on what these are, how they’re used, and how you can build your own, can be found in the Introduction to Object-Oriented Programming in Python lesson.
Bug hunting
Run the complete set of unit tests for the
griddirectory.You will see a bug in
grid.py. Fix this bug, and verify that the tests pass. Do the tests pass when the grid isn’t square?For problems with nearest-neighbours, a good place to look would be where the checks are made in
_initializeNeighbours.Solution
In line 156, the check of the top edge is compared with
w, when it should be withh - 1.`
Test the
GridCreate a new file
test/test_grid.pyto test theGridclass. You should test that thefillandemptyfunctions behave as expected. The rules are that any cell in the grid can only be filled once.Fix any bugs that you find in this process, and verify that the fixes work and all tests pass.
Solution
def test_grid_fill():
    """
    Test the fill method for the grid class.
    """

    # Intialise a 10x10 grid.
    g = Grid(10, 10)

    # Tally counter for the number of filled cells.
    n = 0

    # Let's check that the fill method works for all
    # cells in the grid. Probably overkill, but what the heck!

    # Loop over the width of the grid.
    for w in range(0, g.width()):

        # Loop over the height of the grid.
        for h in range(0, g.height()):

            # Increment the number of cells.
            n += 1

            # Fill the cell.
            g.fill(w, h)

            # Check that the number of filled cells is correct.
            assert g.nFilled() == n

            # Check that this cell is marked as filled.
            assert g.cell(w, h).occupied()

            # Try filling the cell again. (Not allowed!)
            g.fill(w, h)

            # Check that the number of filled cells is correct.
            assert g.nFilled() == n


def test_grid_empty():
    """
    Test the empty method for the grid class.
    """

    # Intialise a 10x10 grid.
    g = Grid(10, 10)

    # Let's check that the empty method works for all
    # cells in the grid. Probably overkill, but what the heck!

    # Loop over the width of the grid.
    for w in range(0, g.width()):

        # Loop over the height of the grid.
        for h in range(0, g.height()):

            # Fill the cell.
            g.fill(w, h)

            # Check that their is one filled cell.
            assert g.nFilled() == 1

            # Check that this cell is marked as filled.
            assert g.cell(w, h).occupied()

            # Empty the cell.
            g.empty(w, h)

            # Check that their are no filled cells.
            assert g.nFilled() == 0

            # Check that this cell is marked as empty.
            assert not g.cell(w, h).occupied()
Key Points
In problems that have fixed boundaries, an edge case is where a parameter sits on one of the boundaries.
In multidimensional problems with fixed boundaries, a corner case is where more than one parameter sits on one of the boundaries simultaneously.
Edge and corner cases need specific tests separate from the tests that apply across the whole problem.
Unit tests test the smallest units of functionality, usually functions.
Integration tests test that these units fit together correctly into larger programs.
Testing randomness
Overview
Teaching: 15 min
Exercises: 10 minQuestions
How can I test non-deterministic applications?
Objectives
Be able to test functions that do not have an exact expected result for a given input.
Up until now we have been testing functions where the output is entirely predictable. In these cases, a handful of tests is usually enough to provide confidence that the software is working as expected. In the real world, however, you might be developing a complex piece of sofware to implement an entirely new algorithm, or model. In certain cases it might not even be clear what the expected outcome is meant to be. Things can be particularly challenging when the software is involves a stochastic element.
Let us consider a class to simulate the behaviour of a die. One is provided in the dice package.
$ cd ../dice
Let’s import it and see how it works.
from dice import Die
help(Die)
How could we test that the die is fair?
Well, first of all we could check that the value of a die roll is in range.
def test_valid_roll():
    """ Test that a die roll is valid. """

    # Intialise a standard, six-sided die.
    die = Die()

    # Roll the die.
    roll = die.roll()

    # Check that the value is valid.
    assert roll > 0 and roll < 7
$ pytest test/test_dice.py::test_valid_roll
Great, that worked. But because die rolls are random, it could have been a fluke that the test passed this time. In practice, we need to check that the assertions hold repeatedly.
def test_always_valid_roll():
    """ Test that a die roll is "always" valid. """

    # Intialise a standard, six-sided die.
    die = Die()

    # Roll the die lots of times.
    for i in range(10000):
        roll = die.roll()

        # Check that the value is valid.
        assert roll > 0 and roll < 7
$ pytest test/test_dice.py::test_always_valid_roll
That is a better test. But does it guarantee that the die is fair? No, it only guarantees that it won’t return a number that isn’t on the die.
We still have more work to do to test that the die is fair.
Perhaps we should test the average value. We know that this should equal the sum of the faces of the die, divided by the number of sides. For a six-sided die, this is 3.5. Now, we will never achieve this exactly without an infinite number of rolls (even getting within machine precision could take billions of rolls), which we don’t have time for.
Fortunately, pytest gives us a way to check things are approximately equal,
given some tolerance. pytest.approx() creates a number with an effective
“error bar”—a quantification of how far from the number we allow to be
considered “equal”. Then any equality comparison with this approximate number
takes into account the uncertainty in it.
def test_average():
    """ Test that the average die roll is correct. """

    # Intialise a standard, six-sided die.
    die = Die()

    # Work out the expected average roll.
    expect = sum(range(1, 7)) / 6

    # Calculate the sum of the die rolls.
    total = 0

    # Set the number of rolls.
    rolls = 100000

    for i in range(0, rolls):
        total += die.roll()

    # Check that the average matches the expected value.
    average = total / rolls
    assert average == pytest.approx(expect, rel=1e-2)
$ pytest test/test_dice.py::test_average
This takes us closer, but we’re still not there. If we constructed a die with no
2 or 5, then the average roll would be (1 + 3 + 4 + 6) / 4; that is, 3.5.
We need to test that the distribution of outcomes is correct, i.e. that each of the six possible outcomes is equally likely.
def test_fair():
    """ Test that a die is fair. """

    # Intialise a standard, six-sided die.
    die = Die()

    # Set the number of rolls.
    rolls = 1000000

    # Create a dictionary to hold the tally for each outcome.
    tally = {}
    for i in range(1, 7):
        tally[i] = 0

    # Roll the die 'rolls' times.
    for i in range(0, rolls):
        tally[die.roll()] += 1

    # Assert that the probability is correct.
    for i in range(1, 7):
        assert tally[i] / rolls == pytest.approx(1 / 6, 1e-2)
$ pytest test/test_dice.py::test_fair
The Die class has passed every test we’ve thrown at it, so we can be confident
that it is relatively bug-free for the cases we’ve tested for. Of course, so far
we’ve only tested 6-sided dice—we have no guarantee that it works for
other numbers of sides, yet.
You can extend this approach to any programming problem where you don’t know the exact answer up front, including those that are random and those that are just exploratory. Start by focusing on what you do know, and write tests for that. As you understand more what the expected results are, you can expand the test suite.
Two six-sided dice
The file
test/test_dice.pyin thedicedirectory contains an empty function,test_double_roll(), for checking that the distribution for the sum of two six-sided die rolls is correct. Fill in the body of this function and runpytestto verify that your test passes.To implement this test, you’ll need to know that the probability of the sum of two rolls of an \(n\)-sided die having a value \(x\) is given by: \[p(x) = \frac{n-|x-(n+1)|}{n^2}\] for \(x\) between 2 and 2\(n\). This is implemented as a helper function
prob_double_roll(x, n)- for example,prob_double_roll(4, 6)calculates the probability of two 6-sided die rolls summing to 4.def prob_double_roll(x, n): """ Expected probabilities for the sum of two dice. """ # For two n-sided dice, the probability of two rolls summing to x is # (n − |x−(n+1)|) / n^2, for x = 2 to 2n. return (n - abs(x - (n+1))) / n**2Solution
def test_double_roll():
    """
    Check that the probability for the sum of two n-sided dice matches
    the expected distribution.
    """

    # Store the expected probabilities for the sum of two dice.
    expect = {}
    for x in range(2, 13):
        expect[x] = prob_double_roll(x, 6)

    # Create a dictionary to hold the tally for each outcome.
    tally = {}
    for key in expect:
        tally[key] = 0

    # Initialise the die.
    die = Die(6)

    # Roll two dice 'rolls' times.
    rolls = 5000000
    for i in range(0, rolls):

        # Sum the value of the two dice rolls.
        roll_sum = die.roll() + die.roll()

        # Increment the tally for the outcome.
        tally[roll_sum] += 1

    # Compute the probabilities and check with expected values.
    for key in tally:

        average = tally[key] / rolls
        assert average == pytest.approx(expect[key], rel=1e-2)
Two \(n\)-sided dice
Parametrize the test in the previous challenge so that it works for any pair of \(n\)-sided dice. Test this using five- and seven-sided dice.
Solution
@pytest.mark.parametrize("sides, rolls", [(5, 5000000), (7, 5000000)])
def test_double_roll(sides, rolls):
    """
    Check that the probability for the sum of two n-sided dice matches
    the expected distribution.
    """

    # Store the expected probabilities for the sum of two dice.
    expect = {}
    for x in range(2, 2 * sides + 1):
        expect[x] = prob_double_roll(x, sides)

    # Create a dictionary to hold the tally for each outcome.
    tally = {}
    for key in expect:
        tally[key] = 0

    # Initialise the die.
    die = Die(sides)

    # Roll two dice 'rolls' times.
    for i in range(0, rolls):

        # Sum the value of the two dice rolls.
        roll_sum = die.roll() + die.roll()

        # Increment the tally for the outcome.
        tally[roll_sum] += 1

    # Compute the probabilities and check with expected values.
    for key in tally:

        average = tally[key] / rolls
        assert average == pytest.approx(expect[key], rel=1e-2)
Key Points
By repeatedly calling the function being considered, tests can check that the expected statistical properties are observed.
Continuous Integration
Overview
Teaching: 15 min
Exercises: 10 minQuestions
How can my tests run automatically?
Objectives
Be able to set up a continuous integration pipeline to check a test suite on pushing to a code hosting platform.
So far, we have been running tests on a single machine by invoking pytest from
the command line. Every time we make changes to the code we manually re-run the
tests in order to check that our changes haven’t broken anything.
In a software project there might be many developers working on different parts of the code remotely, then pushing their changes (commits) to a centralised repository, such as one on GitHub. How can we make sure that tests are run whenever a new commit is received and that we are notified whenever a change breaks the code?
When running tests on your local machine you can be confident that the code is working in your environment, i.e. your operating system, version of Python, etc. How can we be sure that the code will work on a range of environments?
Continuous integration (or CI) is the practice that attempts to solve
these problems. The idea is that every time a new commit is pushed a CI server
sets up a clean environment, does a git clone of your code from the central
repository, then attempts to build it and run any tests. This means that you can
guarantee that for every commit you make, the software will build and run on a
clean machine without manual intervention, and that the test suite
passes—or at least, if it doesn’t, you’ll get warned about it, so you know
to fix it.
There are many fantastic CI services, most of which offer at least some level of service free of charge. In this course we will use GitHub Actions, since it integrates well with GitHub.
Configuring the CI build
Central to GitHub Actions is the concept of a workflow. Each workflow defines
a set of steps that GitHub will take, and tells GitHub when to take them.
Workflows are stored in the .github/workflows/ directory; the . at the start
of the filename means that the directory is hidden at the shell by default.
Workflows are defined in YAML files (short for “YAML Ain’t Markup Language”). A typical workflow might looks something like this:
name: Run tests

on:
  push:
    branches: [ main ]
  pull_request:
    branches: [ main ]

jobs:
  build:

    runs-on: ubuntu-latest
    strategy:
      matrix:
        python-version: [3.7, 3.8, 3.9]

    steps:
    - uses: actions/checkout@v3
    - name: Set up Python ${{ matrix.python-version }}
      uses: actions/setup-python@v4
      with:
        python-version: ${{ matrix.python-version }}
    - name: Install dependencies
      run: |
        python -m pip install --upgrade pip
        python -m pip install pytest
    - name: Test with pytest
      run: |
        pytest
This is a decent chunk of content, so let’s break it down. At the highest level,
there are three items: name, on, and jobs. name defines a name for the
action, so if you have many actions you can identify which one has done what.
on identifies when this action should run. In this case we run the action
whenever there is a push to the main branch, or a pull request to it. Finally,
we define one job, which is to build (and run) the software).
Default git branch naming
Traditionally the default branch in a git repository has been called “master”. Recently there have been an effort to change this (see, for example, this article) to a term that is not associated with slavery. GitHub has opted to now call its default branch
main, but your version ofgitprobably still defaults tomaster. The GitHub Actions template shown above expects a branch calledmain. You can solve this in several ways:
- Rename your
masterbranch after you create the repository and make the first commit. This is the method recommended by GitHub.$ git branch -M main- Before creating the repository, change the default branch name for all new repositories using
git config$ git config --global init.defaultBranch main- Keep the branch name as it is (or choose another name that you prefer) and change the branch name used by GitHub Actions. Then, change the
branches: [ main ]line in theonsection to the name of your branch.
The build job then defines what it needs: to run on the most recent version of
Ubuntu, and to test three Python versions, each of which will run entirely
separately. Then it lists the steps that it will perform: first it checks out
the repository, then sets up the version of Python selected for this run, then
install any dependencies necessary for the software to run, and finally run
pytest.
Actions beyond tests
If this seems unnecessarily complicated to run some tests whenever we push to a repository, you’re not wrong. GitHub Actions is designed to be useful in a wide variety of cases beyond running a test suite—for example, it can also build packaged applications for release whenever a release is tagged, or even kick off a full analysis pipeline when new data are added to a repository.
You can also test on systems other than Linux, so if you don’t have a Windows or macOS machine available to test on, you can still verify that your software works on those platforms.
We’re only scratching the surface today of what GitHub actions can do. But even a very small subset of its features is enough to give us significant benefits!
Your first CI build
We’ll now walk through the process of running your first CI build. Before starting you’ll need to open a terminal by locating the Home Jupyter tab, clicking on the New dropdown button near the top right, then selecting Terminal from the list. For convenience, it might be preferable to split your screen so the terminal tab is next to this one. That way you can follow through the tutorial as you execute various commands.
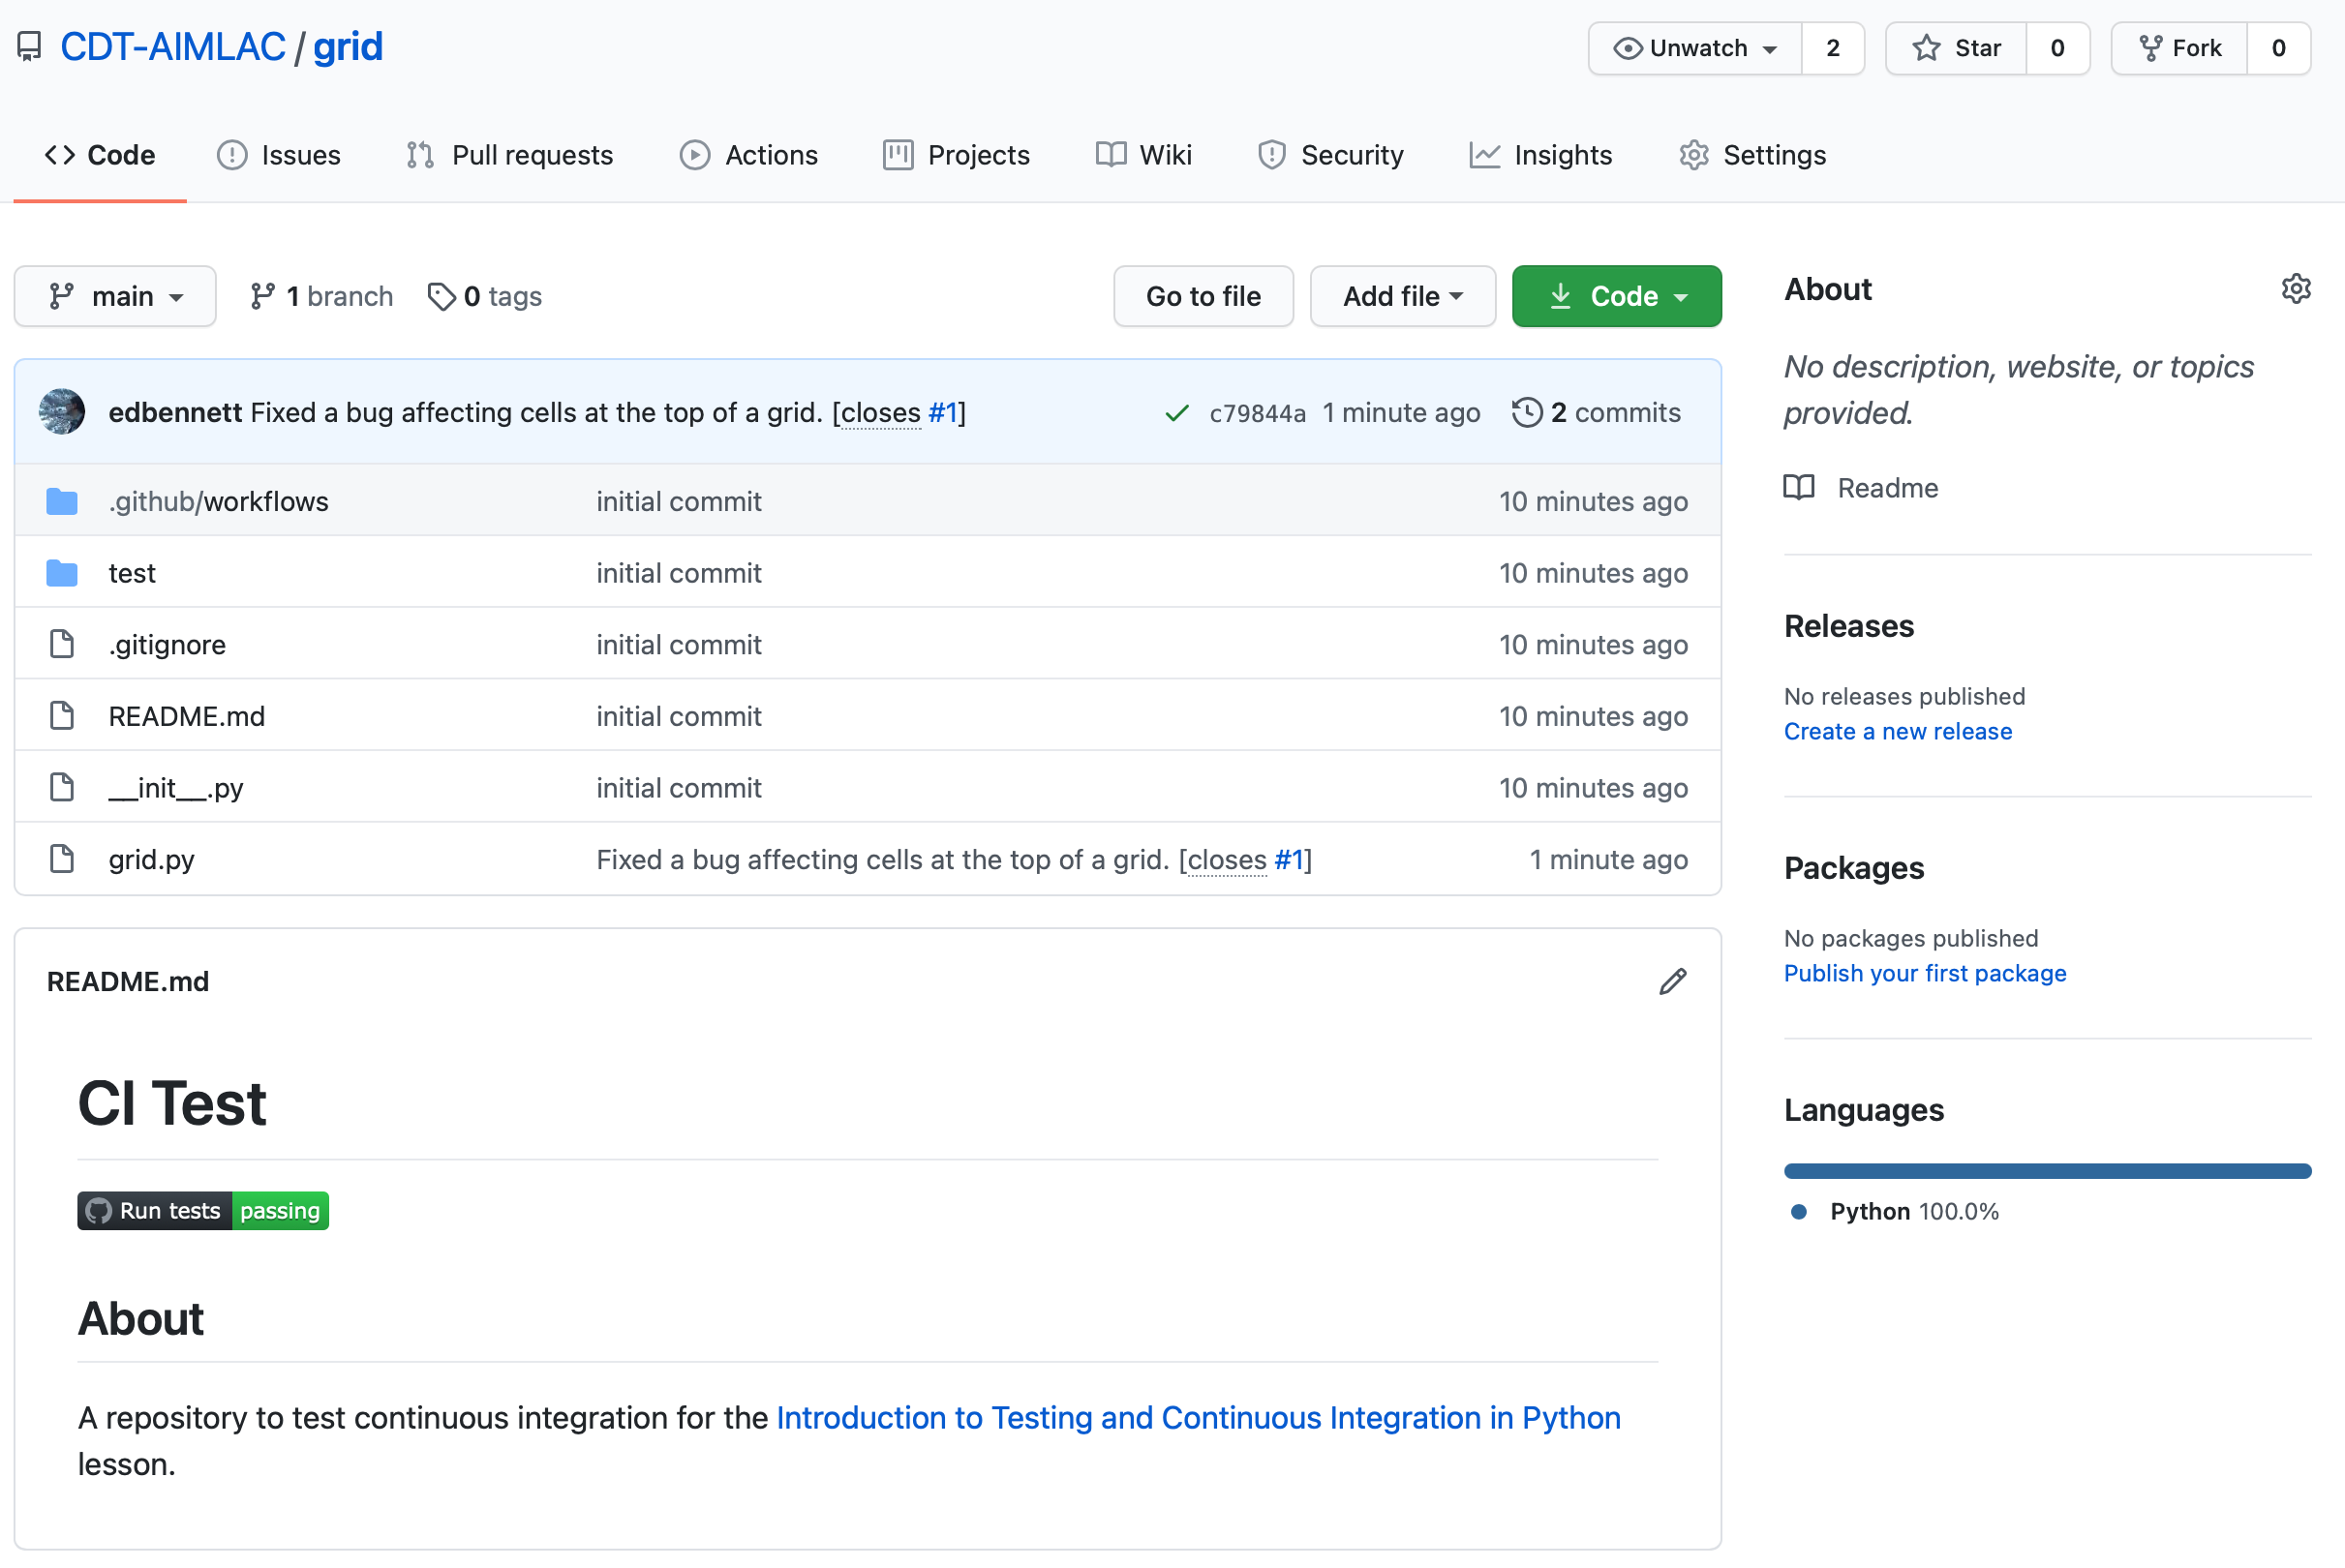
First move into the grid directory. This has already been set up with a
.github/workflows/pytest.yaml and a GitHub README.md file.
$ cd grid
Edit README.md so that both occurrences of USERNAME are replaced by your
GitHub username.
Also edit grid.py to re-introduce the bug that you fixed earlier. (Replace
h-1 with w on line 156.)
Run pytest to check that the tests fail.
$ pytest
Now initialise a new git repository.
$ git init
Add all of the files in the directory and stage them for the commit.
$ git add .
Commit the files that you’ve staged in your local repository.
$ git commit -m "Initial commit."
Finally, rename the branch to main, to match the branch name we are checking
for pushes to in our workflow.
$ git branch -M main
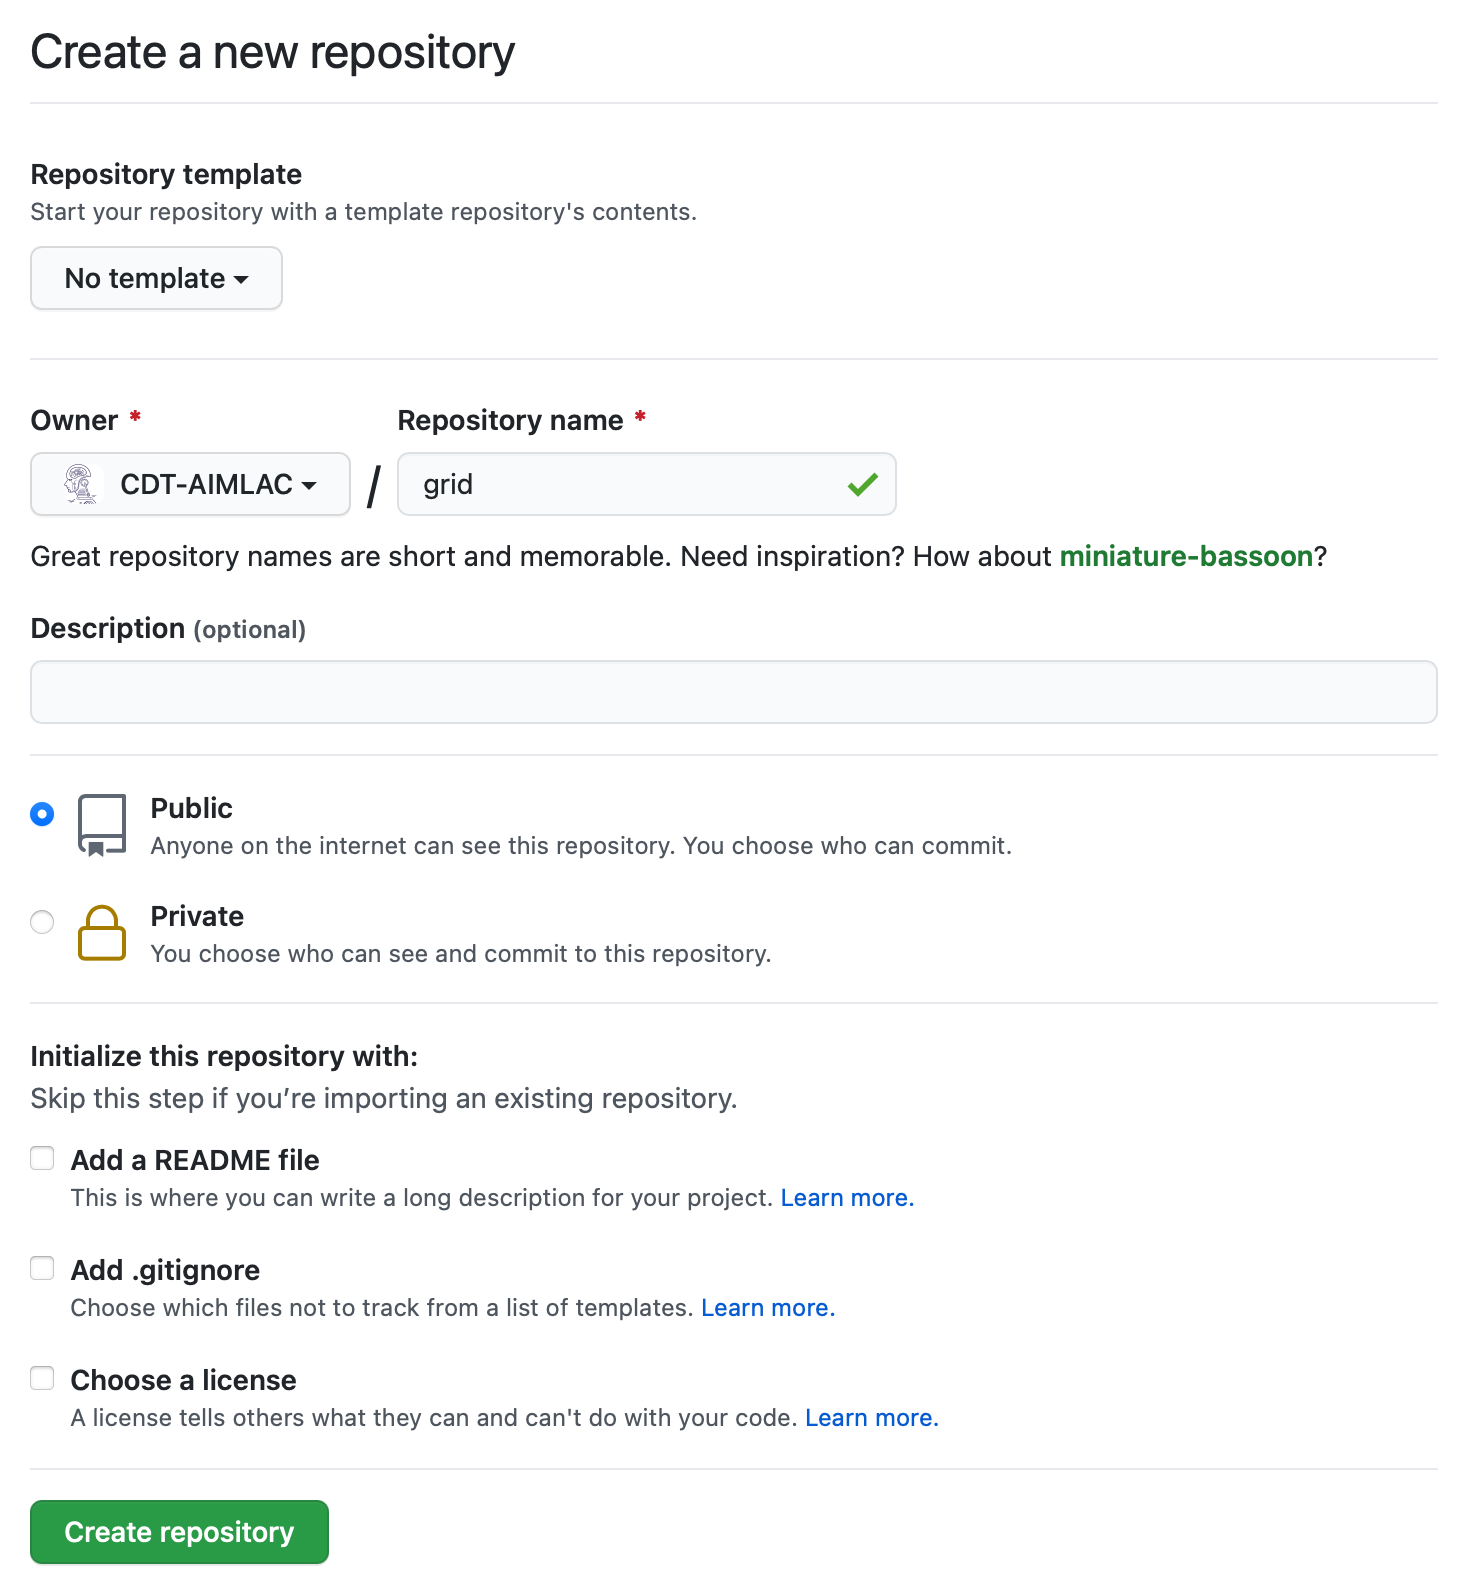
Go to your GitHub profile page and create a new repository called
grid. (It’s important that you use this exact name!) To do so click on the
Repositories tab, then the New button. Set the Repository template to
“No template”, and leave the check boxes for “Add a README file”, “Add
.gitignore”, and “Choose a license” unchecked.
Back on the command line we can now add a URL for the new remote repository that
you just created. Once again, replace USERNAME with your actual GitHub
username.
$ git remote add origin https://github.com/USERNAME/grid.git
You can now push your commit to the remote repository.
$ git push origin main
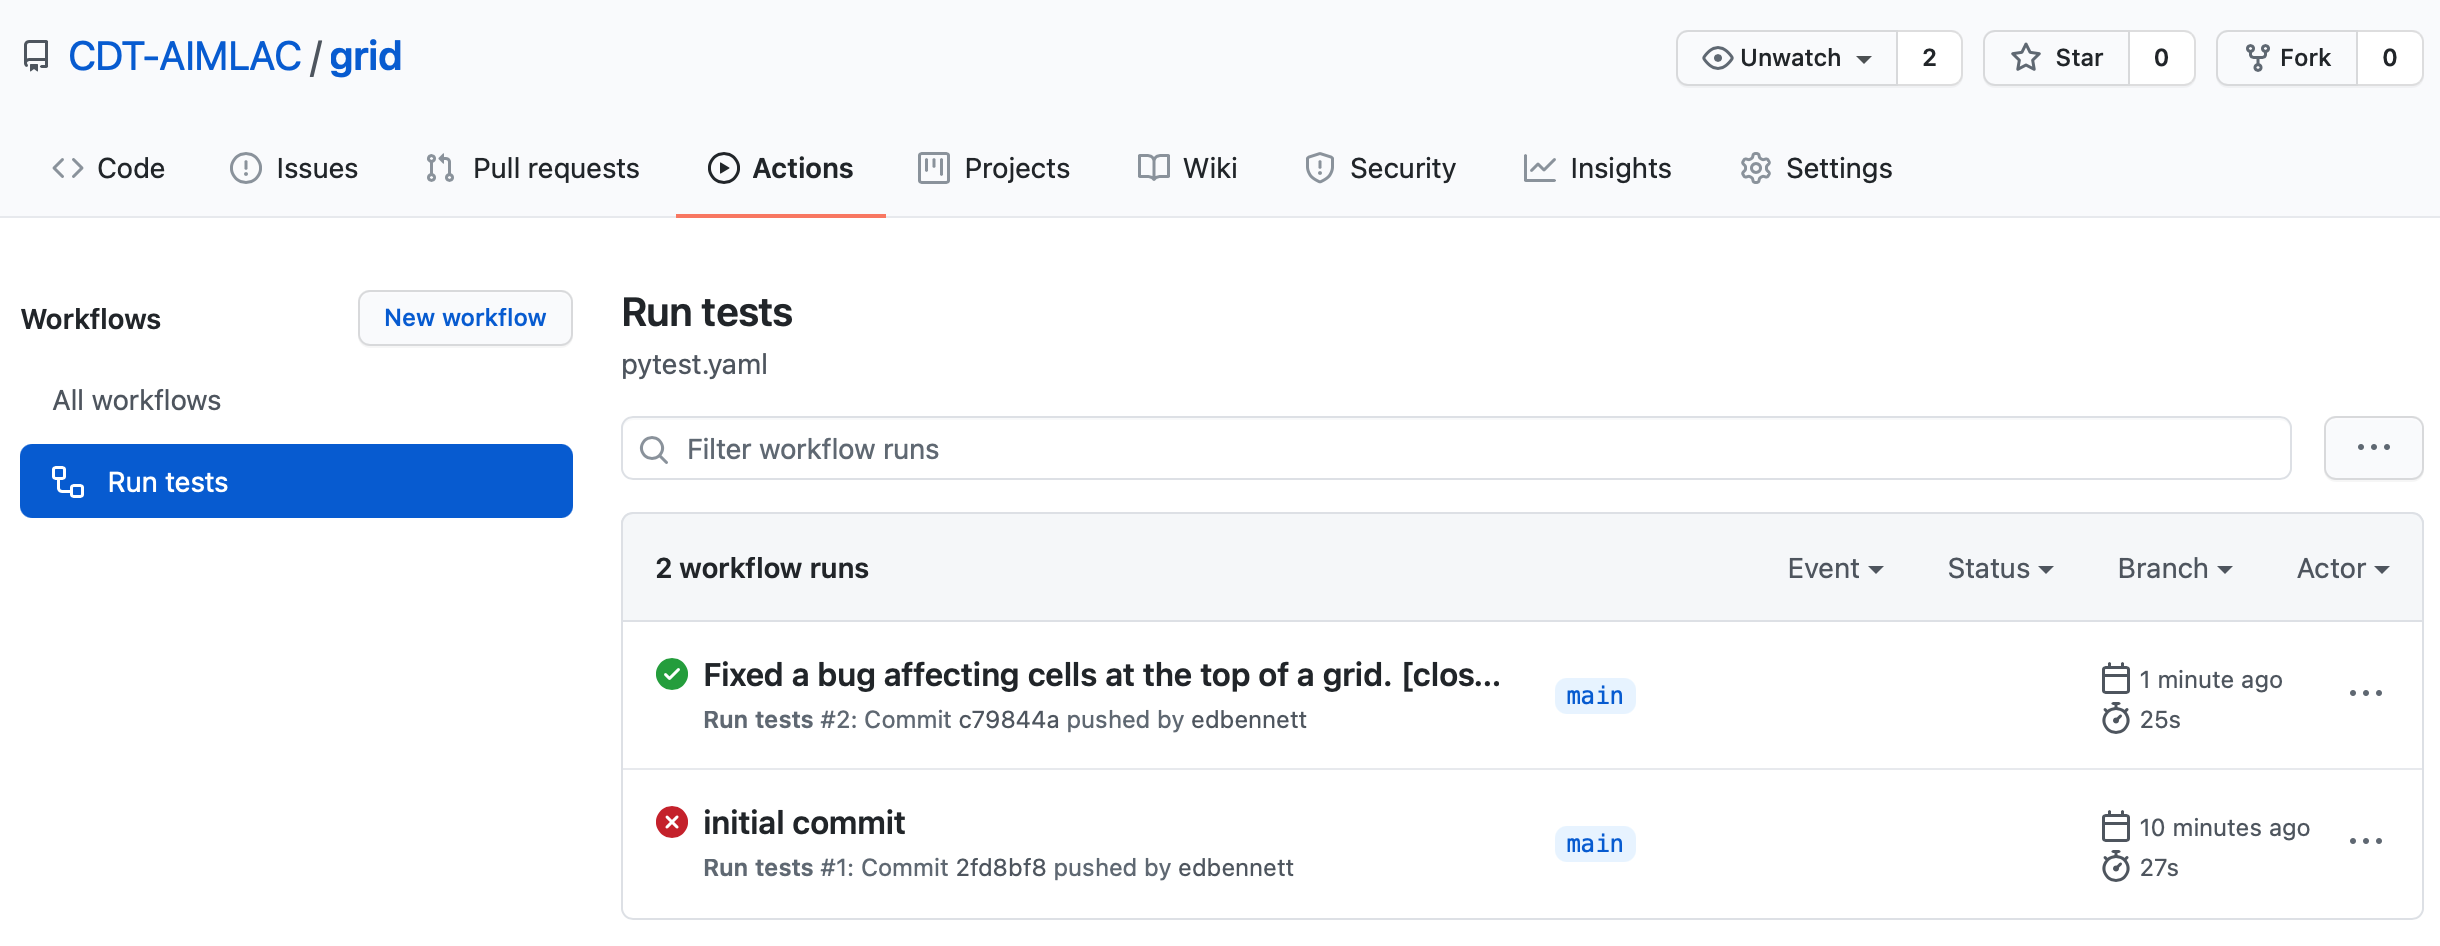
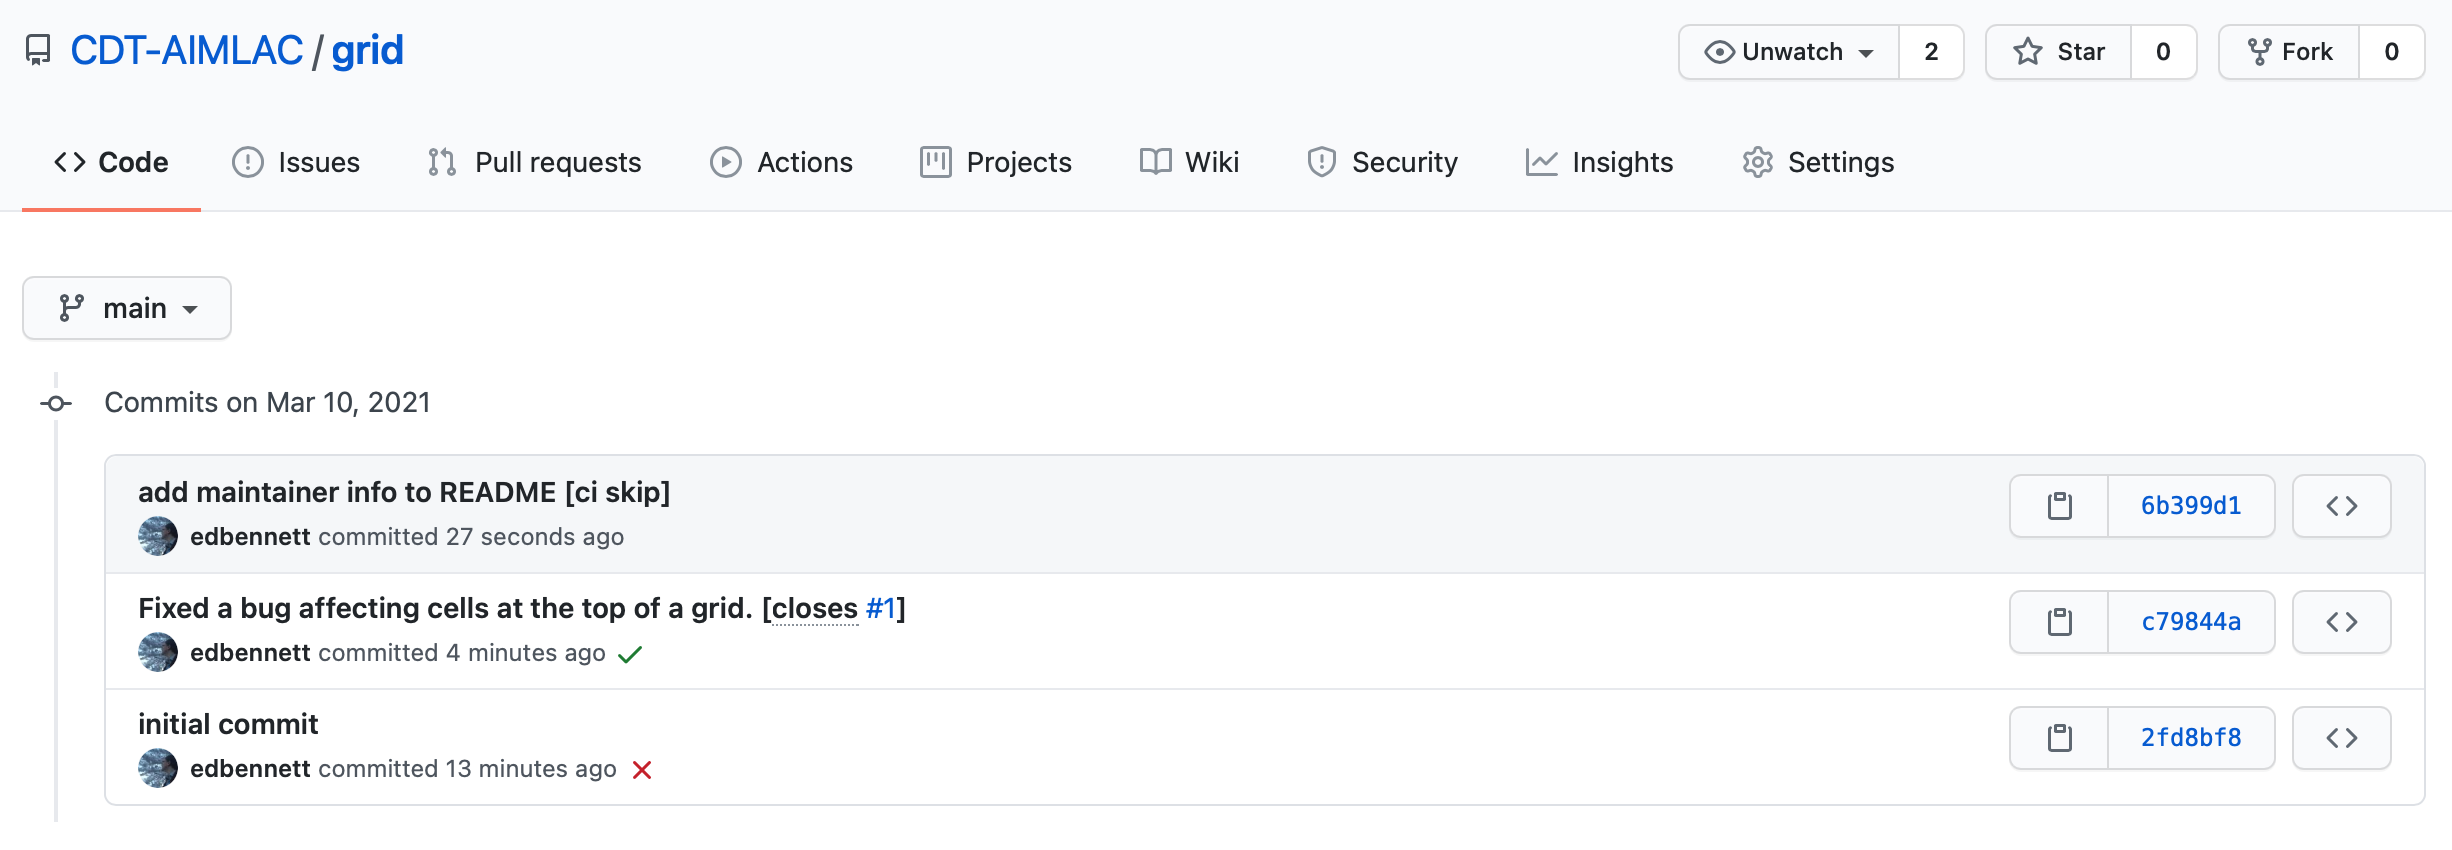
Since we included a .github/workflows/pytest.yaml workflow to run on commit to
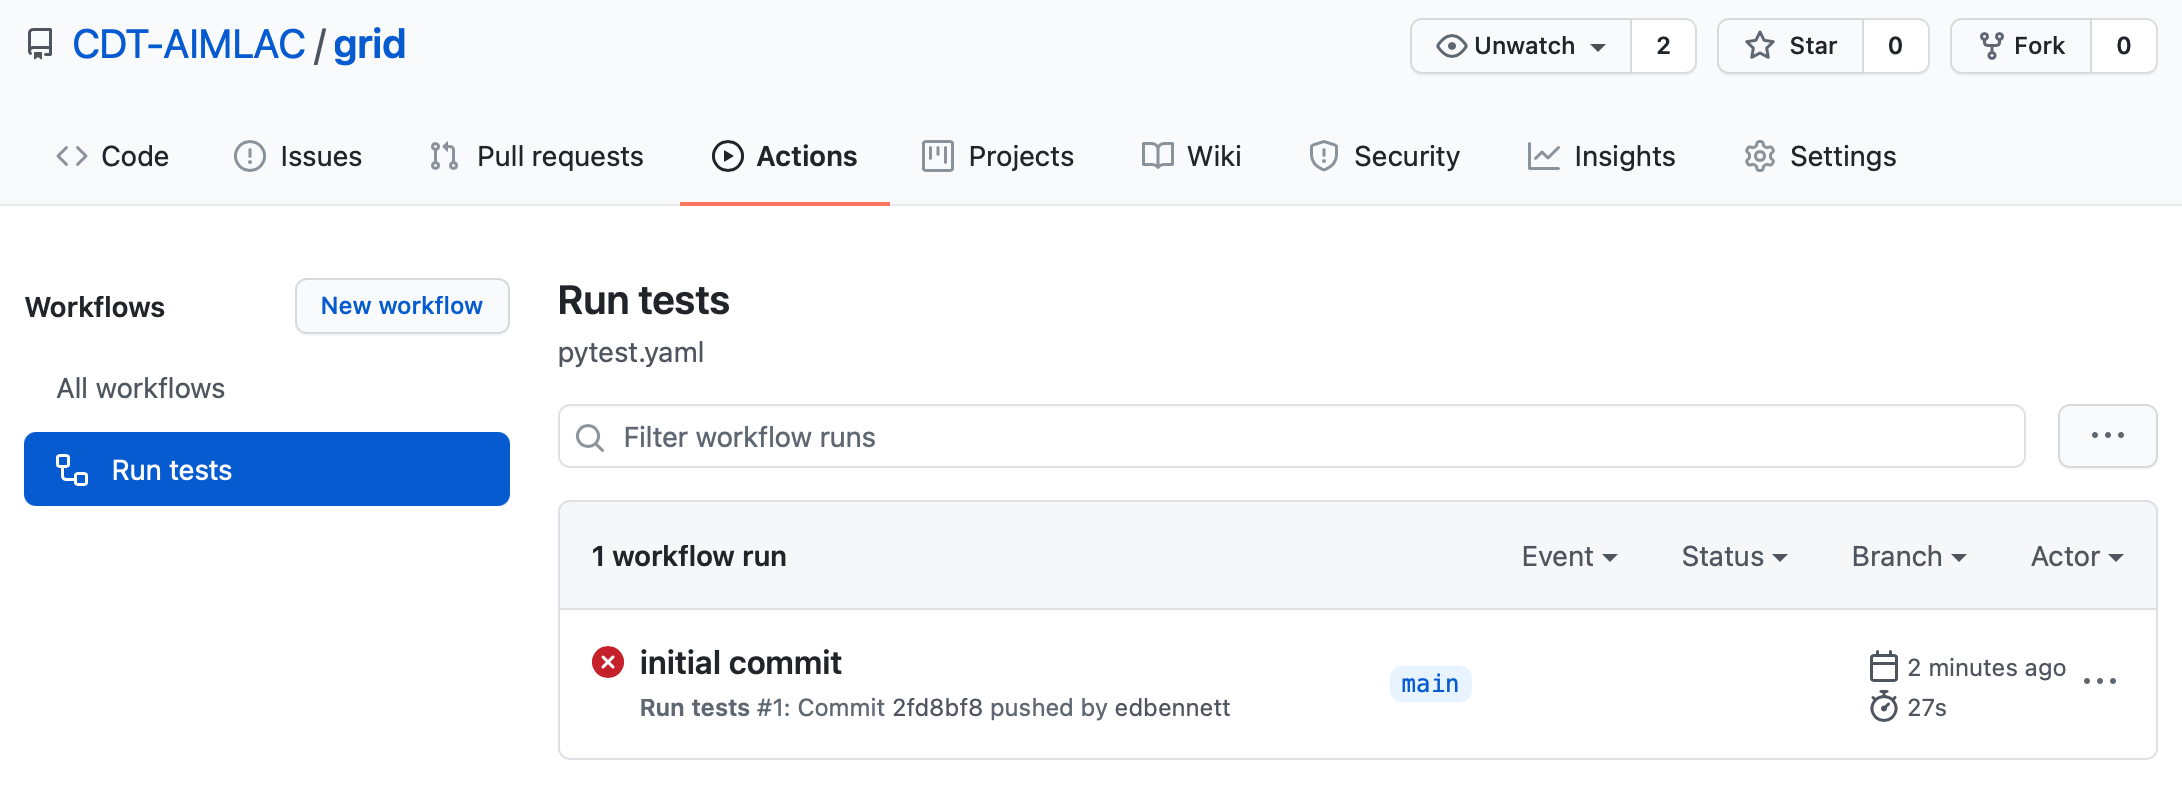
the default branch, GitHub will automatically detect this and initiate a build.
If you visit the GitHub page for the repository you will see a build status
image on the main page.

Clicking on this will take you to the GitHub Actions page for the test workflow, where you can see the progress of the current build, as well as the details of any previous builds. You should see the status reported as failed. In addition, you might also receive an email notifying you of the error.
Don’t do this
It’s normally bad practice to push code that you know is broken. In this case we’re using it as an example to show how to go about fixing it in the correct way. In general, run your test suite before committing, and definitely before pushing, to avoid publishing the repository in a state where someone else can’t clone and start using it.
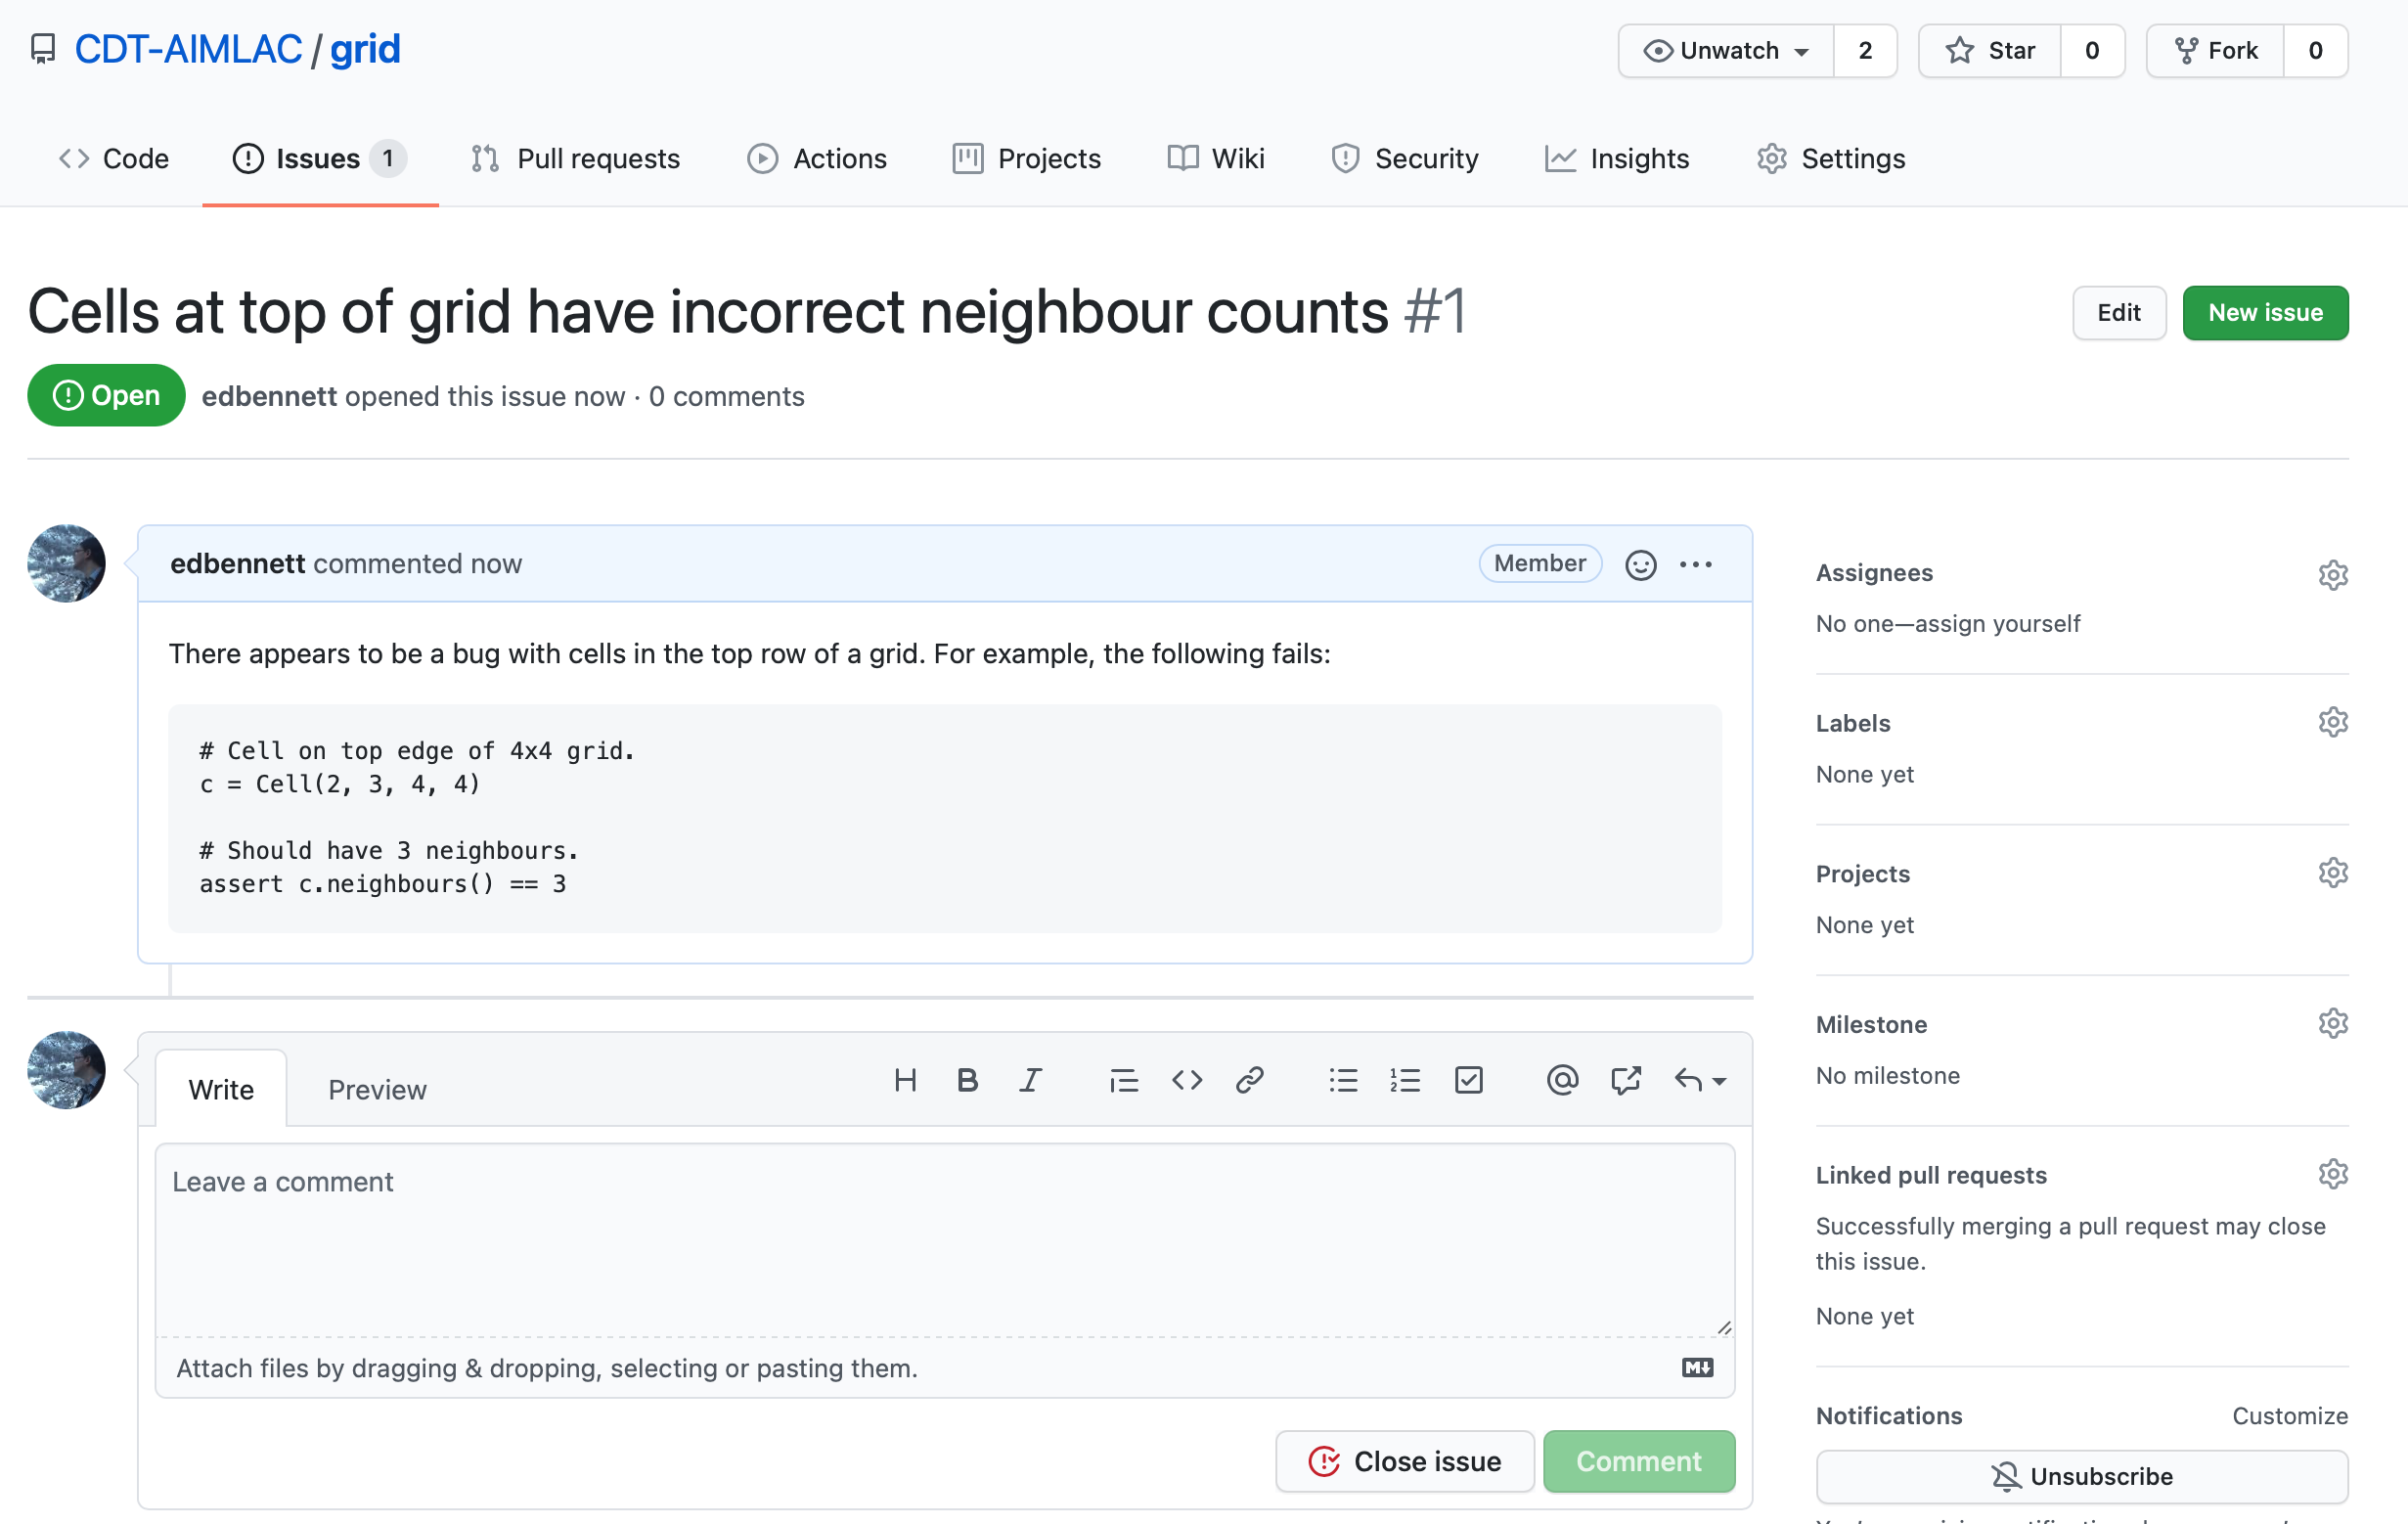
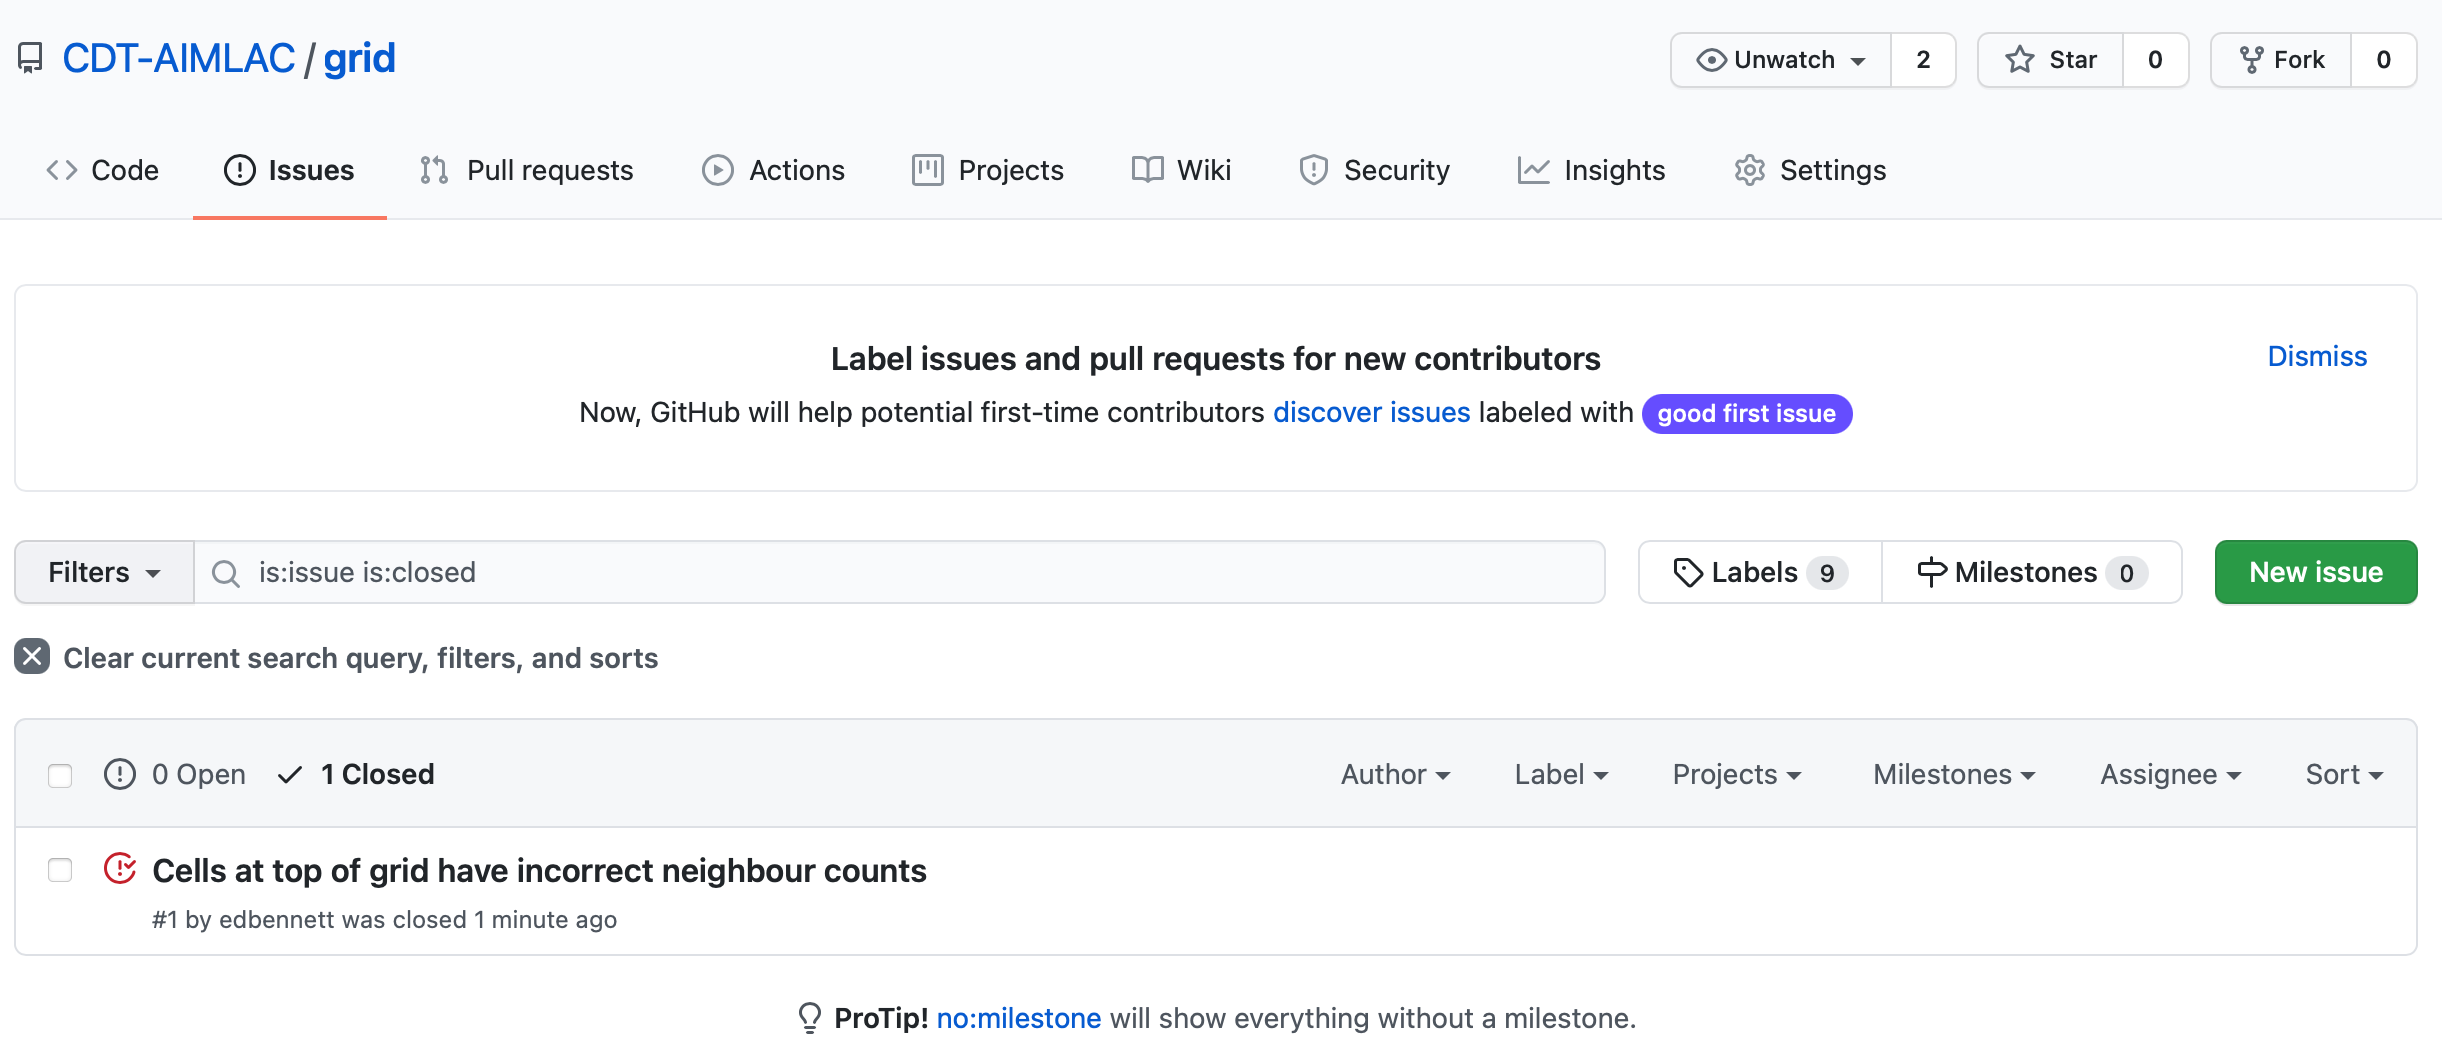
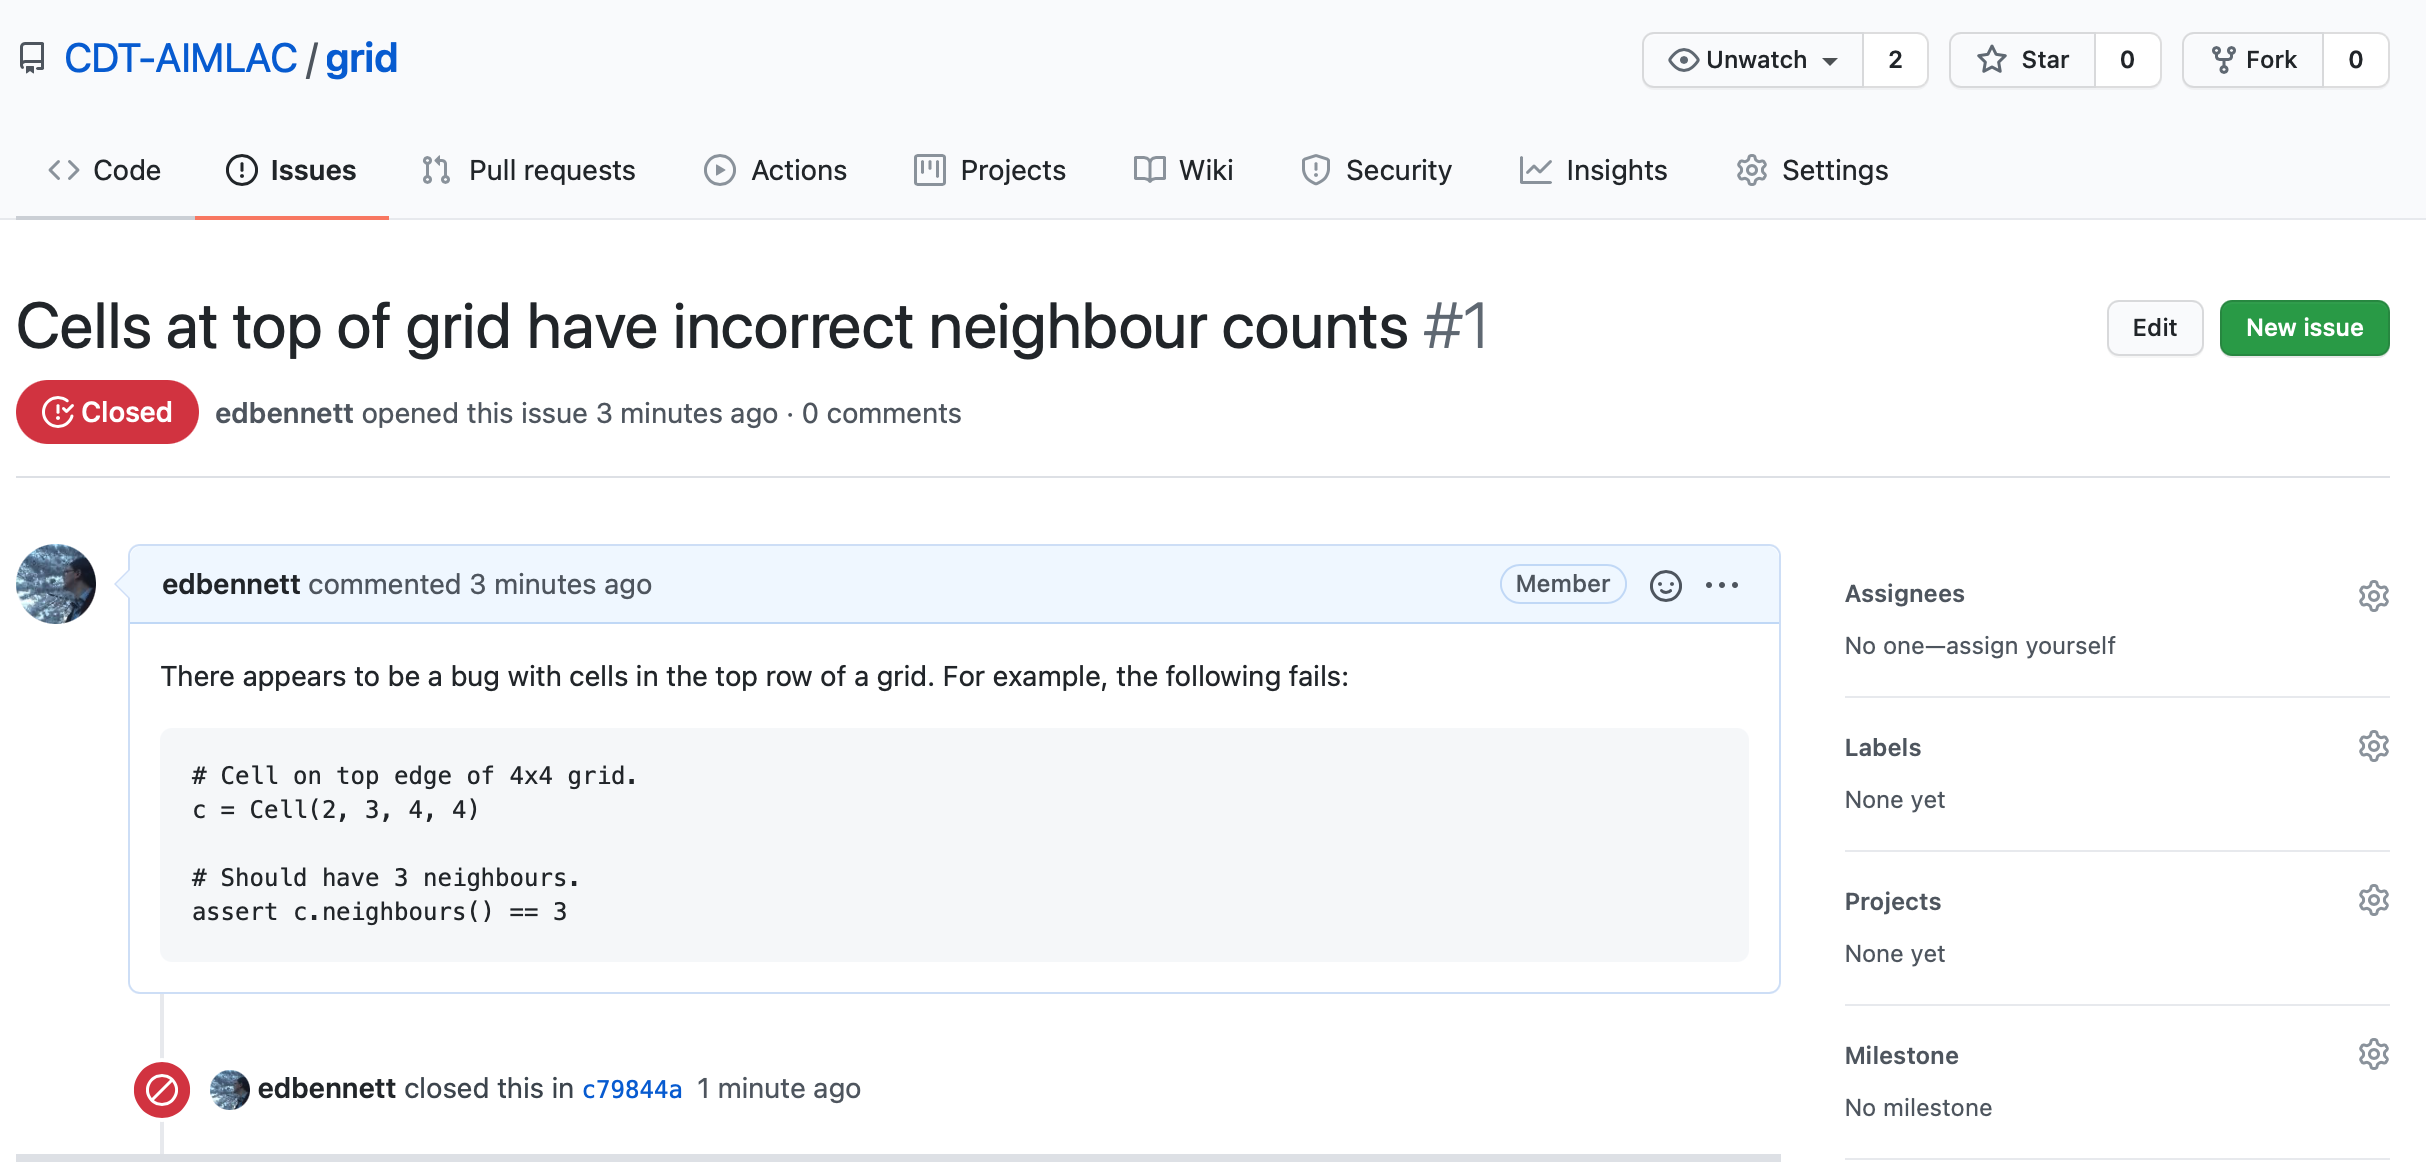
Creating an issue
Because we’ve noticed that the tests are failing, we can open an issue on GitHub to alert people to this. Click on the Issues tab followed by the New issue button. Give your issue whatever title you like, then hit submit. It’s good practice to give a minimal example that illustrates the problem. This helps the owner of the repository to reproduce the problem. You could also provide a new unit test if none of the current ones trigger the bug. In this case, we already have a good test that catches the error.
Pushing a fix
Back in your local repository fix the bug that you introduced earlier and verify
that the tests now pass. Having done this you can stage the grid.py file, then
commit the change. For simplicity we’ll do this in a single step.
$ git commit grid.py -m "Fixed a bug affecting cells at the top of a grid. [closes #1]"
Now push the commit to GitHub.
$ git push
The commit will now appear on GitHub, and GitHub Actions will run another build using the updated version of the code. Once the build is complete you should hopefully see a green status badge on the repository homepage to indicate that it passed.
Take another look at the Issues tab. You should see that the issue that you
opened is now closed. This happened automatically because we included the
phrase “closes #1” somewhere in our commit message. Here #1 is the issue
number—in this case, indicating that it is the first issue that was
opened.
Skipping a CI build
Sometimes you might commit changes that don’t affect the functionality of the
code, e.g. comments, or changes to the README.md file. In this case there is
no need to run another CI build since none of the changes will affect the result
of the tests. Since a build can be a time consuming process, and GitHub only
gives us a certain number of free minutes of actions per month, it would be
wasteful to run one if wasn’t absolutely necessary.
Thankfully there is a flag that can be added to commit messages in order to
indicate that a CI build should be skipped, [ci skip].
Edit the README.md file to include a new line saying “Testing is great!” (or whatever you prefer). Now commit your changes.
$ git commit README.md -m "Updated the README. [ci skip]"
Finally push the changes to GitHub.
$ git push
If you go to the GitHub page for your grid repository you should find that
there wasn’t a third CI build. On the GitHub page you can click on where it says
“3 commits” to show the commit history. There should be a red cross (failed)
next to the first commit, a green tick (passed) next to the second, and nothing
(skipped) next to the third.
Other GitHub actions
GitHub has a whole catalogue of example workflows available that can do a wide variety of things. A few are suggested when you click the New Workflow button in the Actions tab, and more can be found at the
starter-workflowsrepository. Some possibilities are to automatically push new releases to PyPI, and to automatically style check all code against a defined house style (for example, PEP 8).
Try it yourself
Switch now to the
dicedirectory. Set up this directory to be a git repository, hosted on GitHub, and using GitHub actions for CI.To do this:
- Create a new
.github/workflows/directory.- Create a
pytest.yamlfile inside this directory. You can use the example shown above as the basis for it.- Use
git init,git add, andgit committo commit the relevant files to the repository.- Create a new repository on GitHub. Use
git remote addto connect your local repository to the one you’ve just made.- Use
git pushto push your local repository up to GitHub.- Check that the tests ran, and passed.
If you have time, try also adding the badge to your
README.mdthat indicates whether the most recent CI build succeeded or not.
Key Points
Create a metadata file specifying how to run your tests, and push your repository to a hosting service connected with a Continuous Integration provider such as GitHub Actions.
Code coverage
Overview
Teaching: 15 min
Exercises: 10 minQuestions
How can I see how much of my code is tested?
How can I check code coverage as part of a CI workflow?
Objectives
Be able to check code coverage.
Understand that 100% code coverage is neither necessary nor sufficient for a good test suite.
Be able to display code coverage for CI builds.
So far we have written tests to cover the cases that we can think of, either
where we believe the code should work, or where it should generate a particular
error. When pytest notices these expectations not matching reality, the test
fails and we are alerted to the problem.
But what about the problems we haven’t even considered? Could there be some code hiding in our repository that is not tested, and so could go wrong at any moment?
A useful concept to help with this is the idea of code coverage. This is, for a particular application, module, or function, the percentage of lines of code that are executed at least once by the test suite—so at least in some sense are “tested”.
There is a variety of tools available to assist with assessing code coverage.
One of these is coverage; let’s install this now, as well as an extension to
pytest to integrate with coverage.
$ pip install pytest-cov coverage
Now, going back to the grid directory, we can run pytest, but asking it to
collect coverage data and save it in the current directory.
$ pytest --cov=./
========================= test session starts =======================
platform darwin -- Python 3.8.5, pytest-6.2.2, py-1.10.0, pluggy-0.13.1
rootdir: /Users/ed/src/python-testing-ci/code_test/grid
plugins: cov-2.11.1
collected 9 items

test/test_cell.py   .........    [100%]

---------- coverage: platform darwin, python 3.8.5-final-0 -----------
Name                Stmts   Miss  Cover
---------------------------------------
__init__.py             1      0   100%
grid.py                94     34    64%
test/__init__.py        0      0   100%
test/test_cell.py      64      0   100%
---------------------------------------
TOTAL                 159     34    79%


========================= 9 passed in 0.06s =========================
In addition to the test progress and results, we now also see a summary table of
the coverage of each of the modules in the project. Unsurprisingly, the tests
are 100% covered, as pytest runs all the code there. grid.py however is
currently only 64% covered. This isn’t necessarily a problem—100% coverage
isn’t always necessary, and we’re already significantly better than 0%
coverage—but it would be good to take a closer look and see where is and
isn’t covered.
$ coverage html
This reads the coverage information saved by pytest, and creates a graphical
report in HTML format that we can open in a web browser. Opening
htmlcov/index.html in your web browser of choice will show you a prettier
version of the summary table above, but now, clicking on grid.py will give a
line-by-line breakdown of what is and isn’t covered by tests.
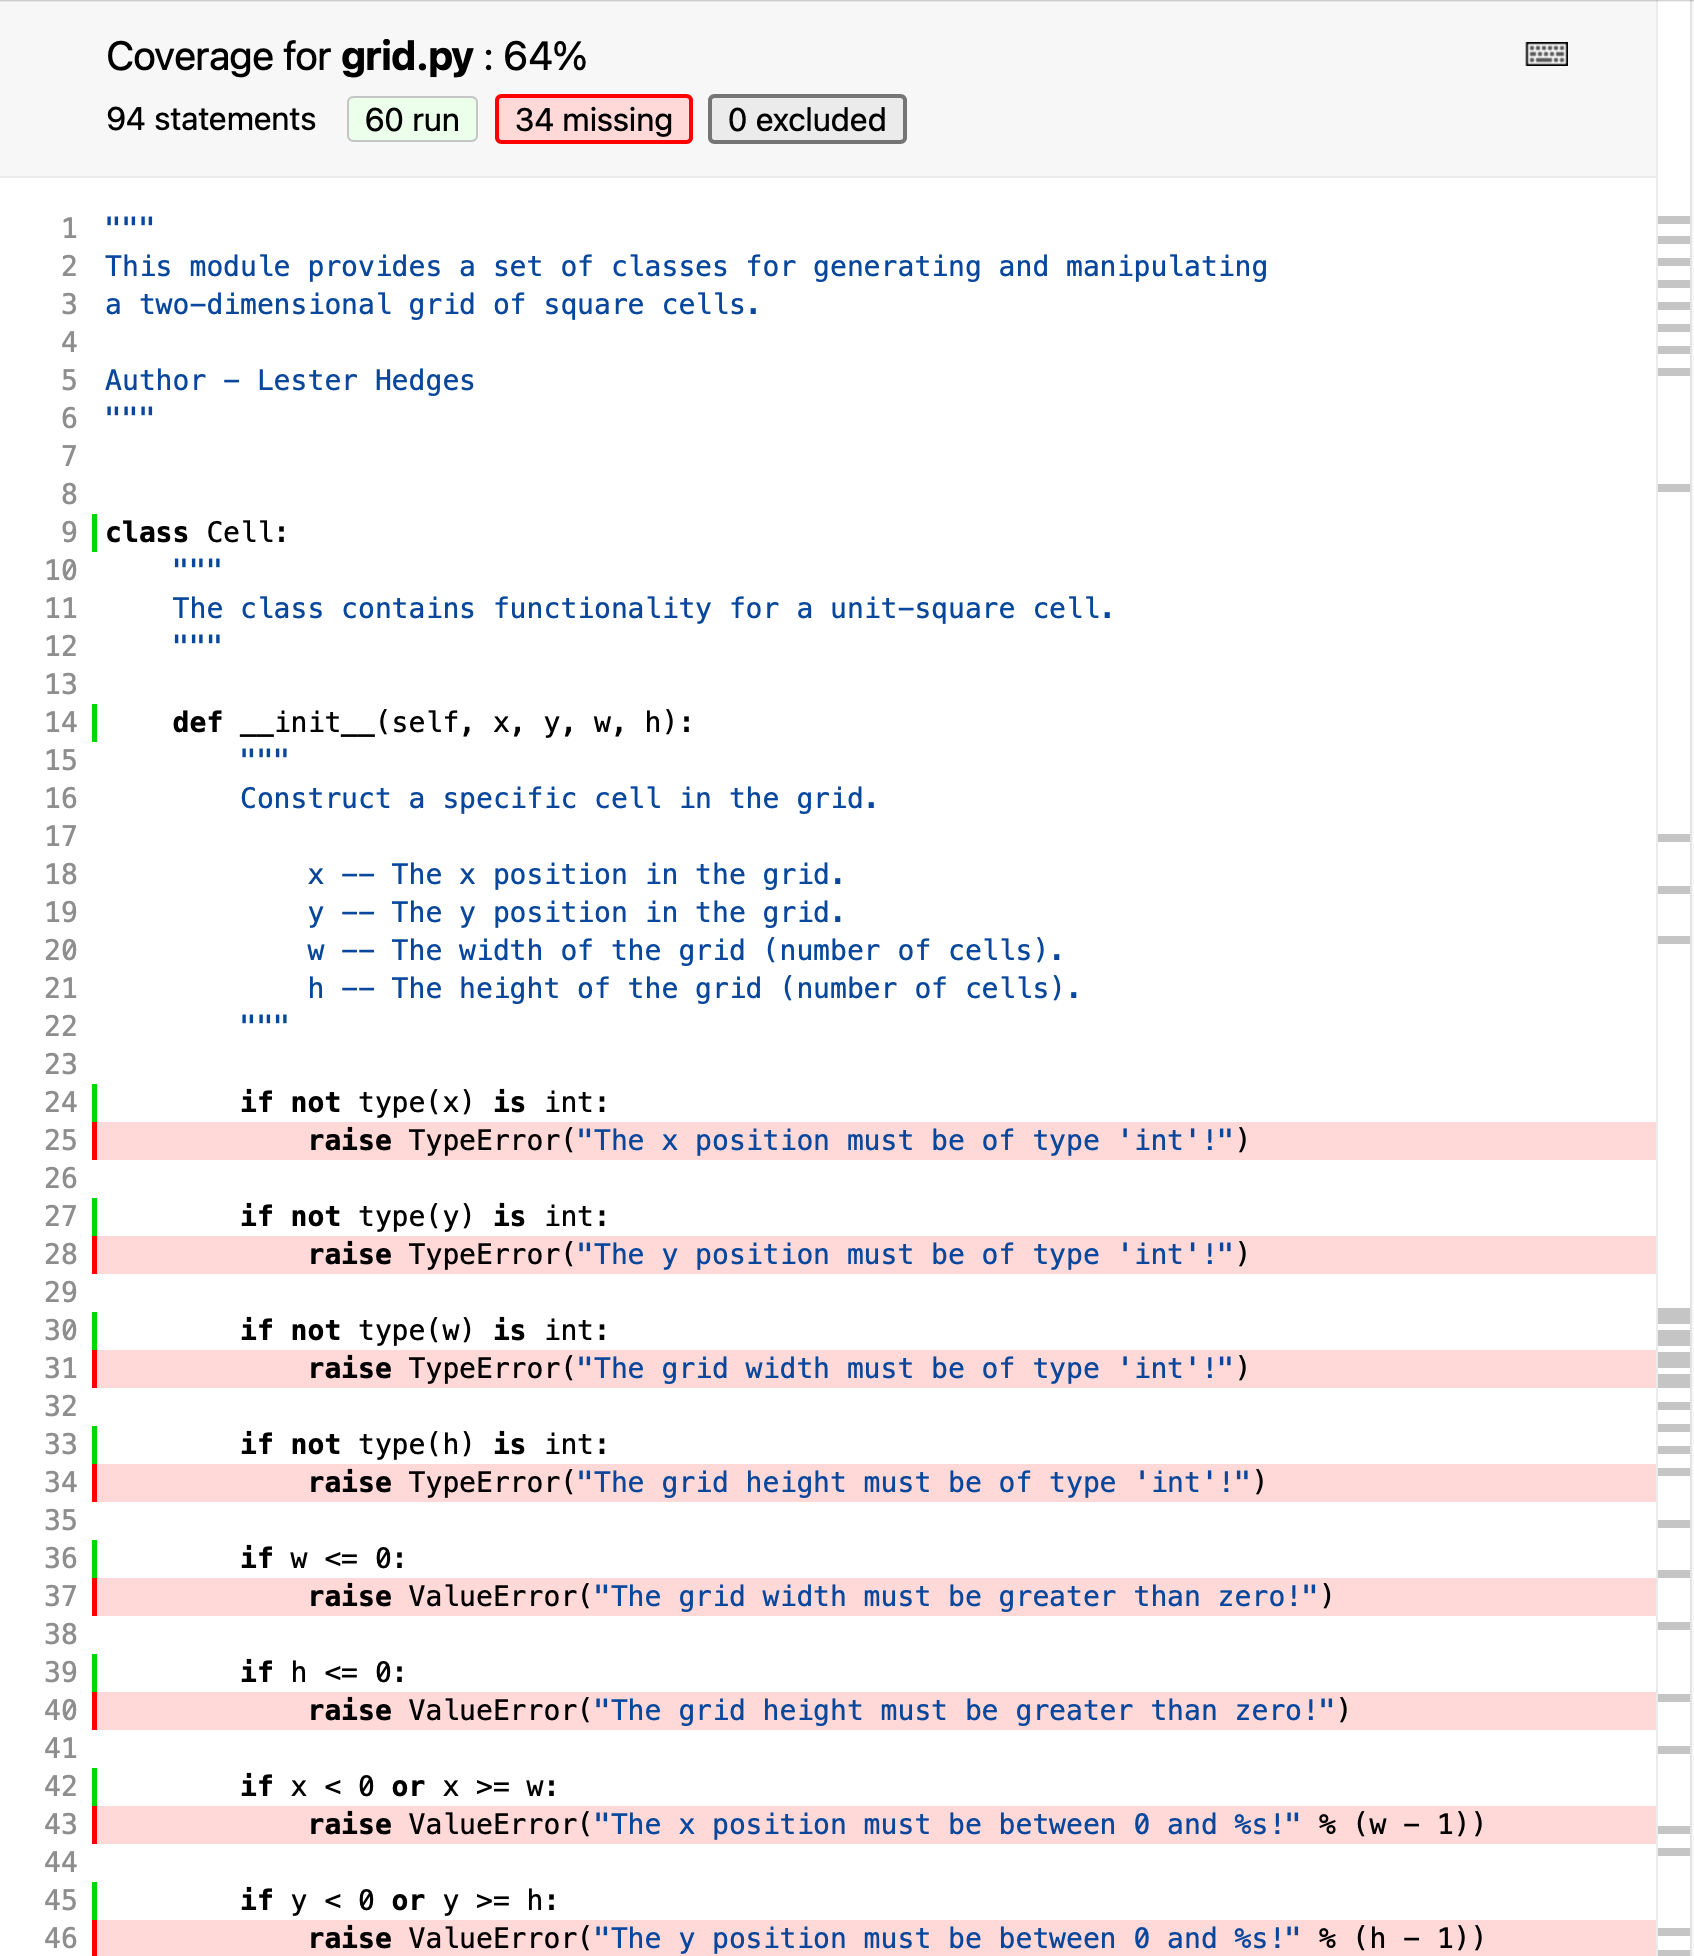
Looking through line-by-line, we can see that places that aren’t tested include
the consistency checks in the __init__() method of Cell, and methods such as
occupied, fill, and empty. It’s a good idea for all functions (and
methods) to have at least one test, so this test suite would benefit from being
expanded.
It’s worth pointing out again that 100% coverage is not essential for a good test suite. If the coverage is below 100%, then that indicates that it’s worth understanding where the uncovered lines of code are, and whether it is worth the time investment to write tests for them. For example, many programs leave the
if __name__ == '__main__'block untested, as testing it adds complexity for little gain.Conversely, 100% coverage does not guarantee that every possible problem has been discovered. If the same person writes the tests and the code, it’s likely that a forgotten corner case in the code will also be forgotten in the test suite; as there is no code there to not be tested, the coverage statistic will not highlight a problem here.
Code coverage is just one tool in your testing arsenal to help you identify areas you may have forgotten to test; it is not useful as a metric to compare between projects.
Coverage and continuous integration
As well as checking that our tests pass, we can also get our continuous integration workflow to check and report on the code coverage. A useful tool to help with this is Codecov, which will keep a history of your coverage data over time so you can visualise trends in it, and as a bonus will generate a badge that you can include alongside the CI workflow status.
To do this, firstly you’ll need to create an account with Codecov. Sign in with your GitHub account to link your Codecov account to your GitHub one, so your repositories will automatically show up.
Then, we need to make three changes to the .github/workflows/pytest.yaml file:
- Add the
codecovandpytest-covpackages to the installation step. - Update the
pyteststep to generate coverage data as well as running the test suite. - Add an extra step to upload the data to Codecov.
With these done, our pytest.yaml file looks as follows:
name: Run tests

on:
  push:
    branches: [ main ]
  pull_request:
    branches: [ main ]

jobs:
  build:

    runs-on: ubuntu-latest
    strategy:
      matrix:
        python-version: [3.7, 3.8, 3.9]

    steps:
    - uses: actions/checkout@v3
    - name: Set up Python ${{ matrix.python-version }}
      uses: actions/setup-python@v4
      with:
        python-version: ${{ matrix.python-version }}
    - name: Install dependencies
      run: |
        python -m pip install --upgrade pip
        python -m pip install pytest pytest-cov codecov
    - name: Test with pytest
      run: |
        pytest --cov=./
    - name: Upload coverage report
      run: |
        codecov
With these edits made, now we can commit the changes and push them to GitHub.
$ git add .github/workflows/pytest.yaml
$ git commit -m 'add coverage reporting to CI workflow'
$ git push origin main
Once the workflow has had time to run, going back to Codecov will
show the grid repository. Clicking through, you can see visualisations of the
coverage now, and the historical coverage over time. You can also drill down
into reports similar to the ones that were generated by coverage html.
Now that Codecov is aware of the repository, we can ask it for a coverage badge,
as well. Going to Settings > Badge, we can copy the Markdown and add it
to our README.md.
$ nano README.md
$ git add README.md
$ git commit -m 'add coverage badge to README [ci skip]'
$ git push origin main
Now our README.md shows the percentage coverage of the test suite, as well as whether it passes.
Try it yourself
Switch back to the
dicedirectory again. In the previous episode, you set up a CI workflow for this repository. Now, adjust this workflow so that it also measures and reports on code coverage, and add a badge from Codecov to theREADME.md.
Key Points
Use the
--covoption topytestto monitor what code is tested, and then usecodecovto report on the results.Having every line of code tested isn’t essential to have a good test suite—even one test is better than zero!
Having every line of code tested doesn’t guarantee that your code is bug free. In particular, edge cases and corner cases are often not guarded against.
codecov.iocan connect to your GitHub account and pull coverage data to generate coverage reports from your CI workflows.
Putting it all together
Overview
Teaching: 5 min
Exercises: 90 minQuestions
How can I apply all of these techniques at once to a real application?
Objectives
Be able to apply testing and CI techniques to a piece of research software.
Now we have developed a range of skills relating to testing and continuous integration, we can try putting them into practice on a real piece of research software.
The software
We are going to work with pl_curves, a piece of research software developed by
Dr Colin Sauzé at Aberystwyth University, which calculates Pareto–Lorenz (PL)
curves for calculating the relative abundance of different bacteria in a
community. It also calculates a Gini coefficient to show how evenly distributed
the different bacteria are. It already has tests written for most functions.
Your task
- Fork the repository. You don’t have push access to the original repository, so you will need to use your own copy of it.
- Enable GitHub actions on your fork, as GitHub disables Actions for forks by default.
- Update the CI and Codecov badges to point to your copy of the repository. Pushing these changes should automatically run the test suite and update the badges.
- Create a virtual environment on your computer for the project, and install the project’s requirements, so you can run the test suite locally.
- Upgrade to the most recent version of Pandas, Matploblib and Pytest. Again, see if this breaks anything. If it does, then fix the issues, and ensure that the test suite passes again.
- Currently, some of the tests for the repository fail. Work out why this is happening, and fix the issues. Check that they are fixed in the CI workflow as well.
- Currently, the code is only tested for Python versions up to 3.9. Since Python has moved on now, add 3.10 and 3.11 as targets for the CI. Do the tests pass now? If not, identify what has caused them to fail, and fix the issues you identify. This is an important reason for having a test suite: sometimes changes entirely external to your code will break your code. Without a test suite, you don’t know whether this has happened until someone points out that your new results don’t match your older ones! Having CI set up allows easy testing of multiple different versions.
- Currently the code is being tested against Ubuntu 20.04 (released April 2020). A new long term support release of Ubuntu came out in April 2022 (version 22.04). Upgrade the operating system being tested from Ubuntu 18.04 to Ubuntu 20.04. As with upgrading Python, the test suite helps us check that the code still runs on a newer operating system.
Hint: In general, before changes are made to libraries that will break existing software using those libraries, they are “deprecated” for some period of time. During this time, the software will issue a warning of the impending breakage of the function, and give advice on how to modify your code so that a) the warning will go away, and b) the software will not break when the breaking change is made in a future version.
Key Points
Testing and CI work well together to identify problems in research software and allow them to be fixed quickly.
If anything is unclear, or you get stuck, please ask for help!