All in One View
Content from Running commands with Snakemake
Last updated on 2026-06-29 | Edit this page
Estimated time: 25 minutes
Overview
Questions
- How do I run a simple command with Snakemake?
Objectives
- Create a Snakemake recipe (a Snakefile)
- Use Snakemake to compute the average plaquette of an ensemble
Introduction
Data analysis in lattice quantum field theory generally has many moving parts: you will likely have many ensembles, with differing physical and algorithmic parameters, and for each many different observables may be computed. These need to be combined in different ways, making sure that compatible statistics are used. Making sure that each step runs in the correct order is non-trivial, requiring careful bookkeeping, especially if we want to update data as ensembles are extended, if we want to take advantage of parallelism to get results faster, and if we want auditability to be able to verify later what steps were performed.
While we could build up tools to do all of these things from scratch, these are not challenges exclusive to lattice, and so we can take advantage of others’ work rather than reinventing the wheel. This frees up our time to focus on the physics challenges. The category of “tools to help run complex arrangements of tools in the right order” is called “workflow management”; there are workflow managers available, most of which are specialised to a specific class of applications.
One workflow manager developed for scientific data analysis is called Snakemake; this will be the target of this lesson. Snakemake is similar to GNU Make, in that you create a text file containing rules specifying how input files are translated to output files, and then the software will work out what rules to run to generate a specified output from the available input files. Unlike Make, Snakemake uses a syntax closely based on Python, and files containing rules can be extended using standard Python syntax. It also has many quality-of-life improvements compared to Make, and so is much better suited for writing data analysis workflows.
At this point, you should have Snakemake already installed and available to you. To test this, we can open a terminal and run
$ snakemake --version
8.25.3
If you instead get a “command not found” error, go back to the setup and check that you have completed all the necessary steps.
The most likely issue learners will encounter here is needing to activate their Snakemake environment when they have opened a fresh terminal. This is hopefully as simple as
conda activate snakemakeIf Conda isn’t set up to automatically activate itself on starting a shell session, they may also need to run something like
source ~/miniconda3/bin/activatewhere the exact path to run will depend on their specific setup.
Looking at the sample data
You should already have the sample data files unpacked. (If not,
refer back to the lesson setup.) Under the
su2pg/raw_data directory, you will find a series of
subdirectories, each containing data for a single ensemble. In each are
files containing the log of the configuration generation, the
computation of the quenched meson spectrum, and the computation of the
Wilson flow.
The sample data are for the SU(2) pure Yang-Mills theory, and have
been generated using the HiRep code. We can look
at their structure with less, for example, we might check
the log of generating the \(\beta=2.0\)
ensemble with the heat bath algorithm:
less raw_data/beta2.0/out_pgEach log contains header lines describing the setup, information on the computation being computed, and results for observables computed on each configuration. Code to parse these logs and compute statistics is included with the sample data; we’ll use these in due course.
To exit less, press q.
Making a Snakefile
To start with, let’s define a rule to count the number of lines in one of the raw data files.
Within the su2pg/workflow directory, edit a new text
file named Snakefile. Into it, insert the following
content:
rule count_lines:
    input: "raw_data/beta2.0/out_pg"
    output: "intermediary_data/beta2.0/pg.count"
    shell:
"wc -l raw_data/beta2.0/out_pg > intermediary_data/beta2.0/pg.count"Key points about this file
- The file is named
Snakefile- with a capitalSand no file extension. - Some lines are indented. Indents must be with space characters, not tabs.
- The rule definition starts with the keyword
rulefollowed by the rule name, then a colon. - We named the rule
count_lines. You may use letters, numbers or underscores, but the rule name must begin with a letter and may not be a keyword. - The keywords
input,output,shellare all followed by a colon. - The file names and the shell command are all in
"quotes". - The file names are specified relative to the root directory of your workflow.
The first line tells Snakemake we are defining a new rule. Subsequent
indented lines form a part of this rule; while there are none here, any
subsequent unindented lines would not be included in the rule. The
input: line tells Snakemake what files to look for to be
able to run this rule. If this file is missing (and there is no rule to
create it), Snakemake will not consider running this rule. The
output: line tells Snakemake what files to expect the rule
to generate. If this file is not generated, then Snakemake will abort
the workflow with an error. Finally, the shell: block tells
Snakemake what shell commands to run to get the specified output from
the given input.
Going back to the shell now, we can test this rule. First up, we need to enter the directory containing the workflow
cd su2pgWe’ll spend most of the rest of the lesson in this directory.
Activate your environment
To call snakemake, we need to have active the
environment that we created in the setup. Current
versions of Conda by default prepend this environment name to your
prompt, so if you don’t see (snakemake) in your prompt, you
will need to activate this
conda activate snakemakeFrom here, we can now run the command
snakemake --cores 1 --forceall --printshellcmds intermediary_data/beta2.0/pg.countIf we’ve made any transcription errors in the rule (missing quotes, bad indentations, etc.), then it will become clear at this point, as we’ll receive an error that we will need to fix.
Snakemake interprets all inputs and outputs as relative to the
working directory. For this reason, you should always run
snakemake from the root of your workflow repository.
An option to make this easier is to have a terminal open to the
correct directory that you don’t use cd in, so it is always
in the right place. You can edit your workflow in a separate window,
either in another terminal with nano or vim,
or in a separate text editing application.
Learners less experienced with the shell may want to cd
into directories to edit files; if they do this and forget to
cd back out again, they will encounter difficulties as
Snakemake may not be able to find the Snakefile or the input files.
If they try to work around this, they may end up with multiple Snakefiles or ones with inputs pointing at incorrect relative paths.
Technically, you can specify absolute paths in Snakefiles, but this is not recommended, for portability reasons. For example, when using Snakemake to execute some rules on another machine, this would fail as it cannot gather the dependencies into the correct location; similarly if someone else were to run a workflow on their own machine, the home directory is unlikely to be the same, so the workflow would fail.
New researchers frequently like to hardcode absolute paths to their data, so this is an important point to reinforce.
For now, we will consistently run snakemake with the
--cores 1 --forceall --printshellcmds options. As we move
through the lesson, we’ll explain in more detail when we need to modify
them.
Let’s check that the output was correctly generated:
$ cat intermediary_data/beta2.0/pg.count
31064 raw_data/beta2.0/out_pgYou might have noticed that we are grouping files into directories
like raw_data and intermediary_data. It is
generally a good idea to keep raw input data separate from data
generated by the analysis. This means that if you need to run a clean
analysis starting from your input data, then it is much easier to know
what to remove and what to keep. Ideally, the raw_data
directory should be kept read-only, so that you don’t accidentally
modify your input data. Similarly, it is a good idea to separate out
“files that you want to include in a paper” from “intermediary files
generated by the workflow but not needed in the paper”; we’ll talk more
about that in a later section.
You might also worry that your tooling will need to use
mkdir to create these directories; in fact, Snakemake will
automatically create all directories where it expects to see output from
rules that it runs.
The example data for this lesson uses read-only raw data throughout, including the containing directories. If learners end up with multiple copies of the data and need to delete one, they should use the commands:
chmod -R u+w raw_data
rm -r raw_data
Having the containing directories read-only means that extra output files can’t be added by accident. It’s a relatively strict measure—while assembling data, one would only want the files read-only, so you could keep adding more files as they were ready.
In the first few episodes we always run Snakemake with the
--forceall flag, and it’s not explained what this does
until Ep. 04. The rationale is that the default Snakemake behaviour when
pruning the DAG leads to learners seeing different output (typically the
message “nothing to be done”) when repeating the exact same command.
This can seem strange to learners who are used to scripting and
imperative programming.
The internal rules used by Snakemake to determine which jobs in the
DAG are to be run, and which skipped, are pretty complex, but the
behaviour seen under --forceall is much more simple and
consistent; Snakemake simply runs every job in the DAG every time. You
can think of --forceall as disabling the lazy evaluation
feature of Snakemake, until we are ready to properly introduce and
understand it.
Running Snakemake
Run snakemake --help | less to see the help for all
available options. What does the --printshellcmds option in
the snakemake command above do?
- Protects existing output files
- Prints the shell commands that are being run to the terminal
- Tells Snakemake to only run one process at a time
- Prompts the user for the correct input file
Hint: you can search in the text by pressing /, move to the next and previous search result with n and N respectively, and quit back to the shell with q
- Prints the shell commands that are being run to the terminal
This is such a useful thing we don’t know why it isn’t the default!
The --cores 1 option is what tells Snakemake to only run
one process at a time, and we’ll stick with this for now as it makes
things simpler. The --forceall option tells Snakemake to
always recreate output files, and we’ll learn about protected outputs
much later in the course. Answer 4 is a total red herring, as Snakemake
never prompts interactively for user input.
Counting trajectories
The count of output lines isn’t particularly useful. Potentially more interesting is the number of trajectories in a given file. In a HiRep generation log, each trajectory concludes with a line of the form
OUTPUT
[MAIN][0]Trajectory #1: generated in [39.717707 sec]We can use grep to count these, as
Counting sequences in Snakemake
Modify the Snakefile to count the number of
trajectories in raw_data/beta2.0/out_pg,
rather than the number of lines.
- Rename the rule to
count_trajectories - Keep the output file name the same
- Remember that the result needs to go into the output file, not just be printed on the screen
- Test the new rule once it is done.
rule count_trajectories:
    input: "raw_data/beta2.0/out_pg"
    output: "intermediary_data/beta2.0/pg.count"
    shell:
"grep -c generated raw_data/beta2.0/out_pg > intermediary_data/beta2.0/pg.count"- Before running Snakemake you need to write a Snakefile
- A Snakefile is a text file which defines a list of rules
- Rules have inputs, outputs, and shell commands to be run
- You tell Snakemake what file to make and it will run the shell command defined in the appropriate rule
Content from Running Python code with Snakemake
Last updated on 2026-06-29 | Edit this page
Estimated time: 25 minutes
Overview
Questions
- How do I configure an environment to run Python with Snakemake?
Objectives
- Create a Conda environment definition
- Use Snakemake to instantiate this environment and use it to run Python code
Why define an environment
Snakemake is written in Python, so anyone running a Snakemake workflow already has Python available. In principle, we could make use of this installation to run any Python code we need to run in our workflow. However, it’s more than likely we will need to make use of libraries that are not installed as part of the Snakemake installation. At that point, we would either need to install additional libraries into our Snakemake environment, which might be used by other analyses that need their own sets of libraries that could create conflicts, or to create a second Snakemake environment for this analysis. If different steps of our workflow need different, conflicting sets of libraries then this becomes more complicated again.
We would also like those trying to reproduce our work to be able to run using exactly the same software environment that we used in our original work. In principle, we could write detailed documentation specifying which packages to install; however, it is both more precise and more convenient to define the environment as a data file, which Conda can use to build the same environment every time.
Even better, we can tell Snakemake to use a specific Conda environment for each rule we define.
A basic environment definition
Conda environment definitions are created in YAML-format files. These specify what Conda packages are needed (including the target version of Python), as well as any Pip packages that are installed.
Some packages give you a choice as to whether to install using Conda or Pip. When working interactively with an environment, using Pip consistently typically reduces the chance of getting into a state where Conda is unable to install packages. That is less of a problem when constructing new environments from definition files, but even so, using Pip where possible will typically allow environments to resolve and install more quickly.
By convention, Conda environment definitions in Snakemake workflows
are placed in a workflow/envs/ directory. Let’s create
workflow/envs/analysis.yml now, and place the following
content into it
YAML
name: su2pg_analysis
channels:
  - conda-forge
dependencies:
  - pip=24.2
  - python=3.12.6
  - pip:
      - h5py==3.11.0
      - jinja2==3.1.6
      - matplotlib==3.9.2
      - numpy==2.1.1
      - pandas==2.2.3
      - scipy==1.14.1
      - uncertainties==3.2.2
      - corrfitter==8.2
      - -e ../../libs/su2pg_analysis
This will install the specified versions of h5py, Matplotlib, Numpy,
Pandas, Scipy, uncertainties, and corrfitter, as well as the analysis
tools provided in the libs directory. The latter are
installed in editable mode, so if you need to modify them to fix bugs or
add functionality while working on your workflow, you don’t need to
remember to manually reinstall them.
Using an environment definition in a Snakefile
Now that we have created an environment file, we can use it in our
Snakefile to compute the average plaquette from a configuration
generation log. Let’s add the following rule to
workflow/Snakefile:
rule avg_plaquette:
    input: "raw_data/beta2.0/out_pg"
    output: "intermediary_data/beta2.0/pg.plaquette.json.gz"
    conda: "envs/analysis.yml"
    shell:
        "python -m su2pg_analysis.plaquette raw_data/beta2.0/out_pg --output_file intermediary_data/beta2.0/pg.plaquette.json.gz"
The conda: block tells Snakemake where to find the Conda
environment that should be used for running this rule. Let’s test this
now:
snakemake --cores 1 --forceall --printshellcmds --use-conda intermediary_data/beta2.0/pg.plaquette.json.gzWe need to specify --use-conda to tell Snakemake to pay
attention to the conda: specification.
Let’s check now that the output was correctly generated:
cat intermediary_data/beta2.0/pg.plaquette.json.gz | gunzip | head -n 31OUTPUT
{
 "program": "pyerrors 2.14.0",
 "version": "1.1",
 "who": "ed",
 "date": "2025-10-08 19:51:58 +0100",
 "host": "azusa, Linux-6.8.0-85-generic-x86_64-with-glibc2.39",
 "description": {
  "INFO": "This JSON file contains a python dictionary that has been parsed to a list of structures. OBSDICT contains the dictionary, where Obs or other structures have been replaced by DICTOBS[0-9]+. The field description contains the additional description of this JSON file. This file may be parsed to a dict with the pyerrors routine load_json_dict.",
  "OBSDICT": {
   "plaquette": "DICTOBS0"
  },
  "description": {
   "group_family": "SU",
   "num_colors": 2,
   "nt": 48,
   "nx": 24,
   "ny": 24,
   "nz": 24,
   "beta": 2.0,
   "num_heatbath": 1,
   "num_overrelaxed": 4,
   "num_thermalization": 1000,
   "thermalization_time": 2453.811479,
   "num_trajectories": 10010
  }
 },
 "obsdata": [{
   "type": "Obs",
   "layout": "1",
   "tag": ["plaquette"],
   "value": [0.5012064525235401],
Some of the output will differ on your machine, since this library tracks provenance, such as where and when the code was run, in the output file.
You might notice that this output contains a lot of information besides the average plaquette. These are metadata—that is, data describing the data, which help us understand it and make better use of it. This includes physics parameters describing what the data refer to, and provenance information describing how and when it was computed.
If you imagine a script that outputs only the average plaquette and its uncertainty:
0.501206452535401 5.027076650629463e-06then seeing just this file in isolation, it would be much harder to understand what it means or where it comes from. You would need some other bookkeeping system to track the physics parameters. Bundling these into the files means we are less likely to accidentally create a situation where the data are presented with incorrect labels.
We’re using JSON format to output the results; if you are not using a library that automatically generates JSON, you might instead use CSV or any other format. The important part is that it can be read and written easily, and can hold the metadata that you need to keep.
We compress each output file with GZIP (the .gz
extension), because the pyerrors library that we are using
does this automatically. Since we are generating one output file per
computation we’re performing, we’ll end up with a lot of files; each has
a lot of metadata within it, so this might take up a lot of space
without compression.
More plaquettes
Add a second rule to compute the average plaquette in the file
raw_data/beta2.2/out_pg. Add this to the same Snakefile you
already made, under the avg_plaquette rule, and run your
rules in the terminal. When running the snakemake command
you’ll need to tell Snakemake to make both the output files.
You can choose whatever name you like for this second rule, but it
can’t be avg_plaquette, as rule names need to be unique
within a Snakefile. So in this example answer we use
avg_plaquette2.
rule avg_plaquette2:
    input: "raw_data/beta2.2/out_pg"
    output: "intermediary_data/beta2.2/pg.plaquette.json.gz"
    conda: "envs/analysis.yml"
    shell:
        "python -m su2pg_analysis.plaquette raw_data/beta2.2/out_pg --output_file intermediary_data/beta2.2/pg.plaquette.json.gz"
Then in the shell:
snakemake --cores 1 --forceall --printshellcmds --use-conda intermediary_data/beta2.0/pg.plaquette.json.gz intermediary_data/beta2.2/pg.plaquette.json.gzIf you think writing a separate rule for each output file is silly, you are correct. We’ll address this next!
- Snakemake will manage Conda environments for you, to help ensure that workflows always use a consistent set of packages
- Use the
--use-condaoption tosnakemaketo enable this behaviour - Use
conda:to specify a Conda environment definition (.yml) file. The path of this is relative to the file in which it is specified. - Conda environment files are conventionally put in the
workflow/envsdirectory
Content from Placeholders and wildcards
Last updated on 2026-06-29 | Edit this page
Estimated time: 35 minutes
Overview
Questions
- How do I make a generic rule?
- How does Snakemake decide what rule to run?
Objectives
- Use Snakemake to compute the plaquette in any file
- Understand the basic steps Snakemake goes through when running a workflow
- See how Snakemake deals with some errors
Making rules more generic
In the previous two episodes, we wrote rules to count the number of generated trajectories in, and compute the average plaquette of, one ensemble. As a reminder, this was one such rule:
rule count_trajectories:
    input: "raw_data/beta2.0/out_pg"
    output: "intermediary_data/beta2.0/pg.count"
    shell:
        "grep -c generated raw_data/beta2.0/out_pg > intermediary_data/beta2.0/pg.count"
When we needed to do the same for a second ensemble, we made a second copy of the rule, and changed the input and output filenames. This is obviously not scalable to large analyses: instead, we would like to write one rule for each type of operation we are interested in. To do this, we’ll need to use placeholders and wildcards. Such a generic rule might look as follows:
# Count number of generated trajectories for any ensemble
rule count_trajectories:
    input: "raw_data/{subdir}/out_pg"
    output: "intermediary_data/{subdir}/pg.count"
    shell:
"grep -c generated {input} > {output}"{subdir} here is an example of a
wildcard Wildcards are used in the input
and output lines of the rule to represent parts of
filenames. Much like the * pattern in the shell, the
wildcard can stand in for any text in order to make up the desired
filename. As with naming your rules, you may choose any name you like
for your wildcards; so here we used subdir, since it is
describing a subdirectory. If subdir is set to
beta2.0 then the new generic rule will have the same inputs
and outputs as the original rule. Using the same wildcards in the input
and output is what tells Snakemake how to match input files to output
files.
If two rules use a wildcard with the same name then Snakemake will treat them as different entities—rules in Snakemake are self-contained in this way.
Meanwhile, {input} and {output} are
placeholders. Placeholders are used in the
shell section of a rule. Snakemake will replace them with
appropriate values before running the command: {input} with
the full name of the input file, and {output} with the full
name of the output file.
If we had wanted to include the value of the subdir
wildcard directly in the shell command, we could have used
the placeholder {wildcards.subdir}, but in many cases, as
here, we just need the {input} and {output}
placeholders.
Let’s test this general rule now:
snakemake --cores 1 --forceall --printshellcmds --use-conda intermediary_data/beta2.0/pg.countAs previously, if you see errors at this point, there is likely a problem with your Snakefile; check that all the rules match the ones that have appeared here, and that there aren’t multiple rules with the same name.
General plaquette computation
Modify your Snakefile so that it can compute the average plaquette for any ensemble, not just the ones we wrote specific rules for in the previous episode.
Test this with some of the values of \(\beta\) present in the raw data.
The replacement rule should look like:
# Compute average plaquette for any ensemble from its generation log
rule avg_plaquette:
    input: "raw_data/{subdir}/out_pg"
    output: "intermediary_data/{subdir}/pg.plaquette.json.gz"
    conda: "envs/analysis.yml"
    shell:
        "python -m su2pg_analysis.plaquette {input} --output_file {output}"
To test this, for example:
snakemake --cores 1 --forceall --printshellcmds --use-conda intermediary_data/beta1.8/pg.plaquette.json.gzChoosing the right wildcards
Our rule puts the trajectory counts into output files named like
pg.count. How would you have to change the
count_trajectories rule definition if you instead
wanted:
the output file for
raw_data/beta1.8/out_hmcto beintermediary_data/beta1.8/hmc.count?the output file for
raw_data/beta1.8/mass_fun-0.63/out_hmcto beintermediary_data/beta1.8/mass_fun-0.63/hmc.count?the output file for
raw_data/beta1.8/mass_fun-0.63/out_hmcto beintermediary_data/hmc_b1.8_m-0.63.count(forraw_data/beta1.9/mass_fun-0.68/out_hmcto beintermediary_data/hmc_b1.9_m-0.68.count, etc.)?the output file for
raw_data/beta1.8/mass_fun-0.63/out_hmcto beintermediary_data/hmc_m-0.63.count(forraw_data/beta1.9/mass_fun-0.68/out_hmcto beintermediary_data/hmc_m-0.68.count, etc.)?
(Assume that both pure-gauge and HMC logs tag generated trajectories the same way. Note that input files for the latter data are not included in the sample data, so these will not work as-is.)
In both cases, there is no need to change the shell part
of the rule at all.
input: "raw_data/{subdir}/out_hmc"
output: "intermediary_data/{subdir}/hmc.count"
This can be done by changing only the static parts of the
input: and output: lines.
This in fact requires no change from the previous answer. The
wildcard {subdir} can include /, so can
represent multiple levels of subdirectory.
input: "raw_data/beta{beta}/mass_fun{mass}/out_hmc"
output: "intermediary_data/hmc_b{beta}_m{mass}.count"
In this case, it was necessary to change the wildcards, because the
subdirectory name needs to be split to obtain the values of \(\beta\) and \(m_{\mathrm{fun}}\). The names chosen here
are {beta} and {mass}, but you could choose
any names, as long as they match between the input and
output parts.
This one isn’t possible, because Snakemake cannot
determine which input file you want to count by matching wildcards on
the file name intermediary_data/hmc_m-0.63.count. You could
try a rule like this:
input: "raw_data/beta1.8/mass_fun{mass}/out_hmc"
output: "intermediary_data/hmc_m{mass}.count"
…but it only works because \(\beta\)
is hard-coded into the input line, and the rule will only
work on this specific sample, not other cases where other values of
\(\beta\) may be wanted. In general,
input and output filenames need to be carefully chosen so that Snakemake
can match everything up and determine the right input from the output
filename.
Filenames aren’t data
Notice that in some examples we can pull out the value of \(\beta\) from the name of the directory in which the file is located. However, ideally, we should avoid relying on this being correct. The name and location are useful for us to find the correct file, but we should try to ensure that the file contents also contain these data, and that we make use of those data in preference to the filename.
Snakemake order of operations
We’re only just getting started with some simple rules, but it’s worth thinking about exactly what Snakemake is doing when you run it. There are three distinct phases:
- Prepares to run:
- Reads in all the rule definitions from the Snakefile
- Plans what to do:
- Sees what file(s) you are asking it to make
- Looks for a matching rule by looking at the
outputs of all the rules it knows - Fills in the wildcards to work out the
inputfor this rule - Checks that this input file is actually available
- Runs the steps:
- Creates the directory for the output file, if needed
- Removes the old output file if it is already there
- Only then, runs the shell command with the placeholders replaced
- Checks that the command ran without errors and made the new output file as expected
For example, if we now ask Snakemake to generate a file named
intermediary_data/wibble_1/pg.count:
OUTPUT
$ snakemake --cores 1 --forceall --printshellcmds intermediary_data/wibble_1/pg.count
Building DAG of jobs...
MissingInputException in line 1 of /home/zenmaster/data/su2pg/workflow/Snakefile:
Missing input files for rule count_trajectories:
    output: intermediary_data/wibble_1/pg.count
    wildcards: subdir=wibble_1
    affected files:
        raw_data/wibble_1/out_pg
Snakemake sees that a file with a name like this could be produced by
the count_trajectories rule. However, when it performs the
wildcard substitution it sees that the input file would need to be named
raw_data/wibble_1/out_pg, and there is no such file
available. Therefore Snakemake stops and gives an error before any shell
commands are run.
Dry-run (--dry-run) mode
It’s often useful to run just the first two phases, so that Snakemake
will plan out the jobs to run, and print them to the screen, but never
actually run them. This is done with the --dry-run flag,
e.g.:
snakemake --dry-run --forceall --printshellcmds intermediary_data/beta1.7/pg.countIf the learner copies down a previous command here, then they might
include a --use-conda. In that case, Snakemake
will build the Conda environments, even though it will not need
to use them.
The amount of checking may seem pedantic right now, but as the workflow gains more steps this will become very useful to us indeed.
- Snakemake rules are made generic with placeholders and wildcards
- Snakemake chooses the appropriate rule by replacing wildcards such the the output matches the target
- Placeholders in the shell part of the rule are replaced with values based on the chosen wildcards
- Snakemake checks for various error conditions and will stop if it sees a problem
Content from Chaining rules
Last updated on 2026-06-29 | Edit this page
Estimated time: 50 minutes
Overview
Questions
- How do I combine rules into a workflow?
- How can I make a rule with multiple input files?
- How should I refer to multiple files with similar names?
Objectives
- Use Snakemake to compute and then plot the average plaquettes of multiple ensembles
- Understand how rules are linked by filename patterns
- Be able to use multiple input files in one rule
A pipeline of multiple rules
We have so far been able to count the number of generated
trajectories, and compute the average plaquette, given an output log
from the configuration generation. However, an individual average
plaquette is not interesting in isolation; what is more interesting is
how it varies between different values of the input parameters. To do
this, we will need to take the output of the avg_plaquette
rule that we defined earlier, and use it as input for another rule.
Let’s define that rule now:
# Take individual data files for average plaquette and plot combined results
rule plot_avg_plaquette:
    input:
        "intermediary_data/beta1.8/pg.plaquette.json.gz",
        "intermediary_data/beta2.0/pg.plaquette.json.gz",
        "intermediary_data/beta2.2/pg.plaquette.json.gz",
    output:
        "assets/plots/plaquette_scan.pdf"
    conda: "envs/analysis.yml"
    shell:
"python src/plot_plaquette.py {input} --output_filename {output}"You can see that here we’re putting “files that want to be included
in a paper” in an assets directory, similarly to the
raw_data and intermediary_data directories we
discussed in a previous episode. It can be useful to further distinguish
plots, tables, and other definitions, by using subdirectories in this
directory.
Rather than one input, as we have seen in rules so far, this rule
requires three. When Snakemake substitutes these into the
{input} placeholder, it will automatically add a space
between them. Let’s test this now:
snakemake --cores 1 --forceall --printshellcmds --use-conda assets/plots/plaquette_scan.pdfLook at the logging messages that Snakemake prints in the terminal. What has happened here?
- Snakemake looks for a rule to make
assets/plots/plaquette_scan.pdf - It determines that the
plot_avg_plaquetterule can do this, if it hasintermediary_data/beta1.8/pg.plaquette.json.gz,intermediary_data/beta2.0/pg.plaquette.json.gz, andintermediary_data/beta2.2/pg.plaquette.json.gz. - Snakemake looks for a rule to make
intermediary_data/beta1.8/pg.plaquette.json.gz - It determines that
avg_plaquettecan make this ifsubdir=beta1.8 - It sees that the input needed is therefore
raw_data/beta1.8/out_pg - Now Snakemake has reached an available input file, it runs the
avg_plaquetterule. - It then looks through the other two \(\beta\) values in turn, repeating the process until it has all of the needed inputs.
- Finally, it runs the
plot_avg_plaquetterule.
Here’s a visual representation of this process:

This, in a nutshell, is how we build workflows in Snakemake.
- Define rules for all the processing steps
- Choose
inputandoutputnaming patterns that allow Snakemake to link the rules - Tell Snakemake to generate the final output files
If you are used to writing regular scripts this takes a little getting used to. Rather than listing steps in order of execution, you are always working backwards from the final desired result. The order of operations is determined by applying the pattern matching rules to the filenames, not by the order of the rules in the Snakefile.
Choosing file name patterns
Chaining rules in Snakemake is a matter of choosing filename patterns that connect the rules. There’s something of an art to it, and most times there are several options that will work, but in all cases the file names you choose will need to be consistent and unambiguous.
Making file lists easier
In the rule above, we plotted the average plaquette for three values
of \(\beta\) by listing the files
expected to contain their values. In fact, we have data for a larger
number of \(\beta\) values, but typing
out each file by hand would be quite cumbersome. We can make use of the
expand() function to do this more neatly:
    input:
        expand(
            "intermediary_data/beta{beta}/pg.plaquette.json.gz",
            beta=[1.5, 1.6, 1.7, 1.8, 1.9, 2.0, 2.1, 2.2, 2.3, 2.4, 2.5],
        ),
The first argument to expand() here is a template for
the filename, and subsequent keyword arguments are lists of variables to
fill into the placeholders. The output is the Cartesian product of all
the parameter lists.
We can check that this works correctly:
snakemake --cores 1 --forceall --printshellcmds --use-conda assets/plots/plaquette_scan.pdfTabulating trajectory counts
The script src/tabulate_counts.py will take a list of
files containing trajectory counts, and output them in a LaTeX table.
Write a rule to generate this table for all values of \(\beta\), and output it to
assets/tables/counts.tex.
The rule should look like:
# Output a LaTeX table of trajectory counts
rule tabulate_counts:
    input:
        expand(
            "intermediary_data/beta{beta}/pg.count",
            beta=[1.5, 1.6, 1.7, 1.8, 1.9, 2.0, 2.1, 2.2, 2.3, 2.4, 2.5],
        )
    output: "assets/tables/counts.tex"
    conda: "envs/analysis.yml"
    shell:
        "python src/tabulate_counts.py {input} > {output}"
To test this, for example:
snakemake --cores 1 --forceall --printshellcmds --use-conda assets/tables/counts.texTabulating trajectory counts (continued)
This setup currently requires reading the value of \(\beta\) from the filename. Why is this not ideal? How would the workflow need to be changed to avoid this?
It’s easy for files to be misnamed when creating or copying them. Putting the wrong data into the file is harder, especially when it’s a raw data file generated by the same program as the rest of the data. (If the wrong value were given as input, this could happen, but the corresponding output data would also be generated at that incorrect value. Provided the values are treated consistently, the downstream analysis could in fact still be valid, just not exactly as intended.)
Currently, grep -c is used to count the number of
trajectories. This would need to be replaced or supplemented with a tool
that read out the value of \(\beta\)
from the input log, and outputs it along with the trajectory count. The
src/tabulate_counts.py script could then be updated to use
this number, rather than the filename.
In fact, the plaquette module does just this; in
addition to the average plaquette, it also records the number of
trajectories generated as part of the metadata and provenance
information it tracks.
- Snakemake links up rules by iteratively looking for rules that make missing inputs
- Careful choice of filenames allows this to work
- Rules may have multiple named input files (and output files)
- Use
expand()to generate lists of filenames from a template
Content from Metadata and parameters
Last updated on 2026-06-30 | Edit this page
Estimated time: 45 minutes
Overview
Questions
- How do I specify and configure parameters my whole workflow relies on?
- How do I set up parameters for individual jobs?
Objectives
- Be able to use the
configobject to accept external configuration - Be able to adjust the
configobject by using YAML files, and override individual options - Know how to format a metadata CSV file
- Be able to read a metadata CSV file and make use of it in a workflow
Global parameters
Thus far, each of our rules has taken one or more input files, and given output files solely based on that. However, in some cases we may want to control options without having them within an input file.
For example, in the previous episode, we wrote a rule to plot a graph
using the script src/plot_plaquette.py. The style of output
we got was good for a paper, but if we were producing a poster, or
putting the plot onto a slide with a dark background, we may wish to use
a different output style. The plot_plaquette.py script
accepts a --styles argument, to tell it what style file to
use to plot. One way to make use of this would be to add
--styles styles/paper.mplstyle directly to the
shell: block. However, if we had many such rules, and
wanted to switch from generating output for a paper to generating it for
a poster, then we would need to change the value in many places.
Instead, we can define a configuration file for our workflow. Create
a new file at config/config.yaml, defining the path to the
style file that we want:
Now, we can specify in our Snakefile to read this file by adding the following line near the top of the file:
configfile: "config/config.yaml"Then, when we use a script to generate a plot, we can update the
shell: block of the corresponding rule similarly to
"python src/plot_plaquette.py {input} --output_filename {output} --plot_styles {config[plot_styles]}"Snakemake will substitute the value it reads from the configuration
file in place of the {config[plot_styles]} placeholder.
(Note that unlike standard Python syntax, we don’t need quotes around
the plot_styles key string.)
Let’s double-check that our workflow still works, running
snakemake --cores 1 --forceall --printshellcmds --use-conda assets/plots/plaquette_scan.pdfNow that we have separated out our configuration from the workflow
itself, we can alter the configuration. For example, we may decide to
test plotting in the style of a different publication. We can test this
by changing jhep to prd, and running
snakemake --cores 1 --forceall --printshellcmds --use-conda assets/plots/plaquette_scan.pdfWe can see that the generated file now uses a different set of fonts.
Before continuing, let’s reset the workflow back to using the
jhep style.
Wilson flow
The tool su2pg_analysis.w0 computes the scale \(w_0\) given a log of the energy density
during evolution of the Wilson flow for an ensemble. To do this, the
reference scale \(\mathcal{W}_0\) needs
to be passed to the --W0 parameter. Use this, and the logs
stored in the files out_wflow for each ensemble’s raw data
directory, to output the \(w_0\) scale
in a file wflow.w0.json.gz for each ensemble, taking the
reference value \(\mathcal{W_0} =
0.2\).
In config.yaml, add:
Then, add the following to the Snakefile:
# Compute w0 scale for single ensemble for fixed reference scale
rule w0:
    input: "raw_data/{subdir}/out_wflow"
    output: "intermediary_data/{subdir}/wflow.w0.json.gz"
    conda: "envs/analysis.yml"
    shell:
        "python -m su2pg_analysis.w0 {input} --W0 {config[W0_reference]} --output_file {output}"
Test this with:
$ snakemake --cores 1 --forceall --printshellcmds --use-conda intermediary_data/beta2.0/wflow.w0.json.gz
$ cat intermediary_data/beta2.0/wflow.w0.json.gz | gunzip | head -n 26
{
 "program": "pyerrors 2.14.0",
 "version": "1.1",
 "who": "ed",
 "date": "2025-10-08 20:28:56 +0100",
 "host": "azusa, Linux-6.8.0-85-generic-x86_64-with-glibc2.39",
 "description": {
  "INFO": "This JSON file contains a python dictionary that has been parsed to a list of structures. OBSDICT contains the dictionary, where Obs or other structures have been replaced by DICTOBS[0-9]+. The field description contains the additional description of this JSON file. This file may be parsed to a dict with the pyerrors routine load_json_dict.",
  "OBSDICT": {
   "plaquette_w0": "DICTOBS0",
   "clover_w0": "DICTOBS1"
  },
  "description": {
   "group_family": "SU",
   "num_colors": 2,
   "nt": 48,
   "nx": 24,
   "ny": 24,
   "nz": 24,
   "beta": 2.0
  }
 },
 "obsdata": [{
   "type": "Obs",
   "layout": "1",
"value": [2.2332066807096895],Generating different filetypes
In addition to different plot styles, we may also wish to generate different filetypes. PDF is useful for including in LaTeX, but SVG may be a better format to use with some tools.
Add a definition to your config.yaml file:
and update the output: block of the
plot_avg_plaquette rule as:
    output:
        multiext("assets/plots/plaquette_scan", config["plot_filetype"]),
Note that unlike in the shell block, we can’t substitute
from config into an output string, so instead
we need to use the multiext helper function to append the
extension. (We could instead have used an f-string,
expand(), or any number of other ways to make this
substitution.)
Changing configurations
Now that we have separated out the data controlling our workflow from the code implementing it, we can individual overwrite parameters, or swap in an entirely different configuration file.
-
We would like to test plotting for a different journal. Re-run the workflow for the plaquette scan, using the
prd.mplstylestyle file, assnakemake --cores 1 --forceall --printshellcmds --use-conda --config plot_styles=styles/prd.mplstyle -- assets/plots/plaquette_scan.pdf(Note that we now need to add an extra
--to tell Snakemake that the list of--configoptions is complete.) We would like to create a plot to include in a poster, in SVG format. Create a new configuration file specifying to use the
poster.mplstylestyle file and the SVG file format, and re-run the workflow using the--configfileoption to specify this new file.
You should now have a file called something like
config/poster.yaml, with content
To test this, run
snakemake --cores 1 --forceall --printshellcmds --use-conda --configfile config/poster.yaml -- assets/plots/plaquette_scan.pdfSimilarly to the previous examples, we need to use the
-- option to tell Snakemake to stop trying to read more
config filenames.
Metadata from a file
We would frequently like our rules to depend on data that are specific to the specific ensembles being analysed. For example, consider the rule:
# Compute pseudoscalar mass and amplitude with fixed plateau
rule ps_mass:
    input: "raw_data/{subdir}/out_corr"
    output: "intermediary_data/{subdir}/corr.ps_mass.json.gz"
    conda: "envs/analysis.yml"
    shell:
        "python -m su2pg_analysis.meson_mass {input} --output_file {output} --plateau_start 18 --plateau_end 23"
This rule hardcodes the positions of the start and end of the plateau region. In most studies, each ensemble and observable may have a different plateau position, so there is no good value to hardcode this to. Instead, we’d like a way of picking the right value from some list of parameters that we specify.
We could do this within the Snakefile, but where possible it is good to avoid mixing data with code. We shouldn’t need to modify our code every time we add or modify the data it is analysing. Instead, we’d like to have a dedicated file containing these parameters, and to be able to have Snakemake read it and pick out the correct values.
To do this, we can exploit the fact that Snakemake is an extension of Python. In particular, Snakemake makes use of the Pandas library for tabular data, which we can use to read in a CSV files.
CSVs aren’t the only way to do this; for more complex data, YAML or even JSON may be a better choice. But CSV is good for most purposes, and easier to get started with. It’s also more readable for non-specialists investigating the workflow, which is valuable in and of itself.
Let’s add the following to the top of the file:
import pandas

metadata = pandas.read_csv("metadata/ensemble_metadata.csv")
The file being read here is a CSV (Comma Separated Values) file. We can create, view, and modify this with the spreadsheet tool of our choice. Let’s take a look at the file now.
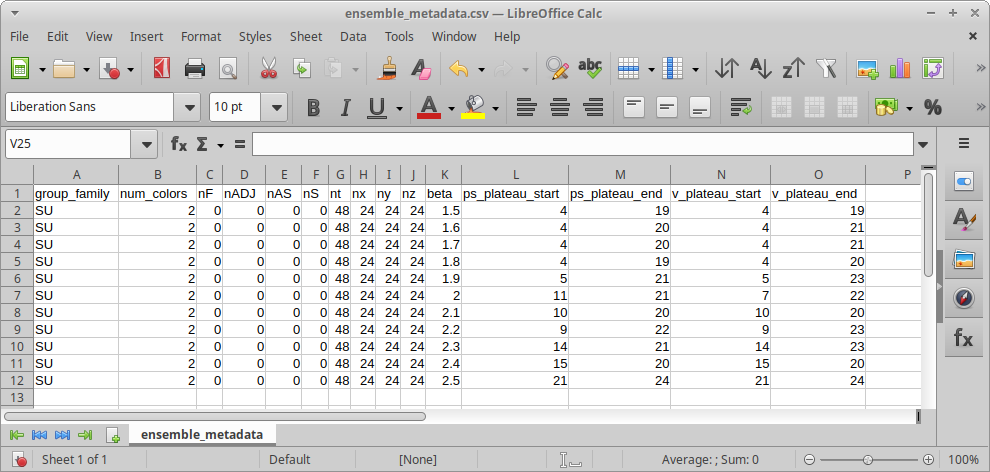
You can see that we have columns defining metadata to identify each ensemble, and columns for parameters relating to the analysis of each ensemble.
Now, how do we tell Snakemake to pull out the correct value from this?
# Compute pseudoscalar mass and amplitude, read plateau from metadata
rule ps_mass:
    input: "raw_data/beta{beta}/out_corr"
    output: "intermediary_data/beta{beta}/corr.ps_mass.json.gz"
    params:
        plateau_start=lookup(within=metadata, query="beta == {beta}", cols="ps_plateau_start"),
        plateau_end=lookup(within=metadata, query="beta == {beta}", cols="ps_plateau_end"),
    conda: "envs/analysis.yml"
    shell:
        "python -m su2pg_analysis.meson_mass {input} --output_file {output} --plateau_start {params.plateau_start} --plateau_end {params.plateau_end}"
We’ve done a couple of things here. Firstly, we’ve made explicit the
reference to \(\beta\) in the file
paths, so that we can use beta as a wildcard, similarly to
in the challenge in the previous episode. Secondly, we’ve introduced a
params: block. This is how we tell Snakemake about
quantities that may vary from run to run, but that are not filenames.
Thirdly, we’ve used the lookup() function to search the
metadata dataframe for the ensemble that we are
considering. Finally, we’ve used {params.plateau_start} and
{params.plateau_end} placeholders to use these parameters
in the shell command that gets run.
Let’s test this now:
$ snakemake --cores 1 --forceall --printshellcmds --use-conda intermediary_data/beta2.0/corr.ps_mass.json.gz
$ cat intermediary_data/beta2.0/corr.ps_mass.json.gz | gunzip | head -n 29
{
 "program": "pyerrors 2.14.0",
 "version": "1.1",
 "who": "ed",
 "date": "2025-10-08 20:41:12 +0100",
 "host": "azusa, Linux-6.8.0-85-generic-x86_64-with-glibc2.39",
 "description": {
  "INFO": "This JSON file contains a python dictionary that has been parsed to a list of structures. OBSDICT contains the dictionary, where Obs or other structures have been replaced by DICTOBS[0-9]+. The field description contains the additional description of this JSON file. This file may be parsed to a dict with the pyerrors routine load_json_dict.",
  "OBSDICT": {
   "mass": "DICTOBS0",
   "amplitude": "DICTOBS1"
  },
  "description": {
   "group_family": "SU",
   "num_colors": 2,
   "representation": "fun",
   "nt": 48,
   "nx": 24,
   "ny": 24,
   "nz": 24,
   "beta": 2.0,
   "mass": 0.0,
   "channel": "ps"
  }
 },
 "obsdata": [{
   "type": "Obs",
   "layout": "1",
"value": [2.1988677698535195],Vector mass
Add a rule to compute the vector meson mass and amplitude, using the
columns beginning v_ in the ensemble metadata file for the
plateau limits.
Hint: su2pg_analysis.meson_mass accepts an argument
--channel, which defaults to ps.
This is very close to the rule for the PS mass.
# Compute vector mass and amplitude, read plateau from metadata
rule v_mass:
    input: "raw_data/beta{beta}/out_corr"
    output: "intermediary_data/beta{beta}/corr.v_mass.json.gz"
    params:
        plateau_start=lookup(within=metadata, query="beta == {beta}", cols="v_plateau_start"),
        plateau_end=lookup(within=metadata, query="beta == {beta}", cols="v_plateau_end"),
    conda: "envs/analysis.yml"
    shell:
        "python -m su2pg_analysis.meson_mass {input} --channel v --output_file {output} --plateau_start {params.plateau_start} --plateau_end {params.plateau_end}"
We can again verify this using
$ snakemake --cores 1 --forceall --printshellcmds --use-conda intermediary_data/beta2.0/corr.ps_mass.json.gz
$ cat intermediary_data/beta2.0/corr.ps_mass.json.gz | gunzip | head -n 29
{
 "program": "pyerrors 2.14.0",
 "version": "1.1",
 "who": "ed",
 "date": "2025-10-08 20:43:06 +0100",
 "host": "azusa, Linux-6.8.0-85-generic-x86_64-with-glibc2.39",
 "description": {
  "INFO": "This JSON file contains a python dictionary that has been parsed to a list of structures. OBSDICT contains the dictionary, where Obs or other structures have been replaced by DICTOBS[0-9]+. The field description contains the additional description of this JSON file. This file may be parsed to a dict with the pyerrors routine load_json_dict.",
  "OBSDICT": {
   "mass": "DICTOBS0",
   "amplitude": "DICTOBS1"
  },
  "description": {
   "group_family": "SU",
   "num_colors": 2,
   "representation": "fun",
   "nt": 48,
   "nx": 24,
   "ny": 24,
   "nz": 24,
   "beta": 2.0,
   "mass": 0.0,
   "channel": "v"
  }
 },
 "obsdata": [{
   "type": "Obs",
   "layout": "1",
   "value": [2.213089845075537],
If it seems awkward to need to define multiple rules that differ only in which channel they look at, this is a good point, and one that we will deal with in the episode on Awkward Corners.
- Use a YAML file to define parameters to the workflow, and attach it
using
configfile:near the top of the file. - Override individual options at run-time with the
--configoption. - Load additional parameter files at run-time using the
--configfileoption. - Use a CSV file loaded into a Pandas dataframe to load ensemble-specific metadata.
- Use
lookup()to get information out of the dataframe in a rule. - Use
params:to define job-specific parameters that do not describe filenames.
Content from Multiple inputs and outputs
Last updated on 2025-10-30 | Edit this page
Estimated time: 35 minutes
Overview
Questions
- How do I write rules that require or use more than one file, or class of file?
- How do I tell Snakemake to not delete log files when jobs fail?
- What do Snakemake errors look like, and how do I read them?
Objectives
- Be able to write rules with multiple named inputs and outputs
- Know how and when to specify
log:within a rule - Be aware that Snakemake errors are common
- Understand how to approach reading Snakemake errors when they occur
Multiple outputs
Quite frequently, we will want a rule to be able to generate more than one file. It’s important we let Snakemake know about this, both so that it can instruct our tools on where to place these files, and so it can verify that they are correctly created by the rule. For example, when fitting a correlation function with a plateau region that we specify, it’s important to look at an effective mass plot to verify that the plateau actually matches what we assert. The rule we just wrote doesn’t do this—it only spits out a numerical answer. Let’s update this rule so that it can also generate the effective mass plot.
# Compute pseudoscalar mass and amplitude, read plateau from metadata,
# and plot effective mass
rule ps_mass:
    input: "raw_data/beta{beta}/out_corr"
    output:
        data="intermediary_data/beta{beta}/corr.ps_mass.json.gz",
        plot=multiext(
            "intermediary_data/beta{beta}/corr.ps_eff_mass",
            config["plot_filetype"],
        ),
    params:
        plateau_start=lookup(within=metadata, query="beta == {beta}", cols="ps_plateau_start"),
        plateau_end=lookup(within=metadata, query="beta == {beta}", cols="ps_plateau_end"),
    conda: "envs/analysis.yml"
    shell:
        "python -m su2pg_analysis.meson_mass {input} --output_file {output.data} --plateau_start {params.plateau_start} --plateau_end {params.plateau_end} --plot_file {output.plot} --plot_styles {config[plot_styles]}"
Rather than having a single string after output:, we now
have a block with two lines. Each line has the format
name=value, and is followed by a comma. To make use of
these variables in our rule, we follow output by a
., and then the name of the variable we want to use,
similarly to what we do for wildcards and
params.
Let’s test that this works correctly:
snakemake --cores 1 --forceall --printshellcmds --use-conda intermediary_data/beta2.0/corr.ps_eff_mass.pdfNon-specificity
What happens if we define multiple named output:
variables like this, but refer to the {output} placeholder
in the shell: block without specifying a variable name?
(One way to find this out is to try echo {output} as the
entire shell: content; this will generate a missing output
error, but will first let you see what the output is.)
Snakemake will provide all of the defined output variables, as a
space-separated list. This is similar to what happens when an output
variable is a list, as we saw earlier when looking at the
expand() function.
Flow plots
Update the Wilson flow \(w_0\) computation that we looked at in a previous challenge to also output the flow of \(\mathcal{W}(t)\), so that the shape of the flow may be checked.
rule w0:
    input: "raw_data/{subdir}/out_wflow"
    output:
        data="intermediary_data/{subdir}/wflow.w0.json.gz",
        plot=multiext(
            "intermediary_data/{subdir}/wflow.W_flow",
            config["plot_filetype"],
	),
    conda: "envs/analysis.yml"
    shell:
        "python -m su2pg_analysis.w0 {input} --W0 {config[W0_reference]} --output_file {output.data} --plot_file {output.plot} --plot_styles {config[plot_styles]}"
Again, we can test this with
snakemake --cores 1 --forceall --printshellcmds --use-conda intermediary_data/beta2.0/wflow.W_flow.pdfMultiple inputs
Similarly to outputs, there are many situations where we want to work
with more than one class of input file—for example, to combine differing
observables into one. For example, the meson_mass rule we
wrote previously also outputs the amplitude of the exponential. When
combined with the average plaquette via one-loop matching, this can be
used to give an estimate of the decay constant. The syntax for this is
the same as we saw above for output:.
# Estimate renormalised decay constant
rule one_loop_matching:
    input:
        plaquette="intermediary_data/{subdir}/pg.plaquette.json.gz",
        meson="intermediary_data/{subdir}/corr.{channel}_mass.json.gz",
    output:
        data="intermediary_data/{subdir}/pg.corr.{channel}_decay_const.json.gz",
    conda: "envs/analysis.yml"
    shell:
        "python -m su2pg_analysis.one_loop_matching --plaquette_data {input.plaquette} --spectral_observable_data {input.meson} --output_filename {output.data}"
To test this:
$ snakemake --cores 1 --forceall --printshellcmds --use-conda intermediary_data/beta2.0/pg.corr.ps_decay_const.json.gz
$ cat intermediary_data/beta2.0/pg.corr.ps_decay_const.json.gz | gunzip | head -n 28
OUTPUT
{
 "program": "pyerrors 2.14.0",
 "version": "1.1",
 "who": "ed",
 "date": "2025-10-08 20:56:18 +0100",
 "host": "azusa, Linux-6.8.0-85-generic-x86_64-with-glibc2.39",
 "description": {
  "INFO": "This JSON file contains a python dictionary that has been parsed to a list of structures. OBSDICT contains the dictionary, where Obs or other structures have been replaced by DICTOBS[0-9]+. The field description contains the additional description of this JSON file. This file may be parsed to a dict with the pyerrors routine load_json_dict.",
  "OBSDICT": {
   "decay_const": "DICTOBS0"
  },
  "description": {
   "group_family": "SU",
   "num_colors": 2,
   "representation": "fun",
   "nt": 48,
   "nx": 24,
   "ny": 24,
   "nz": 24,
   "beta": 2.0,
   "mass": 0.0,
   "channel": "ps"
  }
 },
 "obsdata": [{
   "type": "Obs",
   "layout": "1",
"value": [0.06760436978217312],Naming things
Even when there is only one output: file, we are still
allowed to name it. This makes life easier if we need to add more
outputs later, and can make it a little clearer what our intent is when
we come to read the workflow later.
Spectrum plot
Write a rule that plots the pseudoscalar channel’s decay constant
against its mass, for each ensemble studied. The tool
src/plot_spectrum.py will help with this.
Try making the filename of the tool a parameter too, so that if the script is changed, Snakemake will correctly re-run the workflow.
Hint: first, write a temporary rule to check the output of
python src/plot_spectrum.py --help(Or otherwise, create a Conda environment based on
envs/analysis.yml, and temporarily activate it to run the
command. Remember to deactivate once you’re finished, since otherwise
you will no longer have access to snakemake.)
The help output for plot_spectrum.py is:
OUTPUT
usage: plot_spectrum.py [-h] [--output_filename OUTPUT_FILENAME] [--plot_styles PLOT_STYLES] [--x_observable X_OBSERVABLE]
                        [--y_observable Y_OBSERVABLE] [--zero_x_axis] [--zero_y_axis]
                        datafile [datafile ...]

Plot one state against another for each ensemble

positional arguments:
  datafile              Data files to read and plot

options:
  -h, --help            show this help message and exit
  --output_filename OUTPUT_FILENAME
                        Where to put the plot
  --plot_styles PLOT_STYLES
                        Plot style file to use
  --x_observable X_OBSERVABLE
                        Observables to put on the horizontal axis
  --y_observable Y_OBSERVABLE
                        Observables to put on the vertical axis
  --zero_x_axis         Ensure that zero is present on the vertical axis
  --zero_y_axis         Ensure that zero is present on the vertical axis
Based on this, a possible rule is:
rule spectrum:
    input:
        script="src/plot_spectrum.py",
        ps_mass=expand(
            "intermediary_data/beta{beta}/corr.ps_mass.json.gz",
            beta=[1.5, 1.6, 1.7, 1.8, 1.9, 2.0, 2.1, 2.2, 2.3, 2.4, 2.5],
        ),
        ps_decay_const=expand(
            "intermediary_data/beta{beta}/pg.corr.ps_decay_const.json.gz",
            beta=[1.5, 1.6, 1.7, 1.8, 1.9, 2.0, 2.1, 2.2, 2.3, 2.4, 2.5],
        ),
    output:
        plot=multiext("assets/plots/spectrum", config["plot_filetype"]),
    conda: "envs/analysis.yml"
    shell:
        "python {input.script} {input.ps_mass} {input.ps_decay_const} --y_observable f_ps --zero_y_axis --zero_x_axis --output_file {output.plot} --plot_styles {config[plot_styles]}"
Test this using
snakemake --cores 1 --forceall --printshellcmds --use-conda assets/plots/spectrum.pdfThis plot is referred to from subsequent lessons, so you definitely need to go through it.
Scaled spectrum plot
Write a rule that plots both the pseudoscalar channel’s decay
constant and the vector mass against the pseudoscalar mass, all scaled
by the \(w_0\) scale, for each ensemble
studied having \(\beta \le 1.8\). The
tool src/plot_spectrum.py will help with this.
Hint: compared to the unscaled spectrum plot, you will additionally
need data files for the vector mass and \(w_0\), and will need to pass the
--rescale_w0 option to plot_spectrum.py.
rule spectrum_scaled:
    input:
        script="src/plot_spectrum.py",
        ps_mass=expand(
            "intermediary_data/beta{beta}/corr.ps_mass.json.gz",
            beta=[1.5, 1.6, 1.7, 1.8],
        ),
        v_mass=expand(
            "intermediary_data/beta{beta}/corr.v_mass.json.gz",
            beta=[1.5, 1.6, 1.7, 1.8],
        ),
        ps_decay_const=expand(
            "intermediary_data/beta{beta}/pg.corr.ps_decay_const.json.gz",
            beta=[1.5, 1.6, 1.7, 1.8],
        ),
        w0=expand(
        "intermediary_data/beta{beta}/wflow.w0.json.gz",
            beta=[1.5, 1.6, 1.7, 1.8],
    ),
    output:
        plot=multiext("assets/plots/spectrum_scaled", config["plot_filetype"]),
    conda: "envs/analysis.yml"
    shell:
        "python {input.script} {input.ps_mass} {input.v_mass} {input.ps_decay_const} {input.w0} --y_observable f_ps --y_observable m_v --zero_y_axis --rescale_w0 --output_file {output.plot} --plot_styles {config[plot_styles]}"
Test this using
snakemake --cores 1 --forceall --printshellcmds --use-conda assets/plots/spectrum_scaled.pdfLog files
When a process run by Snakemake exits with an error code, Snakemake removes all the expected output files. Usually this is what we want: we don’t want to have potentially corrupt output, that might be used as input for subsequent rules. However, there are some classes of output file that are useful in helping to identify what caused the error in the first place: log files.
We can tell Snakemake that specified files are log files, rather than
regular output files, by placing them in a log: block
rather than an output: one. Snakemake will not delete a
file marked as a log if an error is raised by the process generating
it.
For example, for the ps_mass rule above, we might
use:
# Compute pseudoscalar mass and amplitude, read plateau from metadata,
# and plot effective mass
rule ps_mass:
    input: "raw_data/beta{beta}/out_corr"
    output:
        data="intermediary_data/beta{beta}/corr.ps_mass.json.gz",
        plot=multiext(
            "intermediary_data/beta{beta}/corr.ps_eff_mass",
            config["plot_filetype"],
        ),
    log:
        messages="intermediary_data/beta{beta}/corr.ps_mass.log",
    params:
        plateau_start=lookup(within=metadata, query="beta == {beta}", cols="ps_plateau_start"),
        plateau_end=lookup(within=metadata, query="beta == {beta}", cols="ps_plateau_end"),
    conda: "envs/analysis.yml"
    shell:
        "python -m su2pg_analysis.meson_mass {input} --output_file {output.data} --plateau_start {params.plateau_start} --plateau_end {params.plateau_end} --plot_file {output.plot} --plot_styles {config[plot_styles]} 2>&1 | tee {log.messages}"
We can again verify this using
snakemake --cores 1 --forceall --printshellcmds --use-conda intermediary_data/beta2.0/corr.ps_mass.json.gz
cat intermediary_data/beta{beta}/corr.ps_mass.log
Since this fit didn’t emit any output on this occasion, the resulting log is empty.
2>&1 | tee
You may recall that | is the pipe operator in the Unix
shell, taking standard output from one program and passing it to
standard input of the next. (If this is unfamiliar, you may wish to look
through the Software Carpentry introduction to the Unix shell
when you have a moment.)
Adding 2>&1 means that both the standard output
and standard error streams are piped, rather than only standard output.
This is useful for a log file, since we will typically want to see
errors there.
The tee command “splits a pipe”; that is, it takes
standard input and outputs it both to standard output and to the
specified filename. This way, we get the log on disk, but also output to
screen as well, so we can monitor issues as the workflow runs.
Logged plots
Adjust the solution for plotting the spectrum above so that any warnings or errors generated by the plotting script are logged to a file.
rule spectrum:
    input:
        script="src/plot_spectrum.py",
        ps_mass=expand(
            "intermediary_data/beta{beta}/corr.ps_mass.json.gz",
            beta=[1.5, 1.6, 1.7, 1.8, 1.9, 2.0, 2.1, 2.2, 2.3, 2.4, 2.5],
        ),
        ps_decay_const=expand(
            "intermediary_data/beta{beta}/pg.corr.ps_decay_const.json.gz",
            beta=[1.5, 1.6, 1.7, 1.8, 1.9, 2.0, 2.1, 2.2, 2.3, 2.4, 2.5],
        ),
    output:
        plot=multiext("assets/plots/spectrum", config["plot_filetype"]),
    log:
        messages="intermediary_data/spectrum_plot.log"
    conda: "envs/analysis.yml"
    shell:
"python {input.script} {input.ps_mass} {input.ps_decay_const} --y_observable f_ps --zero_y_axis --zero_x_axis --output_file {output.plot} --plot_styles {config[plot_styles]} 2>&1 | tee {log.messages}"Logged plots (continued)
We can again verify this using
snakemake --cores 1 --forceall --printshellcmds --use-conda assets/plots/spectrum.pdf
cat intermediary_data/spectrum_plot.log
Dealing with errors
We’ll end the episode by looking at a common problem that can arise
if you mistype a filename in a rule. It may seem silly to break the
workflow when we just got it working, but it will be instructive, so
let’s modify the Snakefile and deliberately specify an incorrect output
filename in the ps_mass rule.
...
shell:
        "python -m su2pg_analysis.meson_mass {input} --output_file {output.data}.json_ --plateau_start {params.plateau_start} --plateau_end {params.plateau_end} --plot_file {output.plot} --plot_styles {config[plot_styles]} 2>&1 | tee {log.messages}"
To keep things tidy, this time we’ll manually remove the intermediary data directory.
And re-run.
$ snakemake --cores 1 --forceall --printshellcmds --use-conda intermediary_data/beta2.0/corr.ps_mass.json.gz
Assuming unrestricted shared filesystem usage.
host: azusa
Building DAG of jobs...
Using shell: /usr/bin/bash
Provided cores: 1 (use --cores to define parallelism)
Rules claiming more threads will be scaled down.
Job stats:
job        count
-------  -------
ps_mass        1
total          1

Select jobs to execute...
Execute 1 jobs...

[Tue Sep  2 00:29:00 2025]
localrule ps_mass:
    input: raw_data/beta2.0/out_corr
    output: intermediary_data/beta2.0/corr.ps_mass.json.gz, intermediary_data/beta2.0/corr.ps_eff_mass.pdf
    log: intermediary_data/beta2.0/corr.ps_mass.log
    jobid: 0
    reason: Forced execution
    wildcards: beta=2.0
    resources: tmpdir=/tmp
Shell command: python -m su2pg_analysis.meson_mass raw_data/beta2.0/out_corr --output_file intermediary_data/beta2.0/corr.ps_mass.json.gz.json_ --plateau_start 11 --plateau_end 21 --plot_file intermediary_data/beta2.0/corr.ps_eff_mass.pdf --plot_styles styles/prd.mplstyle 2>&1 | tee intermediary_data/beta2.0/corr.ps_mass.log
Activating conda environment: .snakemake/conda/7974a14bb2d9244fc9da6963ef6ee6d6_
Waiting at most 5 seconds for missing files:
intermediary_data/beta2.0/corr.ps_mass.json.gz (missing locally)
MissingOutputException in rule ps_mass in file "/home/ed/src/su2pg/workflow/Snakefile", line 68:
Job 0 completed successfully, but some output files are missing. Missing files after 5 seconds. This might be due to filesystem latency. If that is the case, consider to increase the wait time with --latency-wait:
intermediary_data/beta2.0/corr.ps_mass.json.gz (missing locally, parent dir contents: corr.ps_mass.json.gz.json_.json.gz, corr.ps_mass.log, corr.ps_eff_mass.pdf)
Removing output files of failed job ps_mass since they might be corrupted:
intermediary_data/beta2.0/corr.ps_eff_mass.pdf
Shutting down, this might take some time.
Exiting because a job execution failed. Look below for error messages
[Tue Sep  2 00:29:17 2025]
Error in rule ps_mass:
    message: None
    jobid: 0
    input: raw_data/beta2.0/out_corr
    output: intermediary_data/beta2.0/corr.ps_mass.json.gz, intermediary_data/beta2.0/corr.ps_eff_mass.pdf
    log: intermediary_data/beta2.0/corr.ps_mass.log (check log file(s) for error details)
    conda-env: /home/ed/src/su2pg/.snakemake/conda/7974a14bb2d9244fc9da6963ef6ee6d6_
    shell:
        python -m su2pg_analysis.meson_mass raw_data/beta2.0/out_corr --output_file intermediary_data/beta2.0/corr.ps_mass.json.gz.json_ --plateau_start 11 --plateau_end 21 --plot_file intermediary_data/beta2.0/corr.ps_eff_mass.pdf --plot_styles styles/prd.mplstyle 2>&1 | tee intermediary_data/beta2.0/corr.ps_mass.log
        (command exited with non-zero exit code)
Complete log(s): /home/ed/src/su2pg/.snakemake/log/2025-09-02T002859.356054.snakemake.log
WorkflowError:
At least one job did not complete successfully.
There’s a lot to take in here. Some of the messages are very informative. Some less so.
- Snakemake did actually run the tool, as evidenced by the output from the program that we see on the screen.
- Python is reporting that there is a file missing.
- Snakemake complains one expected output file is missing:
intermediary_data/beta2.0/corr.ps_mass.json.gz. - The other expected output file
intermediary_data/beta2.0/corr.ps_eff_mass.pdfwas found but has now been removed by Snakemake. - Snakemake suggests this might be due to “filesystem latency”.
This last point is a red herring. “Filesystem latency” is not an
issue here, and never will be, since we are not using a network
filesystem. We know what the problem is, as we deliberately caused it,
but to diagnose an unexpected error like this we would investigate
further by looking at the intermediary_data/beta2.0
subdirectory.
$ ls intermediary_data/beta2.0/
corr.ps_mass.json.gz.json_.json.gz  corr.ps_mass.log
Remember that Snakemake itself does not create any output files. It
just runs the commands you put in the shell sections, then
checks to see if all the expected output files have appeared.
So if the file names created by your rule are not exactly the same as
in the output: block you will get this error, and you will,
in this case, find that some output files are present but others
(corr.ps_eff_mass.pdf, which was named correctly) have been
cleaned up by Snakemake.
Errors are normal
Don’t be disheartened if you see errors like the one above when first testing your new Snakemake workflows. There is a lot that can go wrong when writing a new workflow, and you’ll normally need several iterations to get things just right. One advantage of the Snakemake approach compared to regular scripts is that Snakemake fails fast when there is a problem, rather than ploughing on and potentially running junk calculations on partial or corrupted data. Another advantage is that when a step fails we can safely resume from where we left off, as we’ll see in the next episode.
Finally, edit the names in the Snakefile back to the correct version and re-run to confirm that all is well.
snakemake --cores 1 --forceall --printshellcmds --use-conda assets/plots/spectrum.pdf- Rules can have multiple inputs and outputs, separated by commas
- Use
name=valueto give names to inputs/outputs - Inputs themselves can be lists
- Use placeholders like
{input.name}to refer to single named inputs - Where there are multiple inputs,
{input}will insert them all, separated by spaces - Use
log:to list log outputs, which will not be removed when jobs fail - Errors are an expected part developing Snakemake workflows, and usually give enough information to track down what is causing them
Content from How Snakemake plans jobs
Last updated on 2025-10-29 | Edit this page
Estimated time: 20 minutes
Overview
Questions
- How do I visualise a Snakemake workflow?
- How does Snakemake avoid unecessary work?
- How do I control what steps will be run?
Objectives
- View the DAG for our pipeline
- Understand the logic Snakemake uses when running and re-running jobs
The DAG
You may have noticed that one of the messages Snakemake always prints is:
OUTPUT
Building DAG of jobs...A DAG is a Directed Acyclic Graph and it can be pictured like so:

The above DAG is based on three of our existing rules, and shows all the jobs Snakemake would run to compute the pseudoscalar decay constant of the \(\beta = 2.0\) ensemble.
Note that:
- A rule can appear more than once, with different wildcards (a rule plus wildcard values defines a job)
- A rule may not be used at all, if it is not required for the target outputs
- The arrows show dependency ordering between jobs
- Snakemake can run the jobs in any order that doesn’t break dependency. For example, one_loop_matching cannot run until both ps_mass and avg_plaquette have completed, but it may run before or after count_trajectories
- This is a work list, not a flowchart, so there are no if/else decisions or loops. Snakemake runs every job in the DAG exactly once
- The DAG depends both on the Snakefile and on the requested target outputs, and the files already present
- When building the DAG, Snakemake does not look at the shell part of the rules at all. Only when running the DAG will Snakemake check that the shell commands are working and producing the expected output files
How many jobs?
If we asked Snakemake to run one_loop_matching on all
eleven ensembles (beta1.5 to beta2.5), how
many jobs would that be in total?
33 in total:
- 11 \(\times\)
one_loop_matching - 11 \(\times\)
ps_mass - 11 \(\times\)
avg_plaquette - 0 \(\times\)
count_trajectories - 0 \(\times\)
spectrum
Snakemake is lazy, and laziness is good
For the last few episodes, we’ve told you to run Snakemake like this:
snakemake --cores 1 --forceall --printshellcmds --use-conda As a reminder, the --cores 1 flag tells Snakemake to run
one job at a time, --printshellcmds is to print out the
shell commands before running them, and --use-conda to
ensure that Snakemake sets up the correct Conda environment.
The --forceall flag turns on forceall mode,
and in normal usage you don’t want this.
At the end of the last chapter, we generated a spectrum plot by running:
snakemake --cores 1 --forceall --printshellcmds --use-conda assets/plots/spectrum.pdfNow try without the --forceall option. Assuming that the
output files are already created, you’ll see this:
$ snakemake --cores 1 --printshellcmds --use-conda assets/plots/spectrum.pdf
Assuming unrestricted shared filesystem usage.
host: azusa
Building DAG of jobs...
Nothing to be done (all requested files are present and up to date).
In normal operation, Snakemake only runs a job if:
- A target file you explicitly requested to make is missing,
- An intermediate file is missing and it is needed in the process of making a target file,
- Snakemake can see an input file which is newer than an output file, or
- A rule definition or configuration has changed since the output file was created.
The last of these relies on a ledger that Snakemake saves into the
.snakemake directory.
Let’s demonstrate each of these in turn, by altering some files and
re-running Snakemake without the --forceall option.
$ rm assets/plots/spectrum.pdf
$ snakemake --cores 1 --printshellcmds --use-conda assets/plots/spectrum.pdf
...
Job stats:
job         count
--------  -------
spectrum        1
total           1
...
This just re-runs spectrum, the final step.
$ rm intermediary_data/beta*/corr.ps_mass.json.gz
$ snakemake --cores 1 --printshellcmds --use-conda assets/plots/spectrum.pdf
...
Nothing to be done (all requested files are present and up to date).
“Nothing to be done”. Some intermediate output is missing, but Snakemake already has the file you are telling it to make, so it doesn’t worry.
$ touch raw_data/beta*/out_pg
$ snakemake --cores 1 --printshellcmds --use-conda assets/plots/spectrum.pdf
...
job                  count
-----------------  -------
avg_plaquette           11
one_loop_matching       11
ps_mass                 11
spectrum                 1
...
total                   34
The touch command is a standard Unix command that resets
the timestamp of the file, so now the correlators look to Snakemake as
if they were just modified.
Snakemake sees that some of the input files used in the process of
producing assets/plots/spectrum.pdf are newer than the
existing output file, so it needs to run the avg_plaquette
and one_loop_matching steps again. Of course, the
one_loop_matching step needs the pseudoscalar mass data
that we deleted earlier, so now the correlation function fitting step is
re-run also.
Explicitly telling Snakemake what to re-run
The default timestamp-based logic is really useful when you want to:
- Change or add some inputs to an existing analysis without re-processing everything
- Continue running a workflow that failed part-way
In most cases you can also rely on Snakemake to detect when you have edited a rule, but sometimes you need to be explicit, for example if you have updated an external script or changed a setting that Snakemake doesn’t see.
The --forcerun flag allows you to explicitly tell
Snakemake that a rule has changed and that all outputs from that rule
need to be re-evaluated.
snakemake --forcerun spectrum --cores 1 --printshellcmds --use-conda assets/plots/spectrum.pdfNote on --forcerun
Due to a quirk of the way Snakemake parses command-line options, you
need to make sure there are options after the
--forcerun ..., before the list of target outputs. If you
don’t do this, Snakemake will think that the target files are instead
items to add to the --forcerun list, and then when building
the DAG it will just try to run the default rule.
The easiest way is to put the --cores flag before the
target outputs. Then you can list multiple rules to re-run, and also
multiple targets, and Snakemake can tell which is which.
BASH
snakemake --forcerun avg_plaquette ps_mass --cores 1 --printshellcmds --use-conda intermediary_data/beta2.0/pg.corr.ps_decay_const.json.gz intermediary_data/beta2.5/pg.corr.ps_decay_const.json.gzThe reason for using the --cores flag specifically is
that you pretty much always want this option.
The --force flag specifies that the target outputs named
on the command line should always be regenerated, so you can use this to
explicitly re-make specific files.
This always re-runs spectrum, regardless of whether the
output file is there already. For all intermediate outputs, Snakemake
applies the default timestamp-based logic. Contrast with
--forceall, which runs the entire DAG every time.
Visualising the DAG
Snakemake can draw a picture of the DAG for you, if you run it like this:
snakemake --force --dag dot assets/plots/spectrum.pdf | gm display -Using the --dag option implicitly activates the
--dry-run option so that Snakemake will not actually run
any jobs, it will just print the DAG and stop. Snakemake prints the DAG
in a text format, so we use the gm command to make this
into a picture and show it on the screen.
Older versions of Snakemake only support outputting the DAG in
dot format, so that argument is not needed there.
Note on gm display
The gm command is provided by the GraphicsMagick toolkit. On
systems where gm will not display an image directly, you
can instead save it to a PNG file. You will need the dot
program from the GraphViz package
installed.
snakemake --force --dag dot assets/plots/spectrum.pdf | dot -Tpng > dag.png
The boxes drawn with dotted lines indicate steps that are not to be run, as the output files are already present and newer than the input files.
Visualising the effect of the
--forcerun and --force flags
Run one_loop_matching on the beta2.0
ensemble, and then use the --dag option as shown above to
check:
How many jobs will run if you ask again to create this output with no
--force,--forcerunor-forcealloptions?How many if you use the
--forceoption?How many if you use the
--forcerun ps_massoption?How many if you edit the metadata file so that the
ps_plateau_startfor the \(\beta=2.0\) ensemble is13, rather than11?
This is a way to make the result in the first place:
BASH
$ snakemake --cores 1 --printshellcmds --use-conda intermediary_data/beta2.0/pg.corr.ps_decay_const.json.gz- This command should show three boxes, but all are dotted so no jobs are actually to be run.
The
--forceflag re-runs only the job to create the output file, so in this case one box is solid, and only that job will run.-
With
--forcerun ps_mass, theps_massjob will re-run, and Snakemake sees that this also requires re-runningone_loop_matching, so the answer is 2.If you see a message like the one below, it’s because you need to put an option after
ps_massor else Snakemake gets confused about what are parameters of--forcerun, and what things are targets.ERROR
WorkflowError:
Target rules may not contain wildcards.
Editing the Snakefile has the same effect as forcing the
ps_massrule to re-run, so again there will be two jobs to be run from the DAG.
With older versions of Snakemake this would not be auto-detected, and
in fact you can see this behaviour if you remove the hidden
.snakemake directory. Now Snakemake has no memory of the
rule change so it will not re-run any jobs unless explicitly told
to.
Removing files to trigger reprocessing
In general, getting Snakemake to re-run things by removing files is a
bad idea, because it’s easy to forget about intermediate files that
actually contain stale results and need to be updated. Using the
--forceall flag is simpler and more reliable. If in doubt,
and if it will not be too time consuming, keep it simple and just use
--forceall to run the whole workflow from scratch.
For the opposite case where you want to avoid re-running particular
steps, see the --touch option of Snakemake mentioned later in the lesson.
- A job in Snakemake is a rule plus wildcard values (determined by working back from the requested output)
- Snakemake plans its work by arranging all the jobs into a DAG (directed acyclic graph)
- If output files already exist, Snakemake can skip parts of the DAG
- Snakemake compares file timestamps and a log of previous runs to determine what need regenerating
Content from Optimising workflow performance
Last updated on 2026-06-18 | Edit this page
Estimated time: 25 minutes
Overview
Questions
- What compute resources are available on my system?
- How do I define jobs with more than one thread?
- How do I measure the compute resources being used by a workflow?
- How do I run my workflow steps in parallel?
Objectives
- Understand CPU, RAM and I/O bottlenecks
- Understand the
threadsdeclaration - Use common Unix tools to look at resource usage
Processes, threads and processors
Some definitions:
- Process: A running program (in our case, each Snakemake job can be considered one process)
- Threads: Each process has one or more threads which run in parallel
- Processor: Your computer has multiple CPU cores or processors, each of which can run one thread at a time
These definitions are a little simplified, but fine for our needs. The operating system kernel shares out threads among processors:
- Having fewer threads than processors means you are not fully using all your CPU cores
- Having more threads than processors means threads have to “timeslice” on a core which is generally suboptimal
If you tell Snakemake how many threads each rule will use, and how many cores you have available, it will start jobs in parallel to use all your cores. In the diagram below, five jobs are ready to run and there are four system cores.

Listing the resources of your machine
So, to know how many threads to make available to Snakemake, we need
to know how many CPU cores we have on our machine. On Linux, we can find
out how many cores you have on a machine with the lscpu
command.
$ lscpu
Architecture:             aarch64
  CPU op-mode(s):         32-bit, 64-bit
  Byte Order:             Little Endian
CPU(s):                   4
  On-line CPU(s) list:    0-3
Vendor ID:                ARM
  Model name:             Cortex-A72
    Model:                3
    Thread(s) per core:   1
There we can see that we have four CPU cores, each of which can run a single thread.
On macOS meanwhile, we use the command
sysctl -n hw.ncpu:
$ sysctl hw.ncpu
hw.ncpu: 8
In this case, we see that this Mac has eight cores.
Likewise find out the amount of RAM available:
BASH
$ free -h
               total        used        free      shared  buff/cache   available
Mem:           3.7Gi       1.1Gi       110Mi        97Mi       2.6Gi       2.6Gi
Swap:          199Mi       199Mi        60Ki
In this case, the machine has 3.7GiB of total RAM.
On macOS, the command is sysctl -h hw.memsize:
$ sysctl -h hw.memsize
hw.memsize: 34,359,738,368
This machine has around 34GB of RAM in total. Dividing by the number of bytes in 1GiB (\(1024^3\) bytes), that becomes 32GiB RAM.
We don’t want to use all of this RAM, but if we don’t mind other applications being unresponsive while our workflow runs, we can use the majority of it.
Finally, to check the available disk space, on the current partition:
(or df -h without the . to show all
partitions) This is the same on both macOS and Linux.
Parallel jobs in Snakemake
You may want to see the relevant part of the Snakemake documentation.
We’ll force all the intermediary steps to re-run by using the
--forceall flag to Snakemake and time the whole run using
the time command.
BASH
$ time snakemake --cores 1 --use-conda --forceall -- assets/plots/spectrum.pdf
real	3m10.713s
user	1m30.181s
sys 0m8.156sMeasuring how concurrency affects execution time
What is the wallclock time reported by the above command? We’ll work out the average for everyone present, or if you are working through the material on your own, repeat the measurement three times to get your own average.
Now change the Snakemake concurrency option to --cores 2
and then --cores 4. Finally, try using every available core
on your machine, using --cores all.
- How does the total execution time change?
- What factors do you think limit the power of this setting to reduce the execution time?
The time will vary depending on the system configuration but
somewhere around 150–200 seconds is expected, and this should reduce to
around 75–100 secs with --cores 2 but depending on your
computer, higher --cores might produce diminishing
returns.
Things that may limit the effectiveness of parallel execution include:
- The number of processors in the machine
- The number of jobs in the DAG which are independent and can therefore be run in parallel
- The existence of single long-running jobs
- The amount of RAM in the machine
- The speed at which data can be read from and written to disk
There are a few gotchas to bear in mind when using parallel execution:
- Parallel jobs will use more RAM. If you run out then either your OS will swap data to disk, or a process will crash.
- Parallel jobs may trip over each other if they try to write to the same filename at the same time (this can happen with temporary files).
- The on-screen output from parallel jobs will be jumbled, so save any output to log files instead.
Multi-thread rules in Snakemake
In the diagram at the top, we showed jobs with 2 and 8 threads. These
are defined by adding a threads: block to the rule
definition. We could do this for the ps_mass rule:
# Compute pseudoscalar mass and amplitude, read plateau from metadata,
# and plot effective mass
rule ps_mass:
    input: "raw_data/beta{beta}/out_corr"
    output:
        data="intermediary_data/beta{beta}/corr.ps_mass.json.gz",
        plot=multiext(
            "intermediary_data/beta{beta}/corr.ps_eff_mass",
            config["plot_filetype"],
        ),
    log:
        messages="intermediary_data/beta{beta}/corr.ps_mass.log",
    params:
        plateau_start=lookup(within=metadata, query="beta == {beta}", cols="ps_plateau_start"),
        plateau_end=lookup(within=metadata, query="beta == {beta}", cols="ps_plateau_end"),
    conda: "envs/analysis.yml"
    threads: 4
    shell:
        "python -m su2pg_analysis.meson_mass {input} --output_file {output.data} --plateau_start {params.plateau_start} --plateau_end {params.plateau_end} --plot_file {output.plot} --plot_styles {config[plot_styles]} 2>&1 | tee {log.messages}"
You should explicitly use threads: 4 rather than
params: threads = "4" because Snakemake considers the
number of threads when scheduling jobs. Also, if the number of threads
requested for a rule is less than the number of available processors
then Snakemake will use the lower number.
Snakemake uses the threads variable to set common
environment variables like OMP_NUM_THREADS. If you need to
pass the number explicitly to your program, you can use the
{threads} placeholder to get it.
Fine-grained profiling
Rather than timing the entire workflow, we can ask Snakemake to benchmark an individual rule.
For example, to benchmark the ps_mass step we could add
this to the rule definition:
rule ps_mass:
    benchmark:
        "benchmarks/ps_mass.beta{beta}.txt"
    ...
The dataset here is so small that the numbers are tiny, but for real data this can be very useful as it shows time, memory usage and IO load for all jobs.
- To make your workflow run as fast as possible, try to match the number of threads to the number of cores you have
- You also need to consider RAM, disk, and network bottlenecks
- Profile your jobs to see what is taking most resources
- Use
--cores allto enable using all CPU cores
Content from Running jobs on a cluster
Last updated on 2026-07-01 | Edit this page
Estimated time: 30 minutes
Overview
Questions
- How do I run Snakemake inside a HPC job?
- How do I have Snakemake run individual rules as HPC jobs?
- When should I do each of these?
Objectives
- Be able to run Snakemake within a single cluster job
- Be able to have Snakemake co-ordinate multiple cluster jobs
- Understand when each method is appropriate
So far, the workflow that we’ve been writing runs in a relatively short amount of time on our personal computer. But what happens if the amount of data we need to work with, or the amount of processing we need to do on those data, scales beyond what our computer can cope with? As with any other problem, at this point we must start looking at running on larger resources, such as high-performance or cloud computing.
Learning about using HPC is beyond the scope of this course, and depends strongly on the specific system you will be using, so this section assumes you already have access to a cluster and a basic understanding of how to use it. If this doesn’t describe you, feel free to skip to the next section!
Every cluster is different
In the following we will show the steps that are most commonly necessary to get working, but the exact implementation will depend on the setup of the specific machine that you’re using. If you have trouble, your local high-performance computing support team should be able to help fill in the gaps.
We will assume a cluster using Slurm as its scheduler, since that is currently the most commonly-deployed option; other schedulers will have different syntax but similar underlying principles.
Running Snakemake in a single batch job
Like any other computational tool, Snakemake can be run from inside a batch job on a cluster. Since compute nodes are generally more powerful than your personal workstation, and can be left running a job for a day or two without needing to worry about preventing the machine from going to sleep, this can be a lot more convenient for moderately intensive workflows.
Let’s open a new terminal, and use it to connect to the cluster we’ll be working on
ssh my-clusterTo begin with, unless your administrators have already installed it, we need to create an environment in which to install Snakemake. This might require steps something like:
module load conda
conda create -n snakemake -c conda-forge -c bioconda snakemake
conda activate snakemake
We then need to get our workflow and data onto the machine. For your
own work, you will most likely download the workflow using
git clone. The data may already be on the machine, or you
may need to download it from another machine, or upload it, using
scp or rsync.
For the workflow we’re developing today, it is sufficient to re-use the ZIP file we used at the start of the lesson, and then copy across our changes to the workflow.
To start with, we need to choose a directory to work in. This should
be on a filesystem accessible to the nodes, and that uses high-speed
storage, since the workflow will read and write a lot of files here. On
some systems this may be called /scratch or
/work. Let’s say that we are on a system where we have a
/scratch/my.username directory.
On the cluster, we then run
cd /scratch/my.username
unzip /scratch/shared/su2pg_starter.zipGetting everyone to download and extract the data is time-consuming; it may be better to provide the download in a shared directory accessible to all users.
Here, /scratch/shared/su2pg_starter.zip should be the
path to the ZIP file we downloaded at the start, which your instructor
may have downloaded to a convenient shared location to save everyone
downloading the same file. If not, you can download it using
# Only run this
# if your instructor hasn't made the ZIP file available in a shared directory
curl -o su2pg_starter.zip https://zenodo.org/records/17476887/files/su2pg_starter.zip?download=1
unzip su2pg_starter.zip
Back in the terminal running on our local machine, we can then run
scp -r workflow/ metadata/ config/ my-cluster:/scratch/my.username/su2pg/Replace my-cluster and /scratch/my.username
with the cluster and directory you’ve used above. This updates the
workflow with all the changes we’ve made so far in this lesson.
Network connections
Many clusters do not let their compute nodes connect to the Internet.
Because of this, if you run snakemake with the
--use-conda option in a job script, and the Conda
environments are not already initialised on the disk, then the run will
fail, as Conda won’t be able to create the environments (since that
would require downloading the packages from the Internet).
To work around this, we can ask Snakemake to create the environments and download the packages from the login node, before we submit the main job to run the workflow.
snakemake --conda-create-envs-onlyWe can now prepare a job script to tell the scheduler to run our job.
The exact set of variables you need will vary from system to system, but
the approximate content will be along the lines of the following, which
we can put into a file submit.sh:
BASH
#!/bin/bash
#SBATCH --job-name su2pg
#SBATCH --time 0:10:00
#SBATCH --nodes 1
#SBATCH --exclusive
#SBATCH --output snakemake.%j.out

module load conda
conda activate snakemake

snakemake --cores all --use-conda assets/plots/spectrum.pdf assets/plots/plaquette_scan.pdfHere, we use --nodes 1 and --exclusive to
request an entire compute node, which Snakemake can then use as much of
as it needs. If you know that your workflow has a small number of very
slow, single-core processes (for example, five), then you could replace
--exclusive with --ntasks 1 --cpus-per-task 5,
so that you don’t occupy an entire node when your workflow will only use
a fraction of it. The --time option you will want to modify
to match the expected run time of your workflow; it’s better to
overestimate here, since the scheduler will stop your job if it
overruns.
Once that is prepared, we can submit it:
sbatch submit.shOnce there is capacity, Slurm will start the job, and you should
quickly see output appearing, both in the log file
snakemake.[job identifier].out, and in the files the
workflow creates.
We can check the status of the job with squeue; once it
finishes (either appears in the CG state, or disappears
from the list entirely), then the job has completed and we may check the
output.
tail snakemake.*.out*It’s important that we verify that the workflow completed successfully, otherwise we might only find out down the line that particular outputs are missing, and lose time needing to regenerate them. Once we’ve done that, we can copy the results back to our local machine to publish:
rsync -r my-cluster:/scratch/my.username/su2pg/assets .Managing multiple jobs with Snakemake
We’ve now seen how we can run a Snakemake workflow within a single cluster job, making use of one (or part of one) compute node. What if our workflow is too demanding to be run this way? For example, if it has many steps each of which require an entire node, and take many hours to complete?
For these workflows, we can use an executor plugin to allow Snakemake to submit jobs directly to the queue.
The initial setup is the same as above:
- Create a Conda (or similar) environment, install Snakemake in it, and activate it;
- Download the workflow and data;
- Optionally, pre-download the Conda environments needed for the workflow.
With this done, we must now install the executor plugin. For Slurm, we can do this via:
pip install snakemake-executor-plugin-slurmWe can now set up a profile, to tell Snakemake and the
executor plugin the parameters they need to successfully run and manage
jobs. On some systems, the administration team may have already set up a
global file; located in a subdirectory of
/etc/xdg/snakemake; otherwise, you’ll need to create one
yourself, in a subdirectory of ~/.config/snakemake.
This can include any of the options set at the Snakemake command line, but there are some that it is a good idea to set in the config file rather than needing to specify every time.
Let’s create such a file now:
mkdir -p ~/.config/snakemake/my-cluster
nano ~/.config/snakemake/my-cluster/profile.yaml
YAML
executor: slurm
jobs: 30
cores: 1080
software-deployment-method: conda
default-resources:
  mem_mb: 4096
  slurm_account: my-project
Looking through these in turn:
-
executor: slurm: Use the Slurm executor plugin. If this plugin isn’t installed and visible to Snakemake, then Snakemake will exit with an error. -
jobs: 30: Queue at most thirty jobs at once. In many cases it’s not useful to queue far more jobs than the system will allow to run at once, particularly if they will need to be cancelled if the workflow fails. -
cores: 1080: Queue jobs using at most 1080 CPU cores concurrently, for the same reason as the previous limit. -
software-deployment-method: conda: This is an alternative way of expressing the--use-condaoption; i.e. Snakemake should use the specified Conda environments. -
default-resources: Unless a rule specifies specific resource requirements, then the ones below will apply. -
mem_mb: 4096: Since our jobs will typically share nodes, it’s important to let Slurm know how much memory each will require; otherwise, it may underpopulate nodes to allow each job far more memory than it actually requires. -
slurm_account: my-project: Most clusters have a mechanism to specify which “project” or “account” a job is associated with. On many clusters, you must specify this in the job script, particularly if you are a member of multiple projects. Specifying it here allows Snakemake to pass this through to the scheduler when it submits jobs.
Once this is working, you can share the profile with other users on the cluster, so discuss this with your cluster administrator.
With a profile in place, we can now run the workflow from the login node:
snakemake --profile my-clusterSnakemake will build the DAG on the login node, and then submit a job
to the scheduler for each job in the workflow. You may want to open a
second terminal to keep an eye on the progress of these jobs in
squeue.
If your cluster does not use Slurm, the full range of executor plugins for Snakemake and instructions for configuring them, can be found at the Snakemake plugin catalog.
Running (and not running) on login nodes
In general, one should not run computationally-intensive workloads on
the login node of a cluster. In principle, the controlling
snakemake process should not be computationally intensive,
since the real work is being done in the jobs it submits; however, some
HPC centres and administrators do no appreciate long-running process of
any kind on their login nodes.
Running on the login node also creates problems if your network connection drops, or your computer goes to sleep.
An alternative approach is to run the primary snakemake
process in a batch job, allocated minimal resources (a single CPU core
and a small amount of memory), that then in turn submits further jobs
for actual work. This relies on the machine being configured to allow
job submission from compute nodes, which is not always allowed.
Something that this also allows is specifying that some rules should not
bother submitting a Slurm job. To do this, add
localrule: True to the rule definition; this marks that the
rule should run in the main snakemake process.
If you are going to be running large Snakemake workflows on a cluster, it’s best to speak to the centre administrator in advance to understand how they would prefer that you do so without inconveniencing other users of the machine.
Running workflows on HPC or Cloud systems could be a whole course in itself. The topic is too important not to be mentioned here, but also complex to teach because you need a cluster to work on.
If you are teaching this lesson and have institutional HPC then ideally you should liaise with the administrators of the system to make a suitable installation of a recent Snakemake version and a profile to run jobs on the cluster job scheduler. In practise this may be easier said than done!
If you are able to demonstrate Snakemake running on cloud as part of a workshop then we’d much appreciate any feedback on how you did this and how it went.
Content from Awkward corners
Last updated on 2025-10-29 | Edit this page
Estimated time: 55 minutes
Overview
Questions
- How can I look up metadata based on wildcard values?
- How can I select different numbers of input files depending on wildcard values?
- How can I tell Snakemake not to regenerate a file?
Objectives
- Understand how Snakemake being built on Python allows us to work around some shortcomings of Snakemake in some use cases.
- Understand how to handle trickier metadata and input file lookups.
- Be able to avoid Snakemake re-running a rule when this is not wanted.
Beyond the pseudoscalar: Input functions
Recall the rule that we have been working on to fit the correlation function of the pseudoscalar meson:
# Compute pseudoscalar mass and amplitude, read plateau from metadata,
# and plot effective mass
rule ps_mass:
    input: "raw_data/beta{beta}/out_corr"
    output:
        data="intermediary_data/beta{beta}/corr.ps_mass.json.gz",
        plot=multiext(
            "intermediary_data/beta{beta}/corr.ps_eff_mass",
            config["plot_filetype"],
        ),
    log:
        messages="intermediary_data/beta{beta}/corr.ps_mass.log",
    params:
        plateau_start=lookup(within=metadata, query="beta == {beta}", cols="ps_plateau_start"),
        plateau_end=lookup(within=metadata, query="beta == {beta}", cols="ps_plateau_end"),
    conda: "envs/analysis.yml"
    shell:
        "python -m su2pg_analysis.meson_mass {input} --output_file {output.data} --plateau_start {params.plateau_start} --plateau_end {params.plateau_end} --plot_file {output.plot} --plot_styles {config[plot_styles]} 2>&1 | tee {log.messages}"
Now, we are frequently interested in more symmetry channels than just
the pseudoscalar. In principle, we could make a copy of this rule, and
change ps to, for example v or
av. (We did this in an earlier challenge for the vector
channel.) However, just like adding more ensembles, this rapidly makes
our Snakefiles unwieldy and difficult to maintain. How can we adjust
this rule so that it works for any channel?
The first step is to replace ps with a wildcard. The
output should then use
corr.{channel}_mass.json rather than
corr.ps_mass.json, and similarly for the log. We will also
need to pass an argument --channel {wildcards.channel} in
the shell block, so that the code knows what channel it is
working with. Since the rule is no longer only for the ps
channel, it should be renamed, for example to
meson_mass.
What about the plateau start and end positions? Currently these are
found using a call to lookup, with the column hardcoded to
"ps_plateau_start" or "ps_plateau_start". We
can’t substitute a wildcard in here, so instead we need to make use of
an input function.
When Snakemake is given a Python function as a param,
input, or output, then it will call this
function, passing in the parsed wildcards, and use the result of the
function call as the value. For example, I could define a function:
and then make use of this within a rule as:
rule test_mass:
    params:
        mass=get_mass,
    ...
This would then set the parameter params.mass to
1.0.
How can we make use of this for getting the plateau metadata?
PYTHON
def plateau_param(position):
    """
    Return a function that can be used to get a plateau position from the metadata.
    `position` should be `start` or `end`.
    """
    def get_plateau(wildcards):
        return lookup(
            within=metadata,
            query="beta == {beta}",
            cols=f"{wildcards['channel']}_plateau_{position}",
        )

    return get_plateau
Working inside out, you will recognise the lookup call
from before, but the cols argument is now changed: we make
use of Python’s f-strings
to insert both the channel and the position (start or
end). We wrap this into a function called
get_plateau, which only takes the wildcards as
an argument. The position is defined in the outer function,
which creates and returns the correct version of
get_plateau depending on which position is
specified. We need to do this because Snakemake doesn’t give a direct
way to specify additional arguments to the input function.
To use this function within the rule, we can use
plateau_start=plateau_param("start") in the
params block for the plateau start position, and similarly
for the end.
Here we choose to use a closure (a function returned by
another function, where the former’s behaviour depends on the arguments
to the latter), so that the same code can be used for both the start and
the end of the plateau. There are other ways to phrase this: you could
define a free function get_plateau(wildcards, position),
and then in the rule definition, use
functools.partial(get_plateau, position=...) to set the
position, or use a lambda
lambda wildcards: get_plateau(wildcards, ...). We choose
the closure here because defining functions should already be familiar
to most learners, and passing functions as values needs to be learned
anyway (since we have to pass one to Snakemake), whereas lambdas and
functools may not be familiar, and aren’t needed elsewhere
in the lesson.
With these changes, the full rule now becomes:
# Compute meson mass and amplitude, read plateau from metadata,
# and plot effective mass
rule meson_mass:
    input: "raw_data/beta{beta}/out_corr"
    output:
        data="intermediary_data/beta{beta}/corr.{channel}_mass.json.gz",
        plot=multiext(
            "intermediary_data/beta{beta}/corr.{channel}_eff_mass",
            config["plot_filetype"],
        ),
    log:
        messages="intermediary_data/beta{beta}/corr.{channel}_mass.log",
    params:
        plateau_start=plateau_param("start"),
        plateau_end=plateau_param("end"),
    conda: "envs/analysis.yml"
    shell:
        "python -m su2pg_analysis.meson_mass {input} --channel {wildcards.channel} --output_file {output.data} --plateau_start {params.plateau_start} --plateau_end {params.plateau_end} --plot_file {output.plot} --plot_styles {config[plot_styles]} 2>&1 | tee {log.messages}"
We can test this for the vector mass:
snakemake --use-conda --cores all --printshellcmds intermediary_data/beta2.0/corr.v_mass.json.gzIf learners skipped over the previous section, note that we’ve
changed the standard snakemake call we were previously
using: now, we don’t use --forceall, so we only regenerate
when necessary (which makes the run quicker). --cores all,
meanwhile, tells Snakemake to use all available CPU cores. In this case
it doesn’t make a difference, since only one job is needed by this run,
but it’s a useful default invocation for production use.
Restricted spectrum
Define a rule restricted_spectrum that generates a plot
of the pseudoscalar decay constant against its mass (both in lattice
units), that only plots data where \(\beta\) is below a specified value
beta0, which is included in the filename.
Use this to test plotting the spectrum for \(\beta < 2.0\).
Hint: Similarly to the above, you may want to define a function that
defines a function, where the former takes the relevant fixed part of
the filename (corr.ps_mass or
pg.corr.ps_decay_const) as input, and the latter the
wildcards.
We can constrain the data plotted by constraining the input data.
Similarly to for the example above, we can use an input function for
this, but this time for the input data rather than to
define params.
def spectrum_param(slug):
    def spectrum_inputs(wildcards):
        return [
            f"intermediary_data/beta{beta}/{slug}.json.gz"
            for beta in metadata[metadata["beta"] < float(wildcards["beta0"])]["beta"]
        ]

    return spectrum_inputs


rule restricted_spectrum:
    input:
        script="src/plot_spectrum.py",
        ps_mass=spectrum_param("corr.ps_mass"),
        ps_decay_const=spectrum_param("pg.corr.ps_decay_const"),
    output:
        plot=multiext("assets/plots/spectrum_beta{beta0}", config["plot_filetype"]),
    conda: "envs/analysis.yml"
    shell:
        "python {input.script} {input.ps_mass} {input.ps_decay_const} --y_observable f_ps --zero_y_axis --zero_x_axis --output_file {output.plot} --plot_styles {config[plot_styles]}"
To generate the requested plot would then be:
snakemake --use-conda --cores all --printshellcmds assets/plots/spectrum_beta2.0.pdfGlobbing
So far, our workflow has been entirely deterministic in what inputs
to use. We have referred to parts of filenames that are substituted in
based on the requested outputs as “wildcards”. You might be familiar
with another meaning of the word “wildcard”, however: the *
and ? characters that you can use in the shell to match
any number of and one or more characters
respectively.
In general we would prefer to avoid using these in our workflows, since we would like them to be reproducible. If a particular input file is missing, we would like to be told about it, rather than the workflow silently producing different results. (This also makes the failure cases easier to debug, since otherwise we can hit cases where we call our tools with an unexpected number of inputs, and they fail with strange errors.)
However, occasionally we do find ourselves needing to perform
shell-style wildcard matches, also known as globbing. For
example, let’s say that we would like to be able to plot only the data
that we have already computed, without regenerating anything. We can
perform a wildcard glob using Python’s glob
function.
At the top of the file, add:
from glob import globThen we can add a rule:
rule quick_spectrum:
    input:
        script="src/plot_spectrum.py",
        ps_mass=glob(
            "intermediary_data/beta*/corr.ps_mass.json.gz",
        ),
        ps_decay_const=glob(
            "intermediary_data/beta*/pg.corr.ps_decay_const.json.gz",
        ),
    output:
        plot=multiext("intermediary_data/check_spectrum", config["plot_filetype"]),
    conda: "envs/analysis.yml"
    shell:
        "python {input.script} {input.ps_mass} {input.ps_decay_const} --y_observable f_ps --zero_y_axis --zero_x_axis --output_file {output.plot} --plot_styles {config[plot_styles]}"
Let’s test this now
snakemake --use-conda --cores all --printshellcmds intermediary_data/check_spectrum.pdfIf you have recently purged the workflow output, then this might raise an error as there are no data to plot. Otherwise, opening this resulting file in your PDF viewer, you’ll most likely see a plot with a reduced number of points compared to previous plots. If you’re lucky, then all the points will be present.
Use with care in production!
This rule will only include data already present at the start of the workflow run in your plots. This means if you start from clean, as people looking to reproduce your work will, then it will fail, and even if you start from a partial run, then some points will (non-deterministically) be omitted from your plots.
For final plots based on intermediary data, always specify the
input explicitly.
Marking files as up to date
One of the useful aspects of Snakemake’s DAG is that it will automatically work out which files need updating based on changes to their inputs, and re-run any rules needed to update them. Occasionally, however, this isn’t what we want to do.
Consider the following example:

We have two steps to this workflow: taking the input data and from it generating some intermediary data, requiring 24 hours. Then we take the resulting data and plot results from it, taking 15 seconds. If we make a trivial change to the input file, such as reformatting white space, we’d like to be able to test the output stage without needing to wait 24 hours for the data to be regenerated.
Further, if we share our workflow with others, we’d like them to be able to reproduce the easy final stages without being required to run the more expensive early ones. This especially applies where the input data are very large, and the intermediary data smaller; this reduces the bandwidth and disk space required for those reproducing the work.
We can achieve this by telling Snakemake to “touch” the relevant
file. Similar to the touch shell command, which updates the
modification time of a file without making changes, Snakemake’s
--touch option updates Snakemake’s records of when a file
was last updated, without running any rules to update it.
For example, in the above workflow, we may run
snakemake --touch data_file
snakemake --cores all --use-conda --printshellcmds plot_file
This will run only the second rule, not the first. Thiis will be the
same regardless of whether input_file is even present, or
when it was last updated.
- Use Python input functions that take a dict of wildcards, and return a list of strings, to handle complex dependency issues that can’t be expressed in pure Snakemake.
- Import
glob.globto match multiple files on disk matching a specific pattern. Don’t rely on this finding intermediate files in final production workflows, since it won’t find files not present at the start of the workflow run. - Use
snakemake --touchif you need to mark files as up-to-date, so that Snakemake won’t try to regenerate them.
Content from Tidying up
Last updated on 2025-10-29 | Edit this page
Estimated time: 35 minutes
Overview
Questions
- How do I split a Snakefile into manageable pieces?
- How do I avoid needing to list every file to generate in my
snakemakecall? - What should I bear in mind when using Git for my Snakemake workflow?
- What should I include in the README for my workflow?
Objectives
- Be able to avoid having long monolithic Snakefiles
- Be able to have Snakemake generate a set of targets without explicitly specifying them
- Understand how to effectively use Git to version control Snakemake worfklows
- Be able to write an effective README on how to use a workflow
Breaking up the Snakefile
So far, we have written all of our rules into a single long file
called Snakefile. As we continue to add more rules, this
can start to get unwieldy, and we might want to break it up into smaller
pieces.
Let’s do this now. We can take the rules relating only to the
pg output files, and place them into a new file
workflow/rules/pg.smk. Since conda: directives
are defined relative to the current file, we need to replace
envs/analysis.yml with ../envs/analysis.yml
when we do this.
In place of the rules we just moved, in the Snakefile,
we add the line
include: "rules/pg.smk"This tells Snakemake to take the contents of the new file we created,
and place it at that point in the file. Unlike Python, where the
import statement creates a new scope, in
Snakemake, anything defined above the include line is
available to the included code. So we are safe to use the configuration
parameters and metadata that we load at the top of the file.
Clean out the Snakefile
Sort the remaining rules in the Snakefile into
additional .smk files. Place these in the
rules subdirectory with pg.smk.
One possible breakdown to use would be
- Rules relating to correlation function fits
- Rules relating to the Wilson flow
- Rules combining output of more than one ensemble
Hint: conda: environments are defined relative to the
source file, so they will need to be adjusted with a
../.
One option is to have four files in workflow/rules:
-
pg.smk, containing the rulescount_trajectoriesandavg_plaquette -
corr_fits.smk, containing the rulesmeson_massandone_loop_matching -
wflow.smk, containing the rulew0 -
output.smk, containing the rulesplot_avg_plaquette,tabulate_counts,restricted_spectrum,spectrum, andquick_spectrum.
In each one, any conda: directives should point to
../envs/analysis.yml.
Tidy up the plot_styles
You might have noticed that we’re using the plot_styles
configuration option as an argument to the plotting rules, but without
including it in the input blocks. Since the argument is a
filename, it is a good idea to let Snakemake know about this, so that if
we adjust the style file, Snakemake knows to re-run the plotting
rules.
Make that change now for all rules depending on
plot_styles.
The input: block should contain a new line similar
to:
plot_styles=config["plot_styles"],The shell: block should then replace references to
{config[plot_styles]} with
{input.plot_styles}.
Use the metadata
Currently a lot of our rules list a lot of values of
beta. Can you tidy this up so that it uses the values from
the metadata file instead?
Each instance of beta= inside an expand may be replaced
with:
beta=sorted(set(metadata["beta"]))Alternatively, you may define this as a variable at the top of the file, and use it by name, rather than repeating it every time.
For the spectrum_scaled rule, you will additionally need
to filter the metadata, for example via
beta=sorted(set(metadata[metadata["beta"] < 1.9]["beta"]))A default target
When we come to run the full workflow to generate all of the assets for our publication, it is frustrating to need to list every single file we would like. It is much better if we can do this as part of the workflow, and ask Snakemake to generate a default set of targets.
We can do this by adding the following rule above all others in our
Snakefile:
tables = expand("assets/tables/{table}.tex", table=["counts"])
plots = expand(
    f"assets/plots/{{plot}}{config['plot_filetype']}",
    plot=["plaquette_scan", "spectrum"],
)


rule all:
    input:
        plots=plots,
        tables=tables,
    default_target: True
Unlike the rules we looked at in the previous section, this one should stay in the main Snakefile. Note that the rule only has inputs: Snakemake sees that those files must be present for the rule to complete, so runs the rules necessary to generate them. When we call Snakemake with no targets, as
snakemake --cores all --use-condathen Snakemake will look to the all rule, and make
assets/tables/counts.tex,
assets/plots/plaquette_scan.pdf, and
assets/plots/spectrum.pdf, along with any intermediary
files they depend on.
It can also be a good idea to add a provenance stamp at this point, where you create an additional data file listing all outputs the workflow generated, along with hashes of their contents, to make it more obvious if any files left over from previous workflow runs sneak into the output.
Using Snakemake with Git
Using a version control system such as Git is good practice when developing software of any kind, including analysis workflows. There are some steps that we can take to make our workflows fit more nicely into Git.
Firstly, we’d like to avoid committing files to the repository that
aren’t part of the workflow definition. We make use of the file
.gitignore in the repository root for this. In general, our
Git repository should only contain things that should not change from
run to run, such as the workflow definition and any workflow-specific
code. Some examples of things that probably shouldn’t be committed
include:
- Input data and metadata. These should live and be shared separately from the workflow, as they are inputs to the analysis rather than a dedicated part of the analysis workflow. This means that someone wanting to read the code doesn’t need to download gigabytes of unwanted data.
- Intermediary and output files. You may wish to share these with readers, and the output plots and tables should be included in your papers. But if a reader wants these from the workflow, they should download the input data and workflow, and run the latter. Mixing generated files with the repository will confuse matters, and make it so that any workflow re-runs create unwanted “uncommitted changes” that Git will notify you about.
-
.snakemakedirectory. Similarly to the intermediary and output files, this will change from machine to machine and should not be committed. (In particular, it will get quite large with Conda environments, which are only useful on the computer they were created on.)
If you quote data from another paper, and have had to transcribe this into a machine-readable format like CSV yourself, then this may be included in the repository, since it is not a data asset that you can reasonably publish in a data repository under your own name. In this case, the data’s provenance and attribution should be clearly stated.
Let’s check the .gitignore for our workflow now.
$ cat .gitignore
# Common temporary files
thumbs.db
.DS_Store

# Python compiled objects
*.pyc
__pycache__/
.mypy_cache/

# Snakemake cache
.snakemake/

# Workflow outputs
assets/
data_assets/
intermediary_data/

# Workflow inputs that should not be held together with code
raw_data/*
metadata/*

# Common editor temporary files
*~
.#*#
You can see that all of the above are being ignored, as are some
common files to sneak into Git repositories—temporary files generated by
text editors and cache files from operating systems, for example. This
forms a good basic template for your own .gitignore files
for Snakemake workflows; you may want to expand yours based on GitHub’s templates, for
example.
Someone downloading your workflow will need to place the input data
and metadata in the correct locations. You might wish to prepare an
empty directory for the reader to place the necessary files into Since
Git does not track empty directories, only files, we create an empty
file in it, and update the .gitignore rules to un-ignore
only that file.
touch metadata/.git_keep
nano .gitignore
OUTPUT
# Don't ignore placeholder files for would-be empty directories
!*/.git_keep
Let’s commit these changes now
git add .gitignore
git add metadata/.git_keep
git commit -m "Prepare empty directory for metadata"
Where you use libraries that you have written, that are not on the Python Package Index, it is a good idea to
incorporate these as Git submodules in your workflow. While
pip can install packages from GitHub repositories, this is
not robust against you moving or closing your GitHub account later, or
GitHub stopping offering free services. Instead, you can make available
a ZIP file containing the workflow and its primary dependencies, which
will continue to be installable significantly further into the
future.
Currently we have a directory libs/su2pg_analysis,
containing the library we have used for most of this analysis. This
library is hosted on GitHub at
https://github.com/edbennett/su2pg_analysis. To track this
as a Git submodule, we use the command
$ git submodule add https://github.com/edbennett/su2pg_analysis libs/su2pg_analysis
Adding existing repo at 'libs/su2pg_analysis' to the index
$ git commit -m "Add su2pg_analysis as submodule"
[main 89c3d3d] Add su2pg_analysis as submodule
 2 files changed, 4 insertions(+)
 create mode 160000 libs/su2pg_analysis
We also need to commit the work we’ve done on the workflow itself. (We’ve put this off while we’ve been learning, but in general it’s a good idea to do this regularly during development, not only when you’ve “finished”.)
git add workflow/ config/
git status
If we’re happy with what is to be committed, we can then run
git commit -m "first draft of complete workflow"What to include?
Which of the following files should be included in a hypothetical workflow repository?
-
sort.py, a tool for putting results in the correct order to show in a paper. -
out_corr, a correlation function output file. -
Snakefile, the workflow definition. -
.snakemake/, the Snakemake cache directory. -
spectrum.pdf, a plot created by the workflow. -
prd.mplstyle, a Matplotlib style file used by the workflow. -
README.md, guidelines on how to use the workflow. -
id_rsa, the SSH private key used to connect to clusters to run the workflow.
- Yes, this tool is clearly part of the workflow, so should be included in the repository, unless it’s being used from an external library.
- No, this is input data, so is not part of the software. This should be part of a data release, as otherwise a reader won’t be able to run the workflow, but should be separate to the Git repository.
- Yes, our workflow release wouldn’t be complete without the workflow definition.
- No, this directory contains files that are specific to your computer, so aren’t useful to anyone else.
- No, this will change from run to run, and is not part of the software. A reader can regenerate it from your code and data, by using the workflow.
- Yes, while this is input to the workflow, it does not change based on the input data, and isn’t generated from the physics, so forms part of the workflow itself.
- Yes, this is essential for a reader to be able to understand how to use the workflow, so should be part of the repository.
- No, this is private information that may allow others to take over or abuse your supercomputing accounts. Be very careful not to put private information in public Git repositories!
README
In general, we would like others to be able to reproduce our
work—this is a key aspect of the scientific method. To this end, it’s
important to let them know how to use our workflow, to minimise the
amount of effort that must be spent getting it running. By convention,
this is done in a file called README, (with an appropriate
file extension).
In this context, it’s good to remember that “other people” includes “your collaborators” and “yourself in six months’ time”, so writing a good README isn’t just good citizenship to help others, it’s also directly beneficial to you and those you work with.
One good format to write a README in is Markdown.
This is rendered to formatted text automatically by most Git hosting
services, including GitHub. When using this, the file is conventionally
called README.md.
Things you should include in your README include:
- A brief statement of what the workflow does, including a link to the paper it was written for.
- A listing of what software is required, including links for installation instructions or downloads. (Snakemake is one such piece of software.)
- Instructions on downloading the repository and necessary data, including a link to where the data can be found.
- Instructions on how to run the workflow, including the suggested
snakemakeinvocation. - An indication of the time required to run the workflow, and the hardware that that estimate applies to.
- Details of where output from the workflow is placed.
- An indication of how reusable the workflow is: is it intended to work with any set of input data, and has it been tested for this, or is it designed for the specific dataset being analysed?
Rather than writing from fresh, you may wish to work from a template for this. One suitable README template can be found in the TELOS Collaboration’s workflow template
Write a README
Use the TELOS
Collaboration template to draft a file README.md for
the workflow we have developed.
- Use
.smkfiles inworkflow/rulesto compartmentalise theSnakefile, and useinput:lines in the mainSnakefileto link them into the workflow. - Add a rule at the top of the
Snakefilewithdefault_target: Trueto specify the default output of a workflow. - Use
.gitignoreto avoid committing input or output data or the Snakemake cache. - Use
.git_keepfiles to preserve empty directories. - Use Git submodules to link to libraries you have written that aren’t on PyPI.
- Include a
README.mdin your repository explaining how to run the workflow.
Content from Publishing your workflow
Last updated on 2025-10-29 | Edit this page
Estimated time: 15 minutes
Overview
Questions
- How do I verify that my workflow is ready to upload?
- How do I prepare a single archive of my workflow and its dependencies?
Objectives
- Understand the need to test a workflow
- Be able to package a workflow for upload
So far, we’ve talked about how to develop a workflow reliably and consistently reproduces the same results. But at some point we would like to publish those results. The scientific method demands that we enable others to reproduce our work. While in principle, they might be able to do this just from the equations and references we write in our paper, in practice we can never provide enough detail to encode every decision our code makes, and so we must publish our workflow to enable reproducibility by others.
In the previous episode, we discussed keeping the workflow in Git. While Git repositories can be made accessible to others through services like GitHub, this is only really suitable for code that is under active development; for long term, static retention, it is better to use a service dedicated to providing that.
In particular, you want references to the workflow in publications to be accessible arbitrarily far in the future. If I see a citation in a paper to a paper from 1955, I can go to the library and read it, or find it on the journal’s website. Most services designed for active use can’t provide guarantees of longevity; even if the resources remain available, their address might change. For ongoing work, this is a minor inconvenience, but for a published paper, we can’t reasonably go back and edit every citation to every workflow years later.
For that reason, data, software, and workflows should be published in an appropriate data or repository. In some fields there are specific repositories focusing on the needs of that community; in lattice, currently there is none. However, for sharing most workflows and modest data (up to 50GB, or 200GB on specific request), a suitable general-purpose repository is Zenodo. This is run by CERN, and is committed to remain available for the life of the CERN datacentre. It provides a DOI for each uploaded dataset, which can be cited in papers in the same way as the DOI for a journal article.
Testing the workflow
Before releasing the workflow to the world, it’s important to verify that it does correctly reproduce the expected outputs. Since you will have been using it for this in development, this would hopefully be automatic, but you can find situations where existing files left over from earlier in development allow the workflow to complete in your working directory, but not in a freshly-cloned version.
Let’s use Git to make a fresh copy of the workflow:
cd ../
git clone --recurse-submodules su2pg su2pg_test
cd su2pg_test
Now, we follow the steps in the README directly. We obtain the data and metadata, and place them into the correct locations. In practice we would want to have the data already in the ZIP format that we will use to upload to Zenodo; for now, we can copy this across:
cp -r ../su2pg/raw_data .
cp ../su2pg/metadata/* metadata/
Now we can re-run Snakemake:
snakemake --cores all --use-condaSince this is a clean copy, Snakemake will once again need to install the Conda environment used by some of the workflow steps.
If Snakemake exits without errors, we can do a quick sense check that the outputs we get match the ones we expect; for example, looking at plots side-by-side. For text files, we can also check the differences explicitly:
diff -r ../su2pg/assets/tables assets/tablesWe expect to see differences in provenance, but not in numbers, when we run on the same computer.
If you can, it’s a good idea to test a different architecture to the one you developed on, and to get a collaborator unfamiliar with the workflow to test the instructions. For example, if you developed the workflow on Linux, then get a collaborator with a Mac to follow the README without your direct guidance.
This will likely raise some issues. In some cases the Conda environment will need to be adjusted to be cross-platform compatible. Note that numerical outputs are not expected to be identical to machine precision when switching between different platforms, due to differences in numerics between different CPUs. However, there should be no visible differences in plots, and tables should be consistent to the last printed significant figure.
Preparing a ZIP file
Since we cannot upload directories to Zenodo, we must prepare a ZIP archive of the full set of code. While GitHub does provide a ZIP version of repositories, it excludes the contents of submodules, instead leaving an empty directory, which is not very useful to potential readers. Instead, we must do this preparation by hand.
In principle, another archive like tar.gz could also be
used. However, Zenodo can preview the contents of ZIP files, and not of
other archives, so ZIP is strongly recommended here.
We again start from a clean clone, ensuring that we have all submodules present (since they may not be available from GitHub later).
cd ..
git clone --recurse-submodules su2pg su2pg_release
zip -9 --exclude "**/.git/*" --exclude "**/.git" -r su2pg.zip su2pg_release
Note that we use --exclude to avoid committing the
.git directory of the repository or its submodules. We
don’t get the .git directory in a GitHub ZIP file either,
and the reader doesn’t need it: they only require the final version used
to generate the work in the paper, not the full history.
At this point, you should be ready to upload to Zenodo. Completing the upload form is beyond the scope of this lesson, but more detail can be found in the TELOS Collaboration reproducibility and open science guide, or in the lesson Publishing your Data Analysis Code.
- Test the workflow by making a fresh clone and following the README instructions
- Use
zip -9 --exclude "**/.git/*" --exclude "**/.git" filename.zip dirnameto prepare a ZIP file of a freshly-cloned repository, with submodules.
Comments in Snakefiles
In the above code, the line beginning
#is a comment line. Hopefully you are already in the habit of adding comments to your own software. Good comments make any code more readable, and this is just as true with Snakefiles.